Adore Beauty Pty Ltd
Showing posts with label howtodoyourownmakeup. Show all posts

Friday, 6 November 2015

Add these babies to your santa list.

It's coming up to Christmas so I thought I do a little post on a few special make up treats to can add to your Santa list!  (please note I this post contains affiliate links which means I get a commission from the merchant when you purchase through my blog)

I'm always banging on about Real Techniques Brushes I still love them and use them in my professional kit you can read up on the ones I recommend here "Heres the brushes you need" but if you fancy something a bit fancy (rose gold yes please!) and high performing go for the ZOEVA Rose Gold Brush Set aren't the pretty...and come in a cute little clutch too! 


This is officially the winter skincare pack but I don't care what side of the hemisphere you're on you will reap the benefits of using this skincare with the holy grail skincare ingredient of Hyaluronic Acid and a nice way to sample products you might like to re-buy in full size check out what you get and best ways to use on the directions here Alpha-H Anti Ageing Skincare.


What better time to get your brow game sorted than just in time for new year try out this stencil set by brow genius Anastasia...I would definitely give these stencils a try and with lots of colour choices you can really make sure you have the perfect brow, also her setting gel is meant to be the best (maybe I should invest as I currently use hubbies hair gel!) buy it here: Anastasia Beverly Hills Brow Kit.


So let me know what you are putting on your santa list this year! These products are all from Beauty Bay and they have a fabulous little Christmas selection.  I love that no matter where in the world you are you can enjoy these products and usually with free delivery too...perfect...just like santa actually! 

Sunday, 25 October 2015

How to: Quick & Flawless Foundation


Pop over to my Facebook page for the video x


{shop here}

*contains affilate links*


Friday, 9 October 2015

10 ways for multi-use make up!

I like a capsule make up bag. Not just for holidays I like it for all the time.  I'm a big fan of multi use products and not just the ones marketed as 'lips, cheeks & eyes'  I mean getting creative with your products, mixing them up to make them work harder... 

Here's my top 10 ideas for mixing up your products...

1. Mix up a squirt of radiance boosting face cream (see my new favourite at the end of this post) with a squirt of concealer = a lovely light & hydrating base can also be used for the beach if you feel you'd like a little bit extra coverage with your SPF.  While we are mixing up beautiful concealer concoctions I'm a big fan of mixing it with eye cream for a very hydrating, line plumping under eye finish!

2. Use a Ivory/shell tone cream eyeshadow as an eyeshadow, highlighter for the cheekbones, a frosted lipstick, shimmery liquid liner...possiblities are endless! (This is the trick I used to create my wearable frosted lip inspired by Tom Ford see me here)

3. Bronzer as false tan- I can never be bothered with self tan but will often bronze my shoulders, declotage, and even down the front of my legs with a light reflecting bronzer (the highlighting effect makes your legs look longer & slimmer)

4. Lipstick as blush or blush as lipstick- if your doing the latter it makes more sense to use a cream blush but you can use power too just make sure you follow up with a nice layer of moisturising lip balm. When using cream blush/lipstick as blush don't forget to blend the edges with whats remaining your foundation brush.

5. No liquid liner but you fancy a feline flick? Use an angled brush to pick up some mascara of your wand and use it exactly the same way or (one of my favourites) push matt black eyeshadow right into the lashline with an angled brush, adds depth to the lashes but in a very soft sultry way.

6. I love a glossy eye look and guess what we make up artists use to achieve it? Usually a clear or slightly tinted lip gloss. One of my favourite looks is glossy eye, black curled lashes and a red lip.  ( Take Caution though: make sure you are not applying a lip plumping, mint infused gloss on the eye area!)

7. Looking for a simple eye look? Use your bronzer to create a simple and chic socket line look. With an open eye slightly tilt your head back, sweep a fluffy eyeshadow brush through your bronzer and then through your crease, instant chicness. 

8. Make your setting powder work harder.  Powder is not just for setting your make up.  Use a sweep of powder over concealer patted onto your eyelid as a good base for any eyeshadow you are applying , sweep powder through your crease to stop a gel or liquid liner transferring up onto your eyelid, press some powder through a one ply tissue into your lips between coats to make for a long lasting, matt lip.

9.  Mix a liquid highlighter with a pump of a matt foundation to make a dewy version of a high coverage base,  for example, I often find the infamous Estee Lauder Double wear way too matt (I just like dewy) so I often mix with a pump of illuminator (e.g. benefit) that way the coverage is still there but with some brightness.

10.  This one way be for the more dedicated make up wearer.  False eyelashes?  I love to snip a full set in half, apply the outer half for a more natural look and save the rest (snipped into three) to wear as individuals on an other occasion.  Makes for a more natural look and just way more comfortable than a full set.

Phew...I made it.  I hope you did too.  Tell me in the comments if you'll try one of these tips or if you have any tips of your own to make your make up bag go that extra mile? Here's my top product recommendations you can shop directly from these links:


{shop the post}
*contains affiliate links*


Monday, 29 June 2015

Changing your make up to compliment a new hair colour.

Since I have dyed my hair pink (see the results on my instagram) I have felt the need to wear more make up to compliment my new hair.   To be honest it suits me for the time being as winter in Melbourne has definitely meant I can wear more make up.  If you are thinking about a colour change don't forget to update your make up too.

Heres a few tips to change up your make up for a bit of a hair change.

{Going darker}

~ Chances are if you are going darker or richer in colour you will need to warm up your complexion somewhat to stop you from looking washed out... enter bronzer stage left.  Use it in a sculptural way as opposed to piling it all on all over (particularly if like me you are in winter right now) read how to Contour with Powder Bronzer.
~ Check your eyebrow colour still works.  I have always wanted to ask Rock N Roll Bride creator Kat Williams how she decides on what eyebrow colour to use when she has blue hair, in reality I know what colour I would use if I was doing her make up but it's something you really need to get right.  If you're going for a darker hair tone consider whether you need to darken your brow colour.
~ I have found I need to define my eyes much more with this hair so have been using my freehand liner technique everyday.  Once you get the hang of it it really is the easiest way to do liner.  If you want a softer look you can use the same technique with an angled brush and some dark brown/grey eyeshadow. Here's the how to:


  • Hold the pen horizontally and very tight to your lashes (make sure you are using the long side of the pen)  I like to start about three quarters of the way along (this helps to keep the eye look open and wide)
  • Slowly and carefully draw small strokes along the lash line (keeping tight to the lashes) if you need to pull your eyelid up slightly to get to the lashline go ahead and do this (you don't want any gaps) aim for a thin, neat line which means you can build up thickness if required
  • Once you have your horizontal line along the lash line pull the line upwards and out (imagine your lower lashline being stretched up toward your brow as your guideline)
  • Once you are happy with the length start from the point and bring it back down at an angle to make a (kind of) triangle shape
  • Fill in the gap so it's all black read more on winged eyeliner with gel liner


  • {Going Lighter}

    ~ Depending on the look you've went for you can likely tone back on your everyday make up you can still do a lovely bronzed glow but maybe go lighter on the eye's and stick to a neutral palette
    ~ Get the eyebrows right.  Chose a lighter tone for filling and creating shape. Remember you can mix colours to ensure you don't go too dark.
    ~ Make sure your skin is glowing use an illuminator under your foundation or a highlighter on top of your base, or if like me you love to glow, use both!
    ~ Going for ombre or balayage is a great best of both worlds method for changing your hair colour you might not need to adjust your make up too much.
    ~ If you have gone a cool lighter colour (like the gorgeous greys and pastels I'm lusting over) make sure you don't use too warm a bronzer you want a subtle and light bronze enough to provide warmth but not make you look yellow/orange against cool tone hair.  The gorgeous Kelly Osbourne is showing what I mean here. Check out my lighter bronzer option in the shop the post section below.


    {Shop Now}


    Pop by my Lustworthy List for a full list of handpicked products by me where you can click straight through to buy.  This is a new project you will be able to buy under steal or splurge categories.  I hope you enjoy!

    Have you thought about a drastic hair colour change?  Did you think about you might need to change your make up or wardrobe choices? I'd love to hear about it, Amy x

    Tuesday, 10 March 2015

    Working up to a statement lip with a wearable lip stain

    After the fun lip stick quiz I posted a while back, what does your lipstick say about your personality? (Click here if you missed it) I had lots of ladies telling me they wished they could wear a statement lip but it just feels weird or foreign on them.  This is the thing with trying different make up you might really love it but are just not used to seeing it on yourself. Its all about working up to it.  

    This is a lighter, more translucent version of a statement lip which is more wearable, requires less maintenance, and is a good way to start getting used to colour on your lips.  Follow these instructions to create a stain for your lips, be prepared for some funny faces! 


    {the diy}

    This is all about getting your lip product really into your lips top create a stain.  
    1. Choose your lipstick or product, opt for a pigmented lip product, so something that's quite rich in colour (not translucent)
    2. With a lip brush apply a coat of lipstick all over your lips (this can be quite a generous coat as you will be working it in)  start from the centre of your pout and work the brush out towards the lip lines so you can use your brush perfect the lip line
    3. Keep working the product in with the brush back and forth really getting the pigment deep into the lips
    4. Do a bit of lip smacking and blotting with your finger (cue funny faces)
    5. Voila! A wearable and low maintenance pop of colour for you to go about your day with! I usually top up with a tiny bit of lip balm just to take away any dryness and give my lips a bit of shine and comfort.
    {shop the look}
    If you are a non lipstick wearer I dare you to try this 3 times this week just to get yourself used to it join me later in the week where I invite you to transform this into a statement lip!

    *This post contains affiliate links*

    Wednesday, 10 December 2014

    3 Make up Brushes to treat yourself to.

    So I have a full list of brushes that I think you should have in your arsenal way back in the early days of my make up DIY series #molmakeuplesson2 but there's just so many brush options to treat yourself to and just help make doing your make up something special so here we go....splurge time!


    {The Fan Brush}


    Well isn't this a girlie little number!  I love a fantail brush when I want to do something lightly and subtly with make up.  So I would go for this if I wanted a light dusting of powder to set my skin or if I wanted to add a highlight to my cheekbones, or down the bridge of my nose.  If you can be heavy handed when it comes to make up this is a good option to keep it light!  Have a look for yourself here.

    {Optical Blurring Brush}


    Ohh I am almost drooling here!  I always say when it comes to topping up your make up you should buff out what you already have on your skin before applying more! So when I came across this I was instantly in love.  You could use it for applying your foundation or take it with you for buffing emergencies!  Have a look for yourself here.

    {Blending Brush}


    I know it sounds a bit boring but a good quality blending brush is the answer to your eye make up dreams... a fluffy brush like this that can really get into the crease of the eye perfect for the socket line eye make up or just for blending in a transition colour for a smokey eye. Have a look for yourself here


    How to apply concealer to look fresh and awake!

    Next in my series of how to take your make up from day to night...

    I sometimes do this routine just to freshen up my look if I'm off out somewhere and literally have ten minutes to get ready, sometimes this is all I do base wise if I am in a rush doing the school run for example.  It's a combination of concealing and highlighting that results in a nice fresh and awake look.  You do this AFTER you have applied your usual foundation.

    {how to}

    1. Apply approx 4 strokes of a brightening concealer downwards fanning out following the shape of your eye with the last one winging outwards in the direction of your ear (bringing the concealer up like this really brightens the full under eye area and has a highlighting effect)
    2. Using a damp beauty blender or your finger pat the concealer from the inner corner outwards blending as you go upwards towards the temples
    3. If you want to set the concealer in the same manner with a translucent powder
    4. Follow with a sweep of blush directly under where you have put your concealer starting at the apple and sweeping upwards to temple.

    So simple but can really freshen up your look!

    {tools & products}


    For more tips on how to take your make up from Day to Night check back on my previous posts


    Tuesday, 9 December 2014

    The Audrey Brow- how to get a retro brow.

    Mirror, Mirror on the wall...who has the most fabulous eyebrows of them all?

    There is so much choice for eyebrow shapes out there and when you get yourself the right tools and with a bit of practise you can really choose what shape you are going for and use it as a new way to change your look up.  You do need to be mindful of your own natural shape for example my brow shape isn't naturally as straight as Audrey's but its amazing what you can do I often do this for an evening look and is one of those subtle add ons you can do to take your look from day to evening.  Perfect for those Christmas parties!


    {brow inspiration}


    {how to}


    1. Take your spoolie (or clean mascara wand) and brush your brows up all the way along, if you have naturally bushy brows (lucky you!) you can start brushing the tail down towards your ear instead of up.
    2. Perfect the arch- dip into your product and draw quite a sharp but small line outwards at the top of your brow (we are going for a slight angle outwards and not upwards as we are not trying to do angry brows) work down with whats left on your brush in small strokes down through the depth of the brow. If you feel it's looking too pointy smooth your finger over the outer point which will gently blend it out.
    3. Do the tail- from the outwards arch work (with small strokes) down the tail. It's up to you how far you bring the tail but bear in mind the longer you go it will start to drag the look of your eye downwards (Audrey has quite a short tail)
    4. Back to the start- work the product through the main part of the brow but still start at the arch and work forwards, your brush strokes as you get closer to the start should be moving upwards but still holding the brush at a horizontal angle.
    5. Add a little bit of concealer above the brow for a lifting effect and on the brow bone as a highlight.
    6. Optional- finish with a brow gel to keep it all in place and define hairs.

    note...you don't need to keep dipping back into your product at each stage just keep stepping back and assessing.

    {The finished look}

    {tools & products}

    • If you are using a shadow or gel you will need an angled brush, stiff bristles are better.
    • A spoolie (if you have a used but clean mascara wand you can use that) or if you fancy a splurge I like this one by Blinc as it's double ended
    • You can also get eyebrow pencils that have the spoolie end like this fab one by TOPSHOP if you are using a pencil hold it at a horizontal to your brow.
    • I personally prefer shadow here I am using espresso by MAC.
    Do you have a brow icon???

    Friday, 7 November 2014

    Moonstruck 3D Fibre Lash Mascara by Younique...

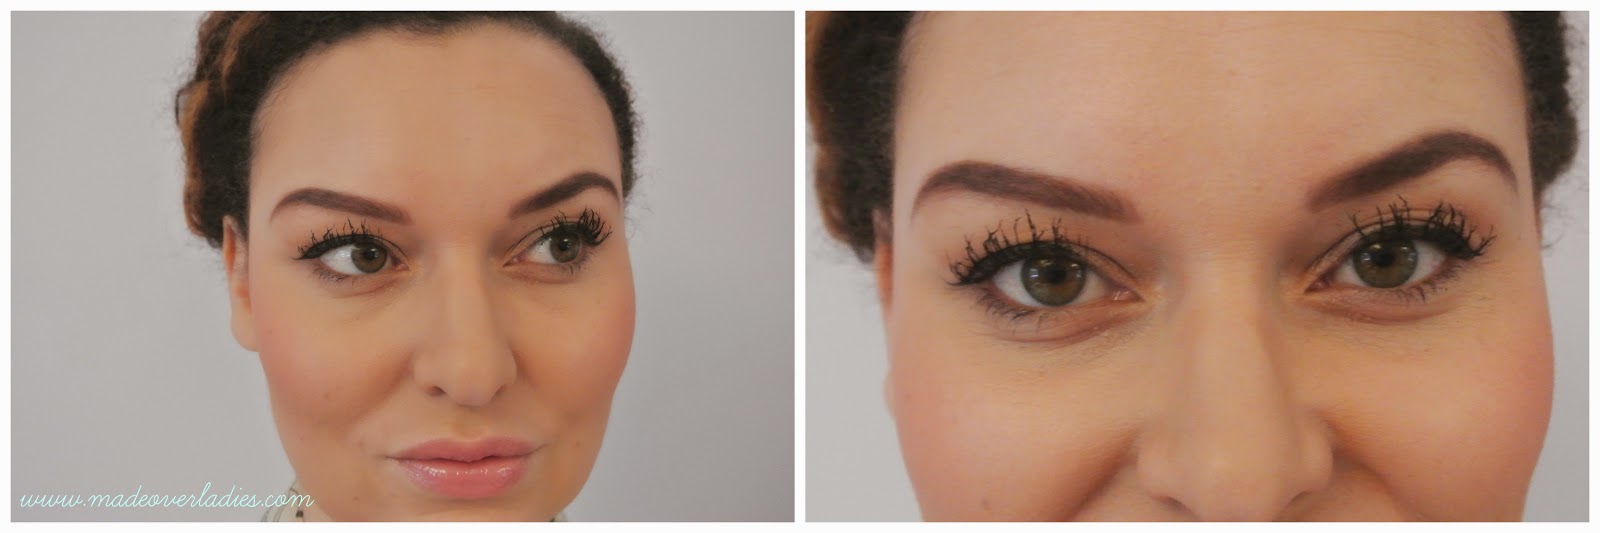
    So you have probably heard the hype about the Moonstruck 3D Fibre Lash Mascara by Younique, it comes from America and there's a good chance you have seen it all over Facebook claiming it to be the next big thing when it comes to lashes.  I've had the chance to wear it a few times now so think I'm in a good position to let you know my thoughts on it. 

    Mascara's are one of the things in my kit I rarely spend more than £10 on I'm a regular buyer of Max Factor False Lash Effect or L'oreal Double extension as I often apply individual lashes to add volume and length to my clients lashes.   My clients love the look of the lashes but this is a fiddly job and difficult to apply on yourself so I'm often asked for alternatives.  I think this mascara is a good alternative to do just that.  Price wise the mascara is £23 plus postage from america so not cheap for an everyday mascara but as an easier option than false lashes and a cheaper option than semi permanent eyelash extensions I think it definitely is good value for money.


    Here's how to apply:


    Do your eyes first (prior to foundation etc) as this can be a bit messy....

    1. Curl your lashes with a good quality lash curler (I reccommend The Shu Uemeru Curler)
    2. Apply a coat of your regular mascara and allow to dry (I have tried the 3d mascara with and without my regular mascara and I recommend doing this step.  You can do it without but you get better results with)

    One eye at a time for the next steps:
    3. Apply the 'Transplanting Gel' first (this is just like a black mascara
    4. Apply the fibres (you'll see lots of fall out on your under eye area)
    5. Quickly apply another coat of the Transplanting gel (this keeps it all in place)
    6. If you want more lashes...repeat the process.

    Be warned... it's a bit addictive!  After cleaning up the fall out I went on to finish the rest of my make up. I followed my five minute flawless foundation technique then my easy contouring with powder

    Then I took a step back had a look and then decided to add another coat!!


    So what's my thoughts...

    • I like it.  It's an easy process to apply (yes I wouldn't be spending time on it every morning prior to the school run) but I would wear as an alternative to falsies for a big night out or if I just feel like adding a little extra drama.  
    • It's easy to remove.  I recently stopped wearing waterproof mascara as I just found it too tough to budge every night and I really want my lashes to be clean when I sleep to really let them breathe and regenerate as I sleep.  I did my usual technique to remove which is soak 2 cotton pads in an oil based make up remover and press over my lids for about 30-60 seconds then gently wipe away.  This minimises rubbing at the eyes but ensure the product is all soaked off.
    • It's fine for my sensitive contact lense wearing eyes.  I was a bit worried about the fibres flying everywhere and getting trapped in my contacts but there's been none of that.
    • If you like a slightly clumpy finish then this is for you.  It you like lashes to be separated and long this probably won't suit you but I like a clumpier and dense finish.  For optimum depth to your lashes follow my free hand liner tutorial and you can come through to give more separation if desired.
    • I don't like the mess it makes in application (lots of fall out) but to be honest it's not an issue if you do your eye make up first which I think is the most efficient way to apply your face.
    • If you have been wearing extensions for a bit too long and feel you would like to try an alternative you might like this there has been some blogs mentioning the mascara might not be good for your lashes but I believe as long as you remove the product well overnight and you give your lashes a break every now and again I don't see why this would cause more damage than a regular waterproof mascara.  If this is something you are worried about supplement your lashes with a good quality lash serum.
    • It takes a wee while to arrive from the US (approx 7-9 days) and when we are used to being able to get our hands on things on next day delivery this can be frustrating.
    • Sorry I have not done the cry test on it yet so can't 100% confirm whether it is waterproof I definitely wouldn't go swimming in it but it did manage a 20 minute walk in the Scottish rain without running anywhere.

    Impressed?? I am slightly addicted I have to say so if you would like to buy you can do here or send me a message on amy@madeoverladies.com there's also lots of other products to have a look at too!!


    Here's the finished look...


    Monday, 27 October 2014

    Simple contouring with powder


    Soooo contouring then? I always get asked about this as if contouring is a new and crazy difficult make up technique but it's really not it it's been part of a make up artist techniques for years plus can be simple, quick and incorporated into your daily make up routine (if you want to).  I do it most days and it's really not complicated and really is just strategic placement of bronzer. If you want to read more in detail about it see here and here

    Here's my easy peasy technique:
    1. Choose a matt bronzer this is the Rimmel Natural Bronzer (which has some slight shimmer)other good options are Benefit Hoola, Bourjois Delice de Soleil Bronzing powder I love this tapered blusher brush by Eco tools for this task
    2. Make your first sweep under the cheekbones (from the top of the ear at an angle going toward the corner of the mouth but stopping about 1 or 2 inches from the mouth)
    3. Go under the jawline (you can also bring this down the decleotage)
    4. Sweep down the sides of your nose and lightly under the tip of your nose
    5. Optional extra- the upper corners of your forehead
    6. Go over each area again adding a little bit more product if you need it.


    Voila easy peasy contouring...

    .

    Thursday, 23 October 2014

    How to do your own wedding make up- added drama!

    I'm honoured to be featured on the fabulous Braw Brides once again with a new wedding make up tutorial I've opted for a budget look this time round but the products I have chosen are great quality & still long lasting and is just a little bit more drama for your big day.

    If you like the look and are interested in the products click on any of the clicks below and you can buy it all online. Easy peasy!


    SHOP THE POST 


    Brushes I used:
    Nasnshy Blending Brushperfect if you have small eyes or need more precision!

    Here's the finished look...


    Wednesday, 1 October 2014

    How to do your own wedding make up- Added Drama

    As we move into autumn/winter its the time of year we tend to get a little braver with our make up and we go for the richer and more sumptuous colours.  This how to do your own wedding make up is a good balance between injecting some rich colour but still keeping it classic for your big day.  Plus I have made this tutorial all with budget products because lets face it if you are doing your own wedding make up the chances are you aren't heading off to Space NK to buy all of your wedding day cosmetics....even though I know you deserve it!  I have included a full product list at the end of the post.  This would also be a great special occasion make up for attending a wedding or a night out.


    As always I start with the eyes...

    1. Start by prepping the eye with either an eyeshadow primer or if you don't have one use some concealer sparingly dabbed over your entire lid up to the brow.
    2. With a plum kohl pencil draw a v shape in the outer corner of your eye (this acts as your colour base which gives the eyeshadow something to stick to and makes the colour you apply next more vibrant)
    3. Blend Blend Blend. Make sure you soften the kohl right out but keeping it in a V shape at the outer corners (you don't have to be tidy here)
    4. Apply your darker colour (Regal a rich aubergine colour from the sleek I Divine Au Natural palette) over where the pencil has been blended out.  Use a fluffy eyeshadow brush for this and remember to keep to the outer V shape.
    5. Clean up underneath the eye if you have bended a bit too far out.  Use a cotton bud dipped in eye make up remover to sweep diagonally from the outer corner out towards the end of the brow.  This will give a nice clean finish.


    6. Pat the lighter colour (I am using Taupe) over the rest of the lid and into the inner corner.  
    7. Use a transition colour (I have chosen Cappucchino) to sweep through the crease, this helps to give your eye dimension and depth.

    On to the liner...

    8. Using a eyeliner pen (i'm using the L'oreal Superliner).  Hold the pen horizontally and very tight to your lashes (make sure you are using the long side of the pen)  I like to start about three quarters of the way along (this helps to keep the eye look open and wide draw small strokes along the lash line (keeping tight to the lashes) if you need to pull your eyelid up slightly to get to the lashline go ahead and do this (you don't want any gaps)
    9. Once you have your horizontal line along the lash line pull the line upwards and out (imagine your lower lashline being stretched up toward your brow as your guideline)
    10.Once you are happy with the length start from the point and bring it back down at an angle to make a (kind of) triangle shape
    11.Fill in the gap so it's all black (you can also go over this with a black shadow if you want a softer line)
    12. Go ahead and apply your mascara top & bottom (I'm using one with a primer which is applied first to lengthen the lashes) you can also apply some of the darker shadow along the lashline if you want to


    Perfect the skin...


    13. For wedding day skin I want it to look dewy but not shiny so I've chose a combo of primers an illuminating one for most of my face which I apply with my foundation brush and a matifying one I use over my nose, forehead & sides of nose (these are my shiny areas adjust what you use according to your skin)


    14.  I use two methods for applying foundation (you can read more in detail in my 5 minute tip) but basically I start by using my flat brush and sweeping some of the foundation down from the centre of my face then switching to a buffing brush to 'whisk it round' this fills in pores and any fine lines.  I the move round my face doing the same two step process until I have a nice even and flawless coverage.


    Safe and easy contouring...

    15. In my last wedding tutorial I opted for contouring with stick foundation but without practise you run the risk of a muddy complexion (not good for bridal make up) using a powder is the easiest and safest method use a matt bronzer (this is rimmel) I always start under the cheekbones as this is where I want the most concentrated product.  I sweep the bronzer from the top of my ear down in a diagonal towards the corner of my mouth. 
    16. Next the jawline, sweep under the jawline to shade the area below, if you need a bit more help in that area sweep down the neck and even into the décolletage.
    17. Sweep down each side of the nose and under the tip of the nose for some gentle nose slimming effects and finally touch the brush over the corners of your forehead. This is what I call soft focus contouring I do it in every make up I do it means I can still see your skin but the angles of your face are emphasised in the softest of ways as we use bronzer it also adds warmth and colour to your skin.


    Add blush & conceal/highlight...

    18. I've chosen a soft peach blush to keep the skin looking nice and fresh I've chosen a cream blusher by revlon, just tap this up and over the cheekbones on the diagonal starting from the apple directly above where you applied your contour
    19. Conceal (& highlight) they areas you wish to conceal are usually under the eyes, down the centre of the nose, mid forehead and also sometimes the upper lips, I opt for a pen concealer draw in where i want to highlight then blend blend blend
    20. Also do any spot concealing here if you have any blemishs you'd like to cover
    21. I then set my highlight with a loose powder and add any extra powder I require over the shiney areas
    22. If you like an illuminated look sweep a highlighter over the cheekbones (above where you placed the blush) in this case I used the 'taupe' shade from my eyeshadow palette. 


    Get a retro brow...
    23. Start by brushing the brows up and outwards
    24. Using a stiff angle brush start at the arch by filling in with a complimentary eyeshadow. If you are going for a retro brow extend them outwards here at this peak then start moving the brush downwards on an angle, go ahead and fill in the rest of the brow keeping the start the most natural (go lightly on product less is more here)
    25. Use a dab of concealer to highlight on the brow bone and just above the arch (this has the effect of a brow lift) you can also use whats left on your concealer to correct any mistakes you have made or to soften the arch if you've made it to pointy


    The drama part...
    26. I've opted for a dark lip for this look I start by lining the lip if you don't like a fully lined lip follow the guide below then blend all over with a fingertip
    27. Pack your lip brush with your lip colour and apply starting from the centre of the lip this way you can really work it into the lips to create a stain then as you work outwards to the lip line you can use the brush to  perfect the line getting right into the corners of the lips and sharpened out the cupids bow
    28. Blot the lips
    29. Reply & then if you like an uber glam look apply a complimentary dramatic gloss


    Add more drama with lashes...
    30.  Your finished eyeshadow should look something like this adding individual lashes just adds more drama
    31.  I came across these little bunched lashes in Superdrug and I love them for self application and comfort...I find them much more comfortable than a strip
    32. Whatever lashes you choose the application is the same.  Firsty put a drop of lash glue on the back of your hand and dip the knotted edge lightly in the glue then let the glue dry a little bit (count to 30ish) before you apply.
    33. You are aiming to put the lashes on top of your own lashes and get them as close as you can to your own lash roots use tweezers to 'tuck' the lashes in behind your own natural lash.
    35.  Apply 3 of these bunches to each eye and allow the glue to dry or 6/7 individuals all the way across
    36. Once its all dry go back in with your liner and paint over the lash glue.


    Here's the finished look...


    Not ready for a dramatic eye & lip combo? I added an alternate lip just in case you wanted a more neutral but still gorgeous option.  This peach lip is Max Factor's Pink Brandy.  I finished off the make up with a spritz of Evian's Spring water which keeps the skin fresh and helps your make up last.  Great to take along with you and spriotz through out the day.


    Let me know your thoughts ladies and if you try it out? And what do you prefer the Berry Stained lip or the soft peach lip?

    If you like my flowercrown...pop back over to the blog next week for a DIY flowercrown tutorial.


    SHOP THE POST 


    Brushes I used:
    perfect if you have small eyes or need more precision