Adore Beauty Pty Ltd
Showing posts with label make up. Show all posts

Sunday, 25 October 2015

How to: Quick & Flawless Foundation


Pop over to my Facebook page for the video x


{shop here}

*contains affilate links*


Friday, 17 July 2015

Fuller natural looking lips and Au revoir to a downturned mouth!


You can see the how to over on my Facebook page...hope you give it a little like or share whilst you are there :) Here's all the products to re-create this little tip...


{shop the post} 
Concealer any stick one will do this new Benefit one looks fun!

Oh and my new hair...


Hair cut courtesy of Helen Thomson. If you're in Melbourne and you fancy something funky (she has some gorgeous funky colours too!) make sure you check her out on Facebook and Insta @helen_thomson_stylist.  As always I'm up for your opinion what do you think? And will you try my quick tip for fuller lips? 


Monday, 29 June 2015

Changing your make up to compliment a new hair colour.

Since I have dyed my hair pink (see the results on my instagram) I have felt the need to wear more make up to compliment my new hair.   To be honest it suits me for the time being as winter in Melbourne has definitely meant I can wear more make up.  If you are thinking about a colour change don't forget to update your make up too.

Heres a few tips to change up your make up for a bit of a hair change.

{Going darker}

~ Chances are if you are going darker or richer in colour you will need to warm up your complexion somewhat to stop you from looking washed out... enter bronzer stage left.  Use it in a sculptural way as opposed to piling it all on all over (particularly if like me you are in winter right now) read how to Contour with Powder Bronzer.
~ Check your eyebrow colour still works.  I have always wanted to ask Rock N Roll Bride creator Kat Williams how she decides on what eyebrow colour to use when she has blue hair, in reality I know what colour I would use if I was doing her make up but it's something you really need to get right.  If you're going for a darker hair tone consider whether you need to darken your brow colour.
~ I have found I need to define my eyes much more with this hair so have been using my freehand liner technique everyday.  Once you get the hang of it it really is the easiest way to do liner.  If you want a softer look you can use the same technique with an angled brush and some dark brown/grey eyeshadow. Here's the how to:


  • Hold the pen horizontally and very tight to your lashes (make sure you are using the long side of the pen)  I like to start about three quarters of the way along (this helps to keep the eye look open and wide)
  • Slowly and carefully draw small strokes along the lash line (keeping tight to the lashes) if you need to pull your eyelid up slightly to get to the lashline go ahead and do this (you don't want any gaps) aim for a thin, neat line which means you can build up thickness if required
  • Once you have your horizontal line along the lash line pull the line upwards and out (imagine your lower lashline being stretched up toward your brow as your guideline)
  • Once you are happy with the length start from the point and bring it back down at an angle to make a (kind of) triangle shape
  • Fill in the gap so it's all black read more on winged eyeliner with gel liner


  • {Going Lighter}

    ~ Depending on the look you've went for you can likely tone back on your everyday make up you can still do a lovely bronzed glow but maybe go lighter on the eye's and stick to a neutral palette
    ~ Get the eyebrows right.  Chose a lighter tone for filling and creating shape. Remember you can mix colours to ensure you don't go too dark.
    ~ Make sure your skin is glowing use an illuminator under your foundation or a highlighter on top of your base, or if like me you love to glow, use both!
    ~ Going for ombre or balayage is a great best of both worlds method for changing your hair colour you might not need to adjust your make up too much.
    ~ If you have gone a cool lighter colour (like the gorgeous greys and pastels I'm lusting over) make sure you don't use too warm a bronzer you want a subtle and light bronze enough to provide warmth but not make you look yellow/orange against cool tone hair.  The gorgeous Kelly Osbourne is showing what I mean here. Check out my lighter bronzer option in the shop the post section below.


    {Shop Now}


    Pop by my Lustworthy List for a full list of handpicked products by me where you can click straight through to buy.  This is a new project you will be able to buy under steal or splurge categories.  I hope you enjoy!

    Have you thought about a drastic hair colour change?  Did you think about you might need to change your make up or wardrobe choices? I'd love to hear about it, Amy x

    Tuesday, 10 March 2015

    Working up to a statement lip with a wearable lip stain

    After the fun lip stick quiz I posted a while back, what does your lipstick say about your personality? (Click here if you missed it) I had lots of ladies telling me they wished they could wear a statement lip but it just feels weird or foreign on them.  This is the thing with trying different make up you might really love it but are just not used to seeing it on yourself. Its all about working up to it.  

    This is a lighter, more translucent version of a statement lip which is more wearable, requires less maintenance, and is a good way to start getting used to colour on your lips.  Follow these instructions to create a stain for your lips, be prepared for some funny faces! 


    {the diy}

    This is all about getting your lip product really into your lips top create a stain.  
    1. Choose your lipstick or product, opt for a pigmented lip product, so something that's quite rich in colour (not translucent)
    2. With a lip brush apply a coat of lipstick all over your lips (this can be quite a generous coat as you will be working it in)  start from the centre of your pout and work the brush out towards the lip lines so you can use your brush perfect the lip line
    3. Keep working the product in with the brush back and forth really getting the pigment deep into the lips
    4. Do a bit of lip smacking and blotting with your finger (cue funny faces)
    5. Voila! A wearable and low maintenance pop of colour for you to go about your day with! I usually top up with a tiny bit of lip balm just to take away any dryness and give my lips a bit of shine and comfort.
    {shop the look}
    If you are a non lipstick wearer I dare you to try this 3 times this week just to get yourself used to it join me later in the week where I invite you to transform this into a statement lip!

    *This post contains affiliate links*

    Thursday, 12 February 2015

    What does your lipstick say about you?

    With a lack of any actual make up for me to play with (I don't have my kit shipped to Australia yet I'm limited to what tutorials I can create) sooooo I thought we could have a bit of lipstick fun...what does your lip colour say about your personality?


    {Nude}
    You're happy to let your eyes do the talking, mysterious & understated suits you well, you are intriguing and have a relaxed & effortless style, you're sultry and can be deep you're not afraid to let your natural beauty to shine through.

    Pink, Orange, Purples your go to lip is bright & fresh, your personality is fun, carefree, with a great sense of humour, you are high energy & fun to be around and don't care much what other people think of you.

    Sophistication is your strong point, you're not afraid of being bold, your style is classic & timeless, you can handle yourself in any situation and have a natural air of grace but can be feisty.

    {Dark}
    You're sexy and confident, you are sassy and you're not afraid to show it, you're extremely feminine, passionate, a bit of  a vamp, admired by women and men alike.

    Ok, so it's a bit of fun what lipstick are you most drawn to? I personally like them all...so what does that say about my personality!? x


    *click on your choice of {lip look} to see my handpicked product choice...you can purchase directly via these links please be aware these do contain affiliate links/images courtesy of Pinterest*


    Thursday, 5 February 2015

    Make up to WORK your specs

    Sometimes I love my specs sometimes I hate them "Hello Giggles" hit the nail on the head with their article (read up here) which inspired me to write this post.  So here's 5 ways I have found, in my experience, that glasses generally rock my make up wearing world.

    {bye bye tired eyes}
    If you are having a particularly "tired/hungover/beenupdoingthenightfeed(s) eye kind of day" reach for the specs.  Wearing your glasses can disguise those under eye bags like no concealer I know.  If you are going for this option either forget the concealer completely and opt for a hydrating eye cream or mix the two on the back of your hand and apply for a lighter, hydrating and concealing, combo.

    {balance is everything}
    Feel like going for a statement lip?  Wearing a bright or bold colour on your lips can be a great way to balance the face when wearing your specs.  Often when you pop your glasses on your eye make up is seriously toned down, why waste your time then? One of my favourite avec-glasses looks is lashings of mascara with curled lashes and a hot pink/bright orange/bold red lip.  Love it and super easy (follow my long lasting lip lesson for tips) or if you are not used to wearing a bold lip work up to it by wearing a stain on your lips, something that adds colour but is still transparent and natural looking. 

    {all about the finishing touches}
    Not many of us manage to actually apply make up whilst wearing our specs (cue some awkward back breaking stance in front of the sink trying to get close enough to the mirror) apply finishing touches with your frames on.  Pop your blush on slightly lower than you would normally, it might sound strange but put your glasses on now and try it I promise you will see what I mean.  Don't spare on highlighter you can still have highlighted cheekbones whilst wearing frames and this will contribute to the brighter eye goal (see above) and you can most definitely do contour with glasses.

    {the ticket to experiment} 
    Given that your glasses are likely to tone down whatever make up you put on your eyes why not try experimenting with a much darker, smokier looking eye.  You might be put off wearing an evening smokey eye during the day but wearing one with your specs can give you a proper power look. Technique needn't be your strong point as the glasses can hide a multitude of sins (stick to my smokey eye technique as a fail-safe).  The only reverse of this is if you opt for rimless or very neutral frames then you may need to apply a little more caution.  Keep lips nude for an effortless, chic look.

    {beware of the brow}
    I have done this myself, probably on more than one occasion, over defined my eyebrows when wearing my specs.  What happens is....you just look angry.  Particularly with a heavy rim frame.  Keep your brows filled in but natural looking to stop yourself from looking like an evil genius, unless of course that was what you were going for.  

    If you are stuck in a rut when it comes to making your specs work with your make up look to the big advertisers for inspiration. They generally get it bang on.  Here's a few of my favourites...wear them with pride ladies x

    Wednesday, 22 October 2014

    Changing up your make up for the season...

    As Autumn/Winter sets in here in the UK I've been thinking about the ways I change up my skincare and make up routine to suit the change in weather and to ensure my make up tones & colours  suit the richer warmer tones we see in winter fashion.


    Plum.

    No big surprise here and sorry if it's predictable but I love plum for autumn/winter.  My favourites for lips is Clinique's Chubby Stick in Broadest Berry or if you prefer a lipstick I particulary like No 7's Moisture Drench in Sugar Plum.  Both are cool tone and therefore have that magic teeth whitening effect.  I always think you can go really bare minimum on the rest of your make up but still look really impactful will a darker lip.

    Exfoliate.

    You might have found that you have become more prone to breakouts since autumn has hit that's usually because we tend to suffer blocked pores .  So as the weather gets colder we really need to treat our skin to a good exfoliation once or twice a week to let the healthy skin shine through and shed the drier flakier skin that comes hand in hand with winter.  I personally like a hot cloth cleanser option such a the Liz Earle Cleanse & Polish but to be honest you don't need to spend a fortune you can use your usual facial wash but buff it off with a muslin cloth.  Follow the exfoliation with a good serum or facial oil, these products have much smaller molecules than moisturiser so gets absorbed into the the skin quickly and goes much deeper.  If your skin can really handle it and isn't prone to breakouts follow up your serum or oil with a rich night cream to really lock in that moisture.

    Warm Browns.

    I love using warmer browns and copper tones in make up at this time of year as it suits so many eye colours.  They can make blue eyes appear bluer, green eyes warmer and brown or hazel eyes richer.  They are really worth experimenting with if you don't really use them.  Copper pigment placed in the centre of the lid over a soft brown smokey eye is a great way to really make your eye stand out I like the Barry M Dazzle Dust in Venus as they are very fine and inexpensive!  If you feel like treating yourself you can rely on the MAC pigments to transform a smokey eye into something more intense and lustrous.  My favourites are copper sparkle and for a darker finish I like Blue Brown.

    Moisture.

    As we succumb to turning our central heating on and we receive less vital vitamin D from the sun our skin becomes parched and that's how it becomes drier in the winter.  Treat it from the inside by drinking lots of water, get yourself a nice water bottle and get guzzling.  I did this about mid August and I find it so easy to drink more water now however feel a bit lost when I leave the house without it!  Also try and replace some of the moisture in the air in your home by placing bowls of water near the heat sources around your house which will also stop your hair & nails from drying out.

    Bronze.

    Yes you are still allowed to use bronzer.  Just because it's autumn now it doesn't mean you have to banish any warmth to your skin in fact a bronzer can really help compliment the warm browns, plums, rich greens and even mustard colours that we see more of in Autumn/Winter.  I tend to change to matt textures though and add a bit of shimmer just with a highighter. I love the Korres Wild Rose Compact to add a bit of warmth but it gives such a velevty finish I think this is something I will always re-buy. I generally also use this in a scuplting way so not so all over bronze as I would in summer.   Look out for my upcoming post 'easy contouring with powder' soon.  If you prefer to stick to something you know go for Benefit's Hoola although its quite dark in colour it is matt therefore great for adding colour and definition to the face but not sparkle which is much more in keeping with autumn/winter make up.

    This gorgeous wee make up bag was found on Etsy.


    Wednesday, 17 September 2014

    The free hand liner

    My last lesson on winged eyeliner focused on using a gel liner and that handy little sellotape trick if you have mastered that and feel like moving onto a free hand version of liner use this guide below to keep you on the right track.

    I'm using the L'Oreal Super Liner which I have been really impressed with.  The nib is nice and thin which makes for a thin, neat line which means you can build up thickness if required.

    Follow the steps below:  


    1. Hold the pen horizontally and very tight to your lashes (make sure you are using the long side of the pen)  I like to start about three quarters of the way along (this helps to keep the eye look open and wide)
    2. Slowly and carefully draw small strokes along the lash line (keeping tight to the lashes) if you need to pull your eyelid up slightly to get to the lashline go ahead and do this (you don't want any gaps)
    3. Once you have your horizontal line along the lash line pull the line upwards and out (imagine your lower lashline being stretched up toward your brow as your guideline)
    4. Once you are happy with the length start from the point and bring it back down at an angle to make a (kind of) triangle shape
    5. Fill in the gap so it's all black 


    Things to remember:


    • The shape of your liner and triangle all depends on your eyeshape as you go step back and gauge the shape your are making with your eyes open.  
    • Don't forget you can always use a cotton bud and eyemake up remover if you need to perfect the line. 
    •  I usually finish off my liner with a sweep of kohl liner under the lashes in the upper water line this is what keeps everything nice and dark.

    Friday, 27 June 2014

    How to do a Socket Line eye make up

    I love this look it is super classic and goes for any occasion and I mean anything a beach wedding, a night out, a lunch with friends, going to work.  You can make this as natural as you like or add drama by making your crease colour that little bit more defined or keeping it natural and finishing the look with a bright lip.  This is my go to eye make up look when I'm wearing a red lip. It's a two colour look and I'm sure most of you have two neutralish eye shadows?

    Here's the finished look...


    Firstly you want to prep your eyelids to make sure the make up lasts you really don't want a big crease in your eyelid with this look.  I used the MAC paint pot in Soft Ochre.  You can use a cream shadow or even your concealer lightly over your lids this cancels out any colour and gives a good base.  I'm using the Urban Decay Naked Palette 2 but you could use any shades you have as long as one is light and one is darker.  Sweep your light shade right over the lid into the inner corner and over the brow bone.  I have chosen 'Bootycall' as it has a little bit of shimmer through it but this is also a lovely look with all matt shadows.


    Now time to find your crease-think about the brush size you are using...If you have small eyes you will need a small brush go for a tapered brush if you can this is the MAC 217.  Dip your brush directly into the darker shadow (I'm using Tease) so you just have the product right on the tip of the brush, lean your head back and look into the mirror, put your brush into the outer corner end of your crease (not right into the outer corner of your lashline check back on my eye anatomy pic here) then do a little curved wind screen wiper motion with your brush. As well as back and forth do tiny little circles with the brush in the same wiper motion.  Go lightly to start out then you can add more shadow if you want a bit more depth.  Don't go too far in on each side there should be a gap between the end of your crease and the start of your lash line as this is what keeps your eye looking wide awake and open.  You could also use a smaller brush with an even darker shadow if you want it more precise.  Then, as always, keep on blending in the same motion until you are happy with it.


    This look generally needs some lashline definition to make it really work. You can either do that with a matt black shadow on an angled brush to really push and smudge into the lashline or go for a full on gel liner (I'm using MAC Blacktrack) but the L'oreal and Maybelline Gel liner is also good.  For a really precise winged liner to finish this look off follow the steps detailed in my winged liner lesson here. I also like to add a kohl liner to the upper water line (this is underneath your lashline) as it's keeps everything nice and dark and defined...this may take practice!  Add lashings of mascara to curled lashes and you are good to go.


    Don't forget the rest of your face...what would you like to see on the blog next ladies? Skin, Lips, Brows, Contour ???

    {More on how to do your own make up...}


    or if you are Melbourne based and would like to book and one on one lesson or special occasion make over read more about my make up services here

    {shop the look}


    Thursday, 15 May 2014

    How to do your own make up~ Smokey Eyes


    So in the last  lesson we touched on each of the three main eye make up types and the anatomy of the eye (here) if you need to reference back to the diagram at any point.  The most requested eye make up by far is the smokey eye.  This is a wearable reasonably subtle smokey eye I have chosen plum and gold as my two colours. ~Note smokey eye is technique not colour so it can be very natural to very dramatic.


    First up we need to prep the mobile lid which means add a primer I'm using a MAC Paint Pot in 'Painterly' or you could use a dab of concealer or foundation blended well over the lid this is what give your eye make up staying power and stops creasing, a sweep of face powder over that will aid blending and make it even better in stopping creases.

    Next we add a colour base so choose something that will work with the colours you have chosen this is Maybelline Colour Tattoo in Metallic Pomegranate this is your secret weapon in doing a successful smokey eye.  Blend the colour base all over the eye but not too far up you don't want to go too far over the crease.  These little pots make the smokey eye more intense and there's loads of them out their regardless of the brand they all do the same job: add depth of colour and give something for the eyeshadow to stick to. Follow the links to my favourites from MaybellineMACBenefit and Smashbox.


    Time to add your first eyeshadow colour I chose a matt texture plum shade and patted it all over the colour base keeping below the crease and then lightly added the same colour to the lower lash line (just with what was left on the brush not adding any further product).  You can keep adding the first colour until you get the intensity you want.  Don't worry about neatness at this stage as you will be blending more and cleaning up under the eye.


    In we go with colour 2 I have chosen half baked from the naked palette as I wanted to warm up the colour and graduate upwards towards my brow bone.  I push the colour right into the crease at the outer corner and blend forward and backward over the crease (windscreen wiper) and also do tiny circular motions with the brush in the same back and forth motions.  If you are adding more product be sure to push the colour into the crease at the outer corner and work in towards the inner crease this way the majority of product in deposited on the outer corner.


    TOP TIP:  I like to add an 'anchor' to my eye make up it is either the bronzer I will be using later on or the face powder I will use for contouring or sometimes even the blush I plan on using.  I like to sweep a little bit of that over colour 2 through the crease in the same motion but ever so lightly.  I just feel this 'anchors' the other colours and ties it into the rest of my face.  

    I also intensify the darker colour on the lower lashline (usually about 2 thirds of the way across) and then add the lighter colour to the tear duct and across to meet the darker colour.  I also highlight my browbone either with the light colour or a matt bone shade shadow.  I will come back to eyeshadow textures in a later lesson.  


    Curl your lashes and add mascara and a liner if you want to.  Now is a good time to stand back and re-assess.  You can go back in and add more if you want as maybe your blending came too far down and you need to pat more colour 1 over the shadows to intensify it or maybe you need to even out the shape on top by bringing your browbone highlight down slightly.  Maybe you just need to blend more.  Blend blend blend it will only make it look better.


    Once you are happy with your eye make up clean up all the mess under the eye with a babywipe or gentle eyemake up remover, add the rest of your face and off you go.  As Kirsty and I were off out on a MOL date last night I decided to add a little extra drama with a darker brown shadow through the crease (MAC's cork) and a set of half lashes. That's the beauty of a smokey eye once you master the technique you can make it as dramatic or as natural as you like.


    I hope this has helped you master the smokey eye if you have any questions please leave a comment below or straight to the Facebook page and I'll do my best to answer your query x

    {More on how to do your own make up...}


    or if you are Melbourne based and would like to book and one on one lesson or special occasion make over read more about my make up services here


    Wednesday, 7 May 2014

    Intro to doing your eye make up and why I do eyes first.

    If you have ever had your make up done by me you know I do eyes first.  I usually a warn my clients this is how I do it but if I don't I usually hear a paniced voice asking "Am I getting foundation??" The cleanest way of doing make up up is by doing your eyes first that way if there is fallout (i.e. eyeshadow dropping down on to your face) the rest of your face can be cleaned up easily and not have eye make up smeared all over your base. It may look weird when you are doing it but it just saves time and makes for a cleaner therefore better finish.    One thing I will say is if you are using all natural colours (so nothing too dark and smokey) or even using cream eyeshadow products (that don't have fall out) you should be fine to do our base first.  I would still leave under eye concealer to the very end so you can still do a bit of a clean up.  So lets get down to it...


    {the eye anatomy}

    If you are going to following any of my how to's (or anyone else's for that matter) you need to 'get' the anatomy of the eye (so you know where you are putting what). 


    The brow bone is the highest part of your eye directly under your eyebrow this is a great place to use a highlighter which makes the arch of your brow more defined which helps to frame your face.

    The socket or crease is the line where your eyelid folds over your eyeball some people don't have much of a crease at all and this is a flat area, some people have hooded eyes so the crease folds away into nothingness and some people have a natural enviable crease that gives them an effortless chicness when they work it right... think Audrey Hepburn.


    The outer corner or outer V is literally horizontal V shape at the end of your lashline into the start of your socket line this is where you put your outer corner definition when doing a classic eye.


    The mobile lid is the part of your eye that moves when you blink i.e. your eyelid.  This is likely where you usually put most of your eye shadow at the moment then wonder why you can't see it when you open your eyes.


    The lashline.  We have two upper and lower.


    The inner Corner/tear duct is the smaller horizontal V shape pointing in towards the eye. Great for adding highlight to make you look more awake or make close set eyes look wider apart.


    *Thanks to my beautiful model Brogan *
      
    {the three main 3 looks}

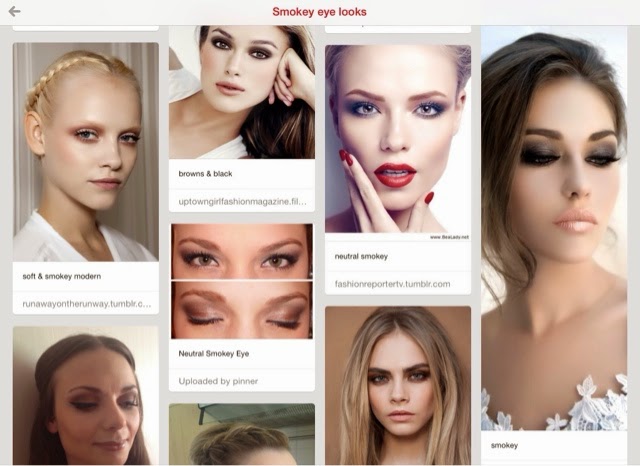
    The thing I get asked most is how to do eyes or people tell me they just can't do eyes.  In all honesty I think eye make up is probably easier than doing a lot of other things in make up for example expert contouring or a really defined bright lip. In my opinion there's a 3 main kinds of eye make up techniques and I have put together some Pinterest boards for you to follow which better displays them.  


    Smokey Eye: this is probably the most mistaken eye makeup some people think this is a colour as opposed to a technique a smokey eye can come in any colour and it's basically using two colours that graduate upwards toward the brow.   Possibly the easiest eye make up to master (honest!) provided you can blend or have a lovely brush to assist you in the process.


     Have a look at the smokey eye looks here .

    Classic Eye: this is a eye technique with one main colour all over the eye that then has outer corner definition in a darker colour, this is the eyemake up look I think most people are aiming for when they ask for a smokey eye.  Great for a feline eyeshape and acccessoried beautifully with a elongated flick of liner. 


    Check out my classic eye examples here.

    Socketline/Crease: think old hollywood eyes.  Here the eye crease is defined in a darker colour which adds depth to the eyes and usually suits a rounder doe eye type look and tyically paired with a thick statement liner and lashes. 


    Research the socketline look here.

    ~edit.  Since I wrote this post there has been a few popular additions in make up namely halo eyes & cut crease I like them both but both are slightly trickier to do on yourself but I will hopefully come back to add these as how to's soon.  If you really want to see them give me a yell on the comments below.


    {More on how to do your own make up...}


    or if you are Melbourne based and would like to book and one on one lesson or special occasion make over read more about my make up services here


    Friday, 25 April 2014

    Using your fingers to apply make up.

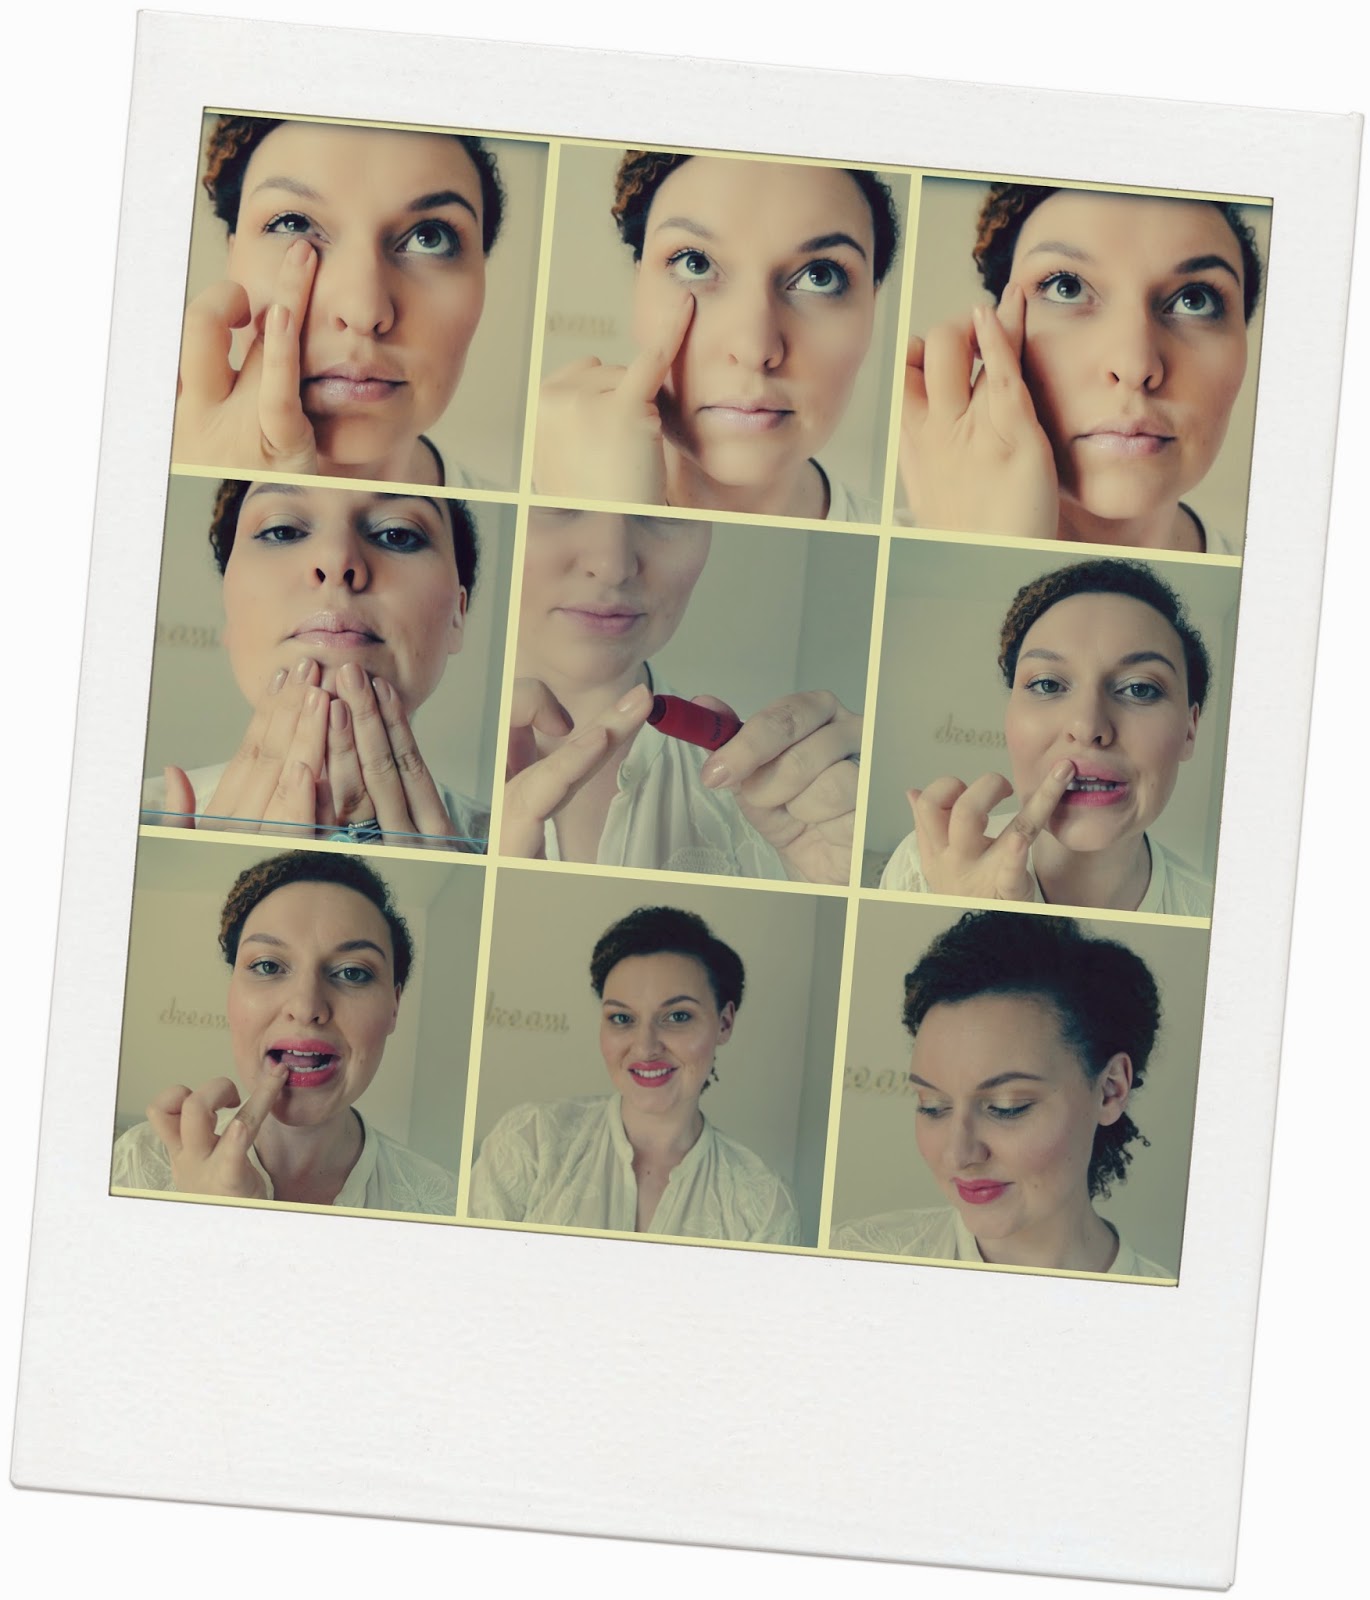
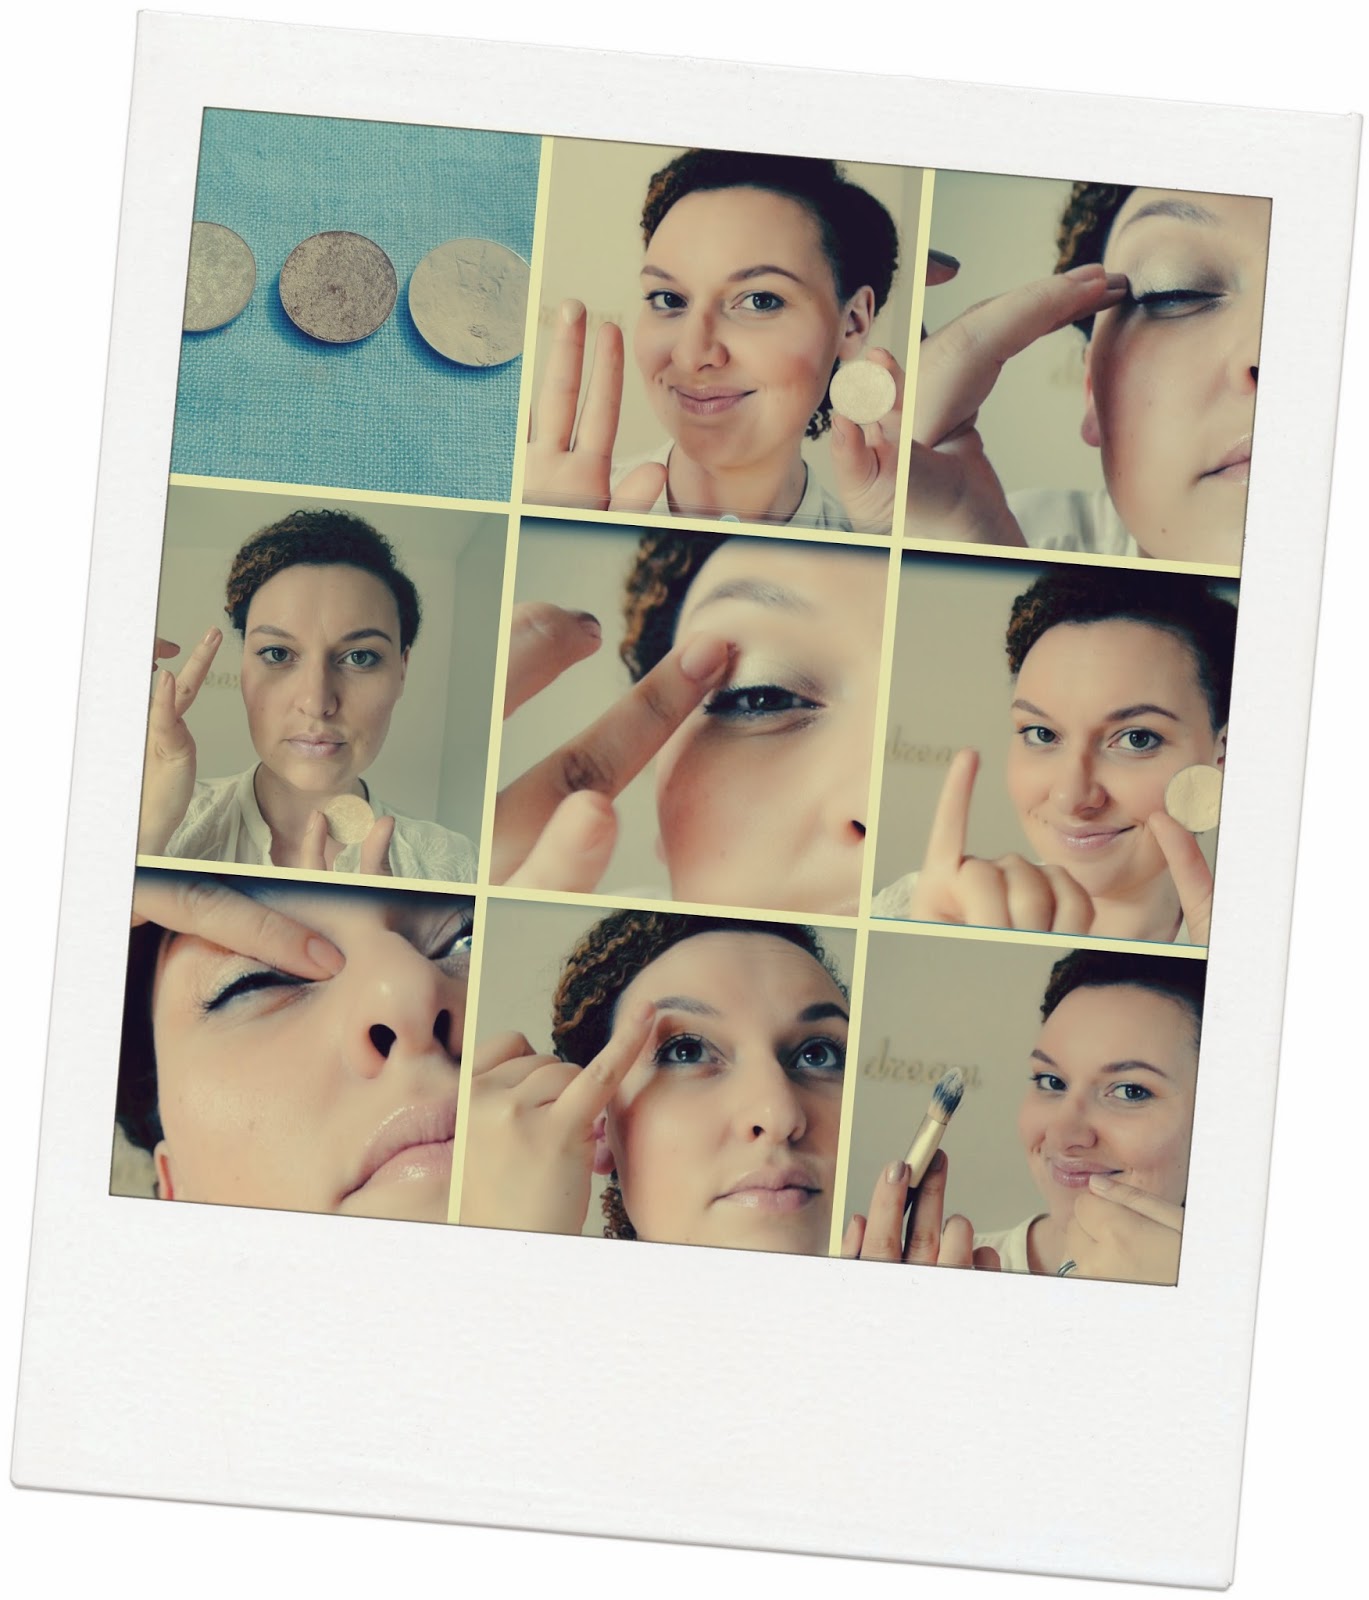
    As we discussed in the last lesson, catch up here , a set of brushes is going to make things a whole lot easier for you when it comes to make up however I think your fingers are an invaluable tool in make up application.  I remember when my friend was pregnant I took her into MAC for a treat to get her make up done and the makeup artist thought is was actual blasphemy when she said sometimes she used her fingers for applying her make up...really?  Maybe it's because I don't have to sell brushes as part of my job but personally I think provided they are clean and you use them in the right manner go for it I say.  Here's my best finger tips...


    • Use your left hand for your left eye and your right hand for your right eye. Why? The orientation of your finger tips works best this way and blending should go from inner corner towards outer corner
    • Use your ring or middle finger for applying eye shadow all over the lid in a patting and then swiping motion 
    • Press the pad of the ring finger in a darker shadow and apply this right into the crease and outwards and down into the outer corner and the same back up again
    • For inner corner highlight press your little finger into a lighter shade starting at the inner corner sweep slightly up into your crease and then the same on your brow bone
    • A note on textures- as I used two shimmery shades here I used a matt texture as my highlight


    • Feel free to apply your foundation with your fingers (I prefer a brush this one is Boots No7 Foundation brush)
    • Pat and press your foundation into your skin to 'mold' your foundation into your skin (this makes sure you're not left with brush marks)
    • Using your ring finger pat pat pat your concealer under your eye along and up the outer corner of your eye and down towards the outer corner of your mouth
    • Use your fingers to pat a cream blush up over the cheekbone.  If you dont have cream blush maybe you could use your lipstick (think multi-use people!)
    • Add a sweep of your lighter shimmery eyeshadow over the top of the blush to act as a highlight
    • Press your middle finger into a bright lipstick and dab and work into the lips to create a stain finish up with a dab of lip balm.
    So it's likely this won't be your special occasion face but it could be your go to the park with the kids face, meet the girls for coffee face or your 'oh my god i'm so late but I won't scare anyone' face...  It's pretty much my go to face and I hope it works for you!

    {More on how to do your own make up...}


    or if you are Melbourne based and would like to book and one on one lesson or special occasion make over read more about my make up services here