Adore Beauty Pty Ltd

Tuesday, 30 September 2014

Change.


It's a strange word that isn't it.  To me it's about doing something differently, or something new, it can be exciting but often it involves effort and can involve things we might not necessarily want to.  If I have spoken with you in person this year there is a good chance I have mentioned a change for me that is happening soon and, as a result, a change for Made Over Ladies. On 1st January 2015 my family and I  will arrive in Melbourne, Australia to start out our life there and continue on our journey as a family.  Gary & I have lived there before and it is a time for a change for us, to grasp an opportunity with open arms.  Yip its scary, it's exciting and it's hard work.  When I think about myself I feel like in general I am resistant to change I generally prefer the status-quo because it's safe, comfortable and makes me think of a blankie and a hot cup of tea on a chilly evening. However more recently I've been thinking about change differently and I have been substituting the word change with chance.  There's not much between the words really is there, just a swap out of one little letter.  A change can be tough but a chance feels like something exciting and desirable.  It's something I want to do for myself, for my husband and for my kids.

When we have told people what we are doing there has definitely been mixed reaction and I get that because everyone has their own ideas about what we should and shouldn't do in life or with our lives, where we should be and what we think is the right thing to do.  I've listened to people be shocked, I've been congratulated and told good for you, I've been told it's sad, I've been told I'm lucky, I've been told i'm brave, I've been asked why? I've felt guilt, I've been excited, I've cried and I could go on and on.  I've listened to it all but most of all I've reminded myself of that one newly edited word in my head...chance.

This wasn't meant to be all about me so I'll swiftly move on.  So what does this mean for Made Over Ladies as you know it?  Well I see it as a chance for something new and new opportunity.  Kirsty will continue to work her magic on brides all over Scotland and we have already welcomed a new MUA to our team, Brogan.  With some new exciting projects on the horizon for her and further growth for the MOL team on the cards she's embracing a new challenge and chance.  I will still very much be a part of the Made Over Ladies team and will be focusing on my blog and launching Made Over Ladies Melbourne so I will still very much be a permanent fixture for Made Over Ladies and I hope you can join us, follow us and support us on our new and exciting pathways. To me change is different but it's not the end of something it's a chance to grow.


Thursday, 25 September 2014

Somethings in life transcend time...

Today the lovely Janet & Frank Purdie celebrate their Ruby wedding anniversary.  We had the honour of using Janet's beautiful wedding dress in our very first photoshoot 'A Vintage Wedding Story'.  Originally handmade by Janet's sister in 1974 the dress is pristine and has been kept lovingly by Janet.  Like their love has transcended time so has this beautiful gown.  We think Janet's wedding style is as current as it is vintage.  

Here's to Janet & Frank... 40 years later we wish them many more years of happily ever after x


Wednesday, 17 September 2014

The free hand liner

My last lesson on winged eyeliner focused on using a gel liner and that handy little sellotape trick if you have mastered that and feel like moving onto a free hand version of liner use this guide below to keep you on the right track.

I'm using the L'Oreal Super Liner which I have been really impressed with.  The nib is nice and thin which makes for a thin, neat line which means you can build up thickness if required.

Follow the steps below:  


  1. Hold the pen horizontally and very tight to your lashes (make sure you are using the long side of the pen)  I like to start about three quarters of the way along (this helps to keep the eye look open and wide)
  2. Slowly and carefully draw small strokes along the lash line (keeping tight to the lashes) if you need to pull your eyelid up slightly to get to the lashline go ahead and do this (you don't want any gaps)
  3. Once you have your horizontal line along the lash line pull the line upwards and out (imagine your lower lashline being stretched up toward your brow as your guideline)
  4. Once you are happy with the length start from the point and bring it back down at an angle to make a (kind of) triangle shape
  5. Fill in the gap so it's all black 


Things to remember:


  • The shape of your liner and triangle all depends on your eyeshape as you go step back and gauge the shape your are making with your eyes open.  
  • Don't forget you can always use a cotton bud and eyemake up remover if you need to perfect the line. 
  •  I usually finish off my liner with a sweep of kohl liner under the lashes in the upper water line this is what keeps everything nice and dark.

Tuesday, 9 September 2014

Taking the leap & sharing the love!

Today I'm not going to spend my two hours of freedom whilst Miss Poppy is at playgroup doing what I was planning on doing and I'm taking the opportunity to write something a little different.  It's all about work and life and trying to keep myself on the tightrope which keeps the balance between the two.


I've been self employed for about 5 years now and I would say I' would consider myself reasonably successful.  I have a job that I really enjoy, that suits my family life, I don't have to spend money on childcare, I'm either working on days my husband is home or my lovely and helpful family members help me out.  The majority of what I do can fit in around the kids but it doesn't necessarily mean it's easy.  Like everyone trying to do the juggling act it's sometimes hard to stay upright and not tangled up on the safety nets.  Often after we have children or our circumstances change a little bit we have to adapt to the changes and make decisions about what it is we want.   You don't have to head to an office every day to be a dedicated worker, you don't have to be 9 to 5 in a retail store to be a worker, you don't have to be in a salon or kitchen or garage or hospital every day to be hard at work.  There's other options out there if you want them or if you need them and you are prepared to take a leap of faith.  Don't get me wrong I have massive respect for those of you going out there every day and doing it all I think you are amazing.  My friends and I have all taken lots of different routes when it comes to worklife balance.  No one route is the right one it's just what works for you.

I know a few other mums who have done the same as me and gone ahead and taken the leap into being self employed as they have chosen to pour their heart and soul into something that they really want to do.  I want to say 'high five' to them and 'you go girl' but then I realise I'd probably sound like an idiot so I instead I try to show a bit of support in the small ways I can...I talk about them.  In fact I could (and will be) talking about them more.  I'm going to natter about them and chat about them and I'm going to be the biggest gossip ever and I hope you'll join in.

What's the first thing you do when you wake up in the morning? (if you have a child over the age of 3 I am hoping you get at least 5 minutes of blissful peace when the daylight first makes an appearance) for me its a quick flick through of my social media favourites so usual suspects, Facebook, Instagram, Twitter and one of my faves Pinterest.  I have surrounded myself on these communities with like minded peeps that have decided to start up themselves and put every ounce of effort and free time into their businesses and their resulting livelihoods.

Here's a few things I will be doing to help out and support the little guys more:

1. I'm going to SHARE more.  Ok we all love to be liked but if you hit SHARE on Facebook you are spreading the word to soooo many more people.  I'm not saying don't 'like' my stuff, please do, but if you read something you like or see something you think is cute hit the share button.  You've basically given that person (whom i'm calling the little guy) access to all of your friends on facebook  to help them spread their message plus given them a virtual high five.  When someone shares my stuff I think "Oh I must have done a good job there insert happy face here" and gives me a little boost.

2. I'm going to chat more.  I'm getting involved.  I'm going to comment and tell someone when I think "wow that's fab" or "oh I fancy that" I'm going to tag my friends when I see something I think they'll like.  I might even ask a question here or there. I'm going to pop a review on a page if I enjoyed my visit or if the person I enlisted did a really good job.  I'll post a pic of my fab new nails or nice clean car or cute handmade card I've bought.  I'm going to say thanks (in public) so everyone else can see too.

3. I'm going to tweet more.  Ok I'm just getting my head round twitter now (slow I know) but when I see something that I take something from I'm going to hit favourite and i'm going to retweet.  I love reading blogs and I read loads of them.  Next time I read a post I love I'm going to say wow that was a good read!  If I see in little inspirational ditty on pinterest i'm going to repin it maybe someone else will take away a bit of inspiration from it too.

4. I'm going to make friends.  I'm going to find  that mums' business page that I was talking to at playgroup and I'm going to let my friends know about it (here I go with the sharing again)  I'm going to track down my dentist's daughters blog he was telling me about and I'm going to add her on bloglovin and mention it to my friend if I think she'll enjoy a read.  I'm going to let my brides know when I come across a fab new business that has just started up and I think their work is great. I'm going to follow a board here and there when I think it's adding some value to my life and i think others might benefit.

So anyway I'm going to be doing a lot of talking and I encourage you to do so too.  Social media is no longer just about watching funny videos, catching up on friends pictures, talking to old pals it's actually where lots of us little guys are trying to run our businesses and get our message out there! I'm in another situation change now where I find myself moving on from one successful business and starting from scratch all over again and it's highlighting just how hard I had to work the first time.  I think it takes guts to put yourself out there and go for it, do something new, so if you're are in the position were you are considering taking the leap and you are able to do so I say go for it!  And for those of you who are already doing so (even if I sound like an idiot) 'high five' and 'you go girl' and most of all, for us little guys and everyone else in between, please don't be shy and share the love!


Inspirational images provided by:

Mindful Wishes offers a range of jewellery aimed to help you stay inspired and focused on your goals and helping to you turn your dreams into your reality.


Wednesday, 3 September 2014

Summer loving x

School holidays have really effected my blog post schedule so sorry to those of you have been following my #molmakeuplesson series and have noticed I have been somewhat absent recently...I will return to normal viewing shortly!  In the meantime I thought you might like to see a snapshot of what I got up to in my summer of fun. 

 You might see a few things that will be coming up on the blog soon including how to make a DIY flowercrown (not just for summer my autumnal colour choices make it perfect for my October weddings I am attending this year and a DIY photobooth...such a fun feature to do for a sepcial event, party or wedding as you can see we had great fun doing it!  Hope you've all had a lovely summer..I'm now holding out for the Indian summer to make an appearance!

Tuesday, 2 September 2014

Make up lessons now available for booking!


I've always been into make up I've experimented with it and always felt comfortable with using it.  I have a natural flair for it.  This is why I decided to train as a Make up Artist...I suppose being comfortable using make up is something I have taken for granted.  I have worked on so many ladies that tell me they just don't know what to do with make up, there's just so many products to choose from and they just feel overwhelmed with it all.  

If you would like to learn how to do your own make up and learn what products you need to create the look you really want why not book in for a make up lesson.  

A One-on-One make up lesson is £30 in this session we will go over the make up techniques required to create your desired look, review your current make up bag and I will recommend products and brushes that will make the job easy for you.  If you have a friend that would like to learn alongside you it's £25 per person.  If it's a special occasion you are attending I can finish the look off for you with a false lash application (£5pp).

If you are interested in this service or would like to make a booking please email me on amy@madeoverladies.com

Find out more about my lessons elsewhere on the blog and read up on my DIY Make up series by searching #MOLmakeuplesson in the 'find on the blog' in the sidebar x


Thursday, 28 August 2014

An evening soiree at TOPSHOP.

Made Over Ladies attended a fab little soiree marking the launch of the new honeymooners personal shopping service at TOPSHOP in association with The Scottish Wedding Directory. We met some lovely brides to be and fellow wedding industry suppliers and partook in some fabulous window shopping!


Personal Shopper Laura Galloway introduced us to the Personal Shopping appointment menu which is quite extensive they really have something to offer for every kind of occasion. 


Laura showed us a few of her picks for the wedding season and some honeymoon outifit choices I loved the tomato colour of this blazer and the large flower print on the dress.  With a few friend's weddings coming up this year I was weighing up my options.


The personal shopping suites were also gorgeous a really nice space for trying on and having some girly fun.  This would bean ideal place for kicking off a hen party or girls night out.  The ladies can also supply bubbles and sweet treats as you try.  Even better.


Time for some fun...


 trying on...


 and of course a #selfie


We also got chatting to some lovely local wedding suppliers and met the fab team from 'Higher Love' who have a beautiful turquoise VW Camper van named Peggy Sue available for hire to transport your wedding party in true vintage style. Pop over to their facebook page to check her out.


We had a fab little night at TOPSHOP and really liked Laura and the girls' styling choices. Personal shopping isn't something I've tried but it's something I'm looking forward to trying it out now.  Here's a few words from Laura about the service she provides...

"Here at TOPSHOP we offer a complimentary service for all our customers. 

So, whether it is a complete wardrobe overhall, an outfit for a night out or wedding, I am here to help you find those pefect outfits! 

We offer on the spot style advice and offer a range of appointment types to suit all your needs. 

You may also consider Personal Shopping as a gift for someone therefore, we offer Personal Shopping Gift Cards. The gift card allows you to give the gift of a personal shopping spree to your desired value and full use of the Personal Shopping suit. 

 You can call our booking line 0844 2435544  to book an appointment. Alternatively you can email me at laura.galloway@topshop.com"


Sunday, 24 August 2014

A little word that means so much...

What words do you think about when you think of a Wedding? Love? Happiness? Marriage? Maybe it's new beginnings and building lives together, starting out and planning your adventures together.  I have the pleasure of being part of weddings who have already started on their journeys and their plans involve more than just husband and wife they maybe already have their homes and have gorgeous little ones to share their wedding day with them so along with 'Happiness', 'Love' and 'Marriage' along comes 'Family' to join the party...

2 years ago we celebrated Kirsty & Nicks wedding day a celebration of their beautiful family.    A day to mark all of the love, history and effort that goes into that small but momentous word....Family. From the matching suits & converse worn by Owen & Evan to Morvens pretty boho floral crown and Joselyn's jewelled dress that twinkled in the lights.  The flowers in tea cups & jars made with love by Kirsty the night before her big day, the meaningful soundtrack to the wedding day chosen by Nick, to the handmade bunting and wedding favour hearts made by her mum and the look of pride on her dads face as he walked her down the aisle.  This was a day full of happiness, love and above all, family.  


Gorgeous families like this don't just happen there's hard work and effort involved, kids to get to school on time and bills to pay and it's sometimes it's easy for us to get caught up in it all.  To me anniversaries aren't about the flowers or chocolates or perfume (although accepted gratefully) but maybe they are about reflection and reminiscing and maybe most importantly there to remind us of who's there at the centre of it all. 

Happy Anniversary to a very beautiful person in my life and her very beautiful family xxx

Thursday, 7 August 2014

A quick 5 minute tip on how to master the flawless foundation routine!

Different kinds of foundation brushes call for different application techniques.  Each of these techniques can be used alone but combine the two methods for the most thorough and flawless finish...


Sweep it down- if you have a flat foundation brush it's likely you spend your mornings painting on your product on that's fine but ensure you only use downward strokes to flatten any tiny downy hairs on the face and not brushing them upwards!  Use the tip of your brush to get right in to the corners of the nose and under eye area.   Also be sure to 'mould' your foundation in with your fingers by pressing  your finger tips over your applied product this will get rid of any brush marks and keep it looking natural.

Whisking it round- for using a buffing or kabuki brush.  This is when you use your a round brush in a whisking circular motion to really buff product into your skin.  This is the best method for filling in pores and fine lines.  It's the best way to melt the product into the skin rather than having a layer of product sitting on top of the skin which makes for a longer lasting finish.

Combining these two techniques will ensure you have an even & thorough coverage which is buffed into the skin resulting in a fresh and natural finish.

Enjoy your new flawless face!


Friday, 1 August 2014

Revisiting contouring

My first post about contouring was quite some time ago and if your a beauty follower on blogs, Pinterest or Facebook you've probably seen the Kim Kardashian crazy contouring picture that floats around after a tweet of her 'mid contour'.  With an influx of information in the beauty world about contouring these are quite easy to do guidelines to try it out.

Have you ever had your make up done and felt like you've been given the 10 years younger treatment? Likelihood is that you've had some contouring incorporated into your make over. Mastering the art of contouring is no easy task but can make you look and feel great. Contouring is about light and shade and using make up products to either bring out (using a light shade) or push back (using a darker shade) areas of the face.

Follow these simple contouring rules:
1. Only ever attempt contouring in a well lit area.
2. The 'perfect' face shape is oval and that's what you are aiming for so use a darker product (you can use either powder or foundation) around the outside of the face to 'blank out' outer areas (e.g. top corners near hairline, corners of the jaw) aim for a diamond shape in the centre of the face. This pushes back these outer areas into the shade making your face appear more oval.
3. Adjacent to these darkened areas use a lighter product to bring out the new face shape you have created.
4. BLEND. Single most important thing in contouring...well actually in make up application full stop. Regardless of what product you have used you must blend these harsh lines or you will get some serious funny looks! Be brave and use a good amount of product don't go too faint or you've likely wasted your time but don't forget to blend like you've never blended before!
5. Use contouring to emphasis your cheekbones by sweeping your darker colour down underneath your cheekbones (do the fish face and suck in your cheeks to see where this colour should go), use your darker colour down each side of your nose to slim a wide nose or on the underneath the tip of your nose to shorten a long nose, go under your chin and along the underside of the jaw to camouflage a double chin and finally a sweep of the darker to the cleavage will create depth and emphasis. 
6. Now you have finished contouring go look at yourself in a different mirror and blend some more!

Just a note about products. Darker colour should be a Matt finish so it is flat and not reflecting the light  best products to use are either a bronzer without shimmer try Benefit Hoola or a face powder two tones darker than your skin tone. If you are using foundation to contour make sure you use your actual skin tone to blend the two contouring products.  

To finish the process you must add the light.  To highlight feel free to add shimmer but it also doesn't  have to be shimmery it could be a lighter concealer you use or a light reflecting concealer.  Good areas to highlight with shimmer are inner corner of the eyes, cuspids bow, tops of cheekbones, brow bones but to add a sweep down the centre of the nose and highlight the centre of forehead I prefer to stick to none shimmer.    For a contemporary look forgo the blush but if you can't resist finish with a sweep of blush on those cheeks and up to the temples.

Practise makes perfect when it comes to contouring and it's worth the effort. My original celeb reference point was Jennifer Lopez when I wrote this post first time round but I'd say she's been superseded! Here's some contour queens let's see if they can motivate you to join the contouring revolution!


Ax


Wednesday, 23 July 2014

How to do brows...


Here's a quick little something on how to do brows:

1. Brush those babies up with a spoolie (or clean mascara wand)
2. Fill in with a shadow starting from the arch in an outwards direction (I like to use an angled brush)
3. Work your way down the tail of the brow elongating them if you so desire
4. Brush the product lightly through the start of the brow so to keep it natural (an upwards direction is good here)
5. Want to look five years younger? Highlight on top of your brow and blend it in which give you an instant eye lift..perfecto x

Do you have brow traumas?  Ask me a question and I'll do my best to answer catch me on...

 facebook | pinterest | instagram | twitter

...ohh and excuse my fluffy hair #curlygirlproblems

Monday, 21 July 2014

How to do your own wedding make up...polished & natural.

This is the first of a series in how to do your own wedding make up that I have had featured over on the fabulous Scottish wedding blog Braw Brides it's really important you pop over there for a full description of each step as this is just a quick how to in pictures....easy!  Don't forget you can ask any questions or if you have any requests on catch me on social media x


Friday, 18 July 2014

Natural skincare- Oat Bomb and Oat Milk Toner

My little boy Ollie has eczema it's horrendous for him he's a very itchy boy we are currently on a on a journey to relieve his symptoms in a natural way.  The harsh steroid creams I have been using for the past four years have been shelved and with the help of a herbalist we're now on a natural skincare journey with him.  Thanks to our lovely herbalist Clare at Napiers who introduced me to the power of the humble oat!  I started off just using this on Ollie but I realised how lovely it made my skin feel and now it's a fixture in my own skincare routine.  So much so I've stopped using any other day moisturiser (apart from my eye cream) and I no longer have the flakey skin problem I did have with the transition from winter to spring.

Follow the steps below to create your own natural Oat Bomb and Oat milk toner.


I'm about to go all Blue Peter...

Here's what you need:

1. Oats 
2. A muslin cloth (or you could use a pair of tights)
3. String
4. Something to decant into (for the toner)
5. Coconut oil (optional)

Wrap up a couple of handfuls of oats in a muslin cloth and tie firmly with string.  This is your oat bomb.  Run your bath and allow the water to run through the muslin and oats so the water is turned into a natural oatmilk.  For additional moistursing and lovely scent add a spoonful of coconut oil to your warm bath.  Lie back and wallow in it!  

For the toner: Squeeze some additional water out of the oat bomb into a bowl and later decant into a dropper bottle or recycled pump bottle. Keep this in the fridge and give it a good shake before each use.  You can also use the soaked oat bomb as an exfoliator all over your body in the bath. 


I have been using my decanted oat milk daily.  You can use it as a cleanser itself but most of all I like keeping my container in the fridge and using it as a toner on my skin.  It feels cool and has a slight tightening effect which makes my skin look and feel toned but not in an uncomfortable way.   I still follow my usual evening skincare routine since starting this natural approach I honestly have not used a moisturiser in the mornings and have really noticed a radiance in my skin.  So for as long as it works for me (as I am a believer of changing up your skincare routine) I would highly recommend adding a bag of oats to your shopping list.  For Ollie we are still on his journey some days are better than others but I know oats will always be useful for calming itching & irritated skin the anti-inflammatory, moisturising & cleansing properties of oats have astounded me I would recommend you try for yourself! 
Ax


Wednesday, 16 July 2014

How to do your own Wedding Make up- Natural and Polished.

Braw Brides have invited me to give you the low down on creating the perfect make up look for you on your wedding day.  Wedding day budgets can be tight and if a professional make up artist is not an option for you or perhaps you are having a destination wedding  and choosing to do you your own make up I hope to give you a few hints and tips to make the task a bit easier and enjoyable.  I will be bringing you three looks in this series the first is my most requested look which is 'Polished and Natural'.

You want to you look like you on your big day but you would like to look like the most beautiful version of yourself that translates well in your wedding photos and that you can look back on and say "wow I really loved the way I looked on my wedding day".

So here we go I will recommend products as I go...this first step may suprise you but I reccomend you do your eyes first this means if you drop any make up on your face it can be easily cleaned off and your base will be nice and clean underneath.  Firstly you want to prep your eyelids to make sure the make up lasts you really don't want a big crease in your eyelid with this look.  I used the MAC paint pot in Soft Ochre.  You can use a cream shadow or even your concealer lightly over your lids this cancels out any colour and gives a good base.  I'm using the Urban Decay Naked Palette 2 but you could use any shades you have as long as one is light and one is darker.  Sweep your light shade right over the lid into the inner corner and over the brow bone.  I have chosen 'Bootycall' as it has a little bit of shimmer through it but this is also a lovely look with all matt shadows.


Now time to find your crease-think about the brush size you are using...If you have small eyes you will need a small brush go for a tapered brush if you can this is the MAC 217.  Dip your brush directly into the darker shadow (I'm using Tease) so you just have the product right on the tip of the brush, lean your head back and look into the mirror, put your brush into the outer corner end of your crease (not right into the outer corner of your lashline check back on my eye anatomy pic here) then do a little curved wind screen wiper motion with your brush. As well as back and forth do tiny little circles with the brush in the same wiper motion.  Go lightly to start out then you can add more shadow if you want a bit more depth.  Don't go too far in on each side there should be a gap between the end of your crease and the start of your lash line as this is what keeps your eye looking wide awake and open.  You could also use a smaller brush with an even darker shadow if you want it more precise.  Then, as always, keep on blending in the same motion until you are happy with it.

This look generally needs some lashline definition to make it really work. You can either do that with a matt black shadow on an angled brush to really push and smudge into the lashline or go for a full on gel liner (i'm using MAC Blacktrack) but the L'oreal and Maybelline Gel liner is also good.  For a really precise winged liner to finish this look off follow the steps detailed in my winged liner lesson here. I also like to add a kohl liner to the upper water line (this is underneath your lashline) as it's keeps everything nice and dark and defined...this may take practice!  Add lashings of mascara to curled lashes and you are good to go.
Ax


Friday, 11 July 2014

Quick 5 min lesson for Long Lasting lips!

When the weather is warming up and the sun is shining I generally go for a lighter make up look but do like to make my lips a feature. How do I keep my lipstick long lasting?  Follow this quick tutorial for a long lasting lip...
  • I have already prepped my lips with a lip balm as described in my skincare lesson 
  • I like to start with a base so usually blot my foundation brush over my lips to neutralize my lip colour (this is a good step if you have quite pigmented lips) it only needs the tiniest amount of product to do this I am not advocating concealer lips this also gives a bit of staying power  
  • I start by outlining my lips then filling in all over with the same lip pencil then patting the colour in with a finger this gives the lipstick or gloss you are using something to stick on to
  • I then really pack my lip brush with the lip stick of my choice and work it into the lips all over, back and forth, this (along with the liner) creates a stain on your lips
  • If your lips need a little bit of correction (for example you might want to slightly enhance your top lip or you might need to even out your lip line) go back in and do this with your same lip liner
  • For a professional finish clean up around the edges using your concealer brush (again only a tiny bit of product required)
  • You can then top up the lips with a little bit of lipgloss if you like a glossy look or if you want really long lasting blot by placing a tissue over your lips and pressing (not between the lips) and repeat application
  • If you are into highlight (and you should be after my contour & highlight lesson) don't forget to add a dab of your highlighter to your cupids bow to give you an even poutier finish. 
My favourite lip liners-

1. Rimmel Exaggerate in 063 Eastend Snob (a soft mauve toned pink good for teeth whitening!)
2. MAC Lip Pencil in Subculture or No 7 Precision Lips Pencil in Nude (the perfect nudes and a great choice for exaggerating your lipline in a natural way or for using as a base if you don't have a matching liner for your lips)
3.A Clinique chubby stick can be both your liner and lip colour....I prefer the intense range as these have the best colour payoff. 

Have fun! x


Friday, 4 July 2014

Storyboard- Love's Young Dream

This is Love's Young Dream...you can almost feel the passion and touch the warmth between these two hearts.  Even on your wedding day find the time to just be the two of you.  Take a moment to feel the sun on your face, breath in the warm fresh air and look forward to the rest of your lives together.  


Images by Lush & Co

Wednesday, 2 July 2014

How to Contour & Highlight

Ladies as requested here is my quick take on contour and highlight.  My version is not complicated and doesn't include layer upon layer of product.  I use a foundation stick to ensure enough coverage but if you want more you could do this over a coat of foundation (for example something light like MAC Face & Body).  Pop to the end of this post to purchase the products you might need for this look.

You need two colours of foundation a darker colour (one or two shades darker than your skin tone) this is your contour.  The darker colour is put in the areas of the face we’d like to ‘push back’ so under the cheekbones, under the jawline, down the sides and under tip of the nose and on the outer corners of the forehead.

You also need a lighter colour (one or two shades lighter than your skin tone) this is your highlight.   The lighter colour works by bringing forward the areas you are highlighting so above the cheekbones, down the centre of the nose and the centre of the forehead.


I'm using the Maybelline stick foundations in Soft Honey & Classic ivory.  I like a stick foundation as they make the task of contouring quite easy.  Prepare to look a bit odd in between blending!


Now you are ready to blend blend blend! You are going to blend these two colours so you have no lines left starting by blending the darker colours first using a buffing brush (I like the Real Techniques brushes check out my post of the tools you need here) in small circular motions I always start at the hollow of my cheekbone.  


Next you want to blend out the highlight you can use the same brush but you may need a smaller brush for the nose the aim is to blend not so that both colours are merged into one but so there are no harsh edges.


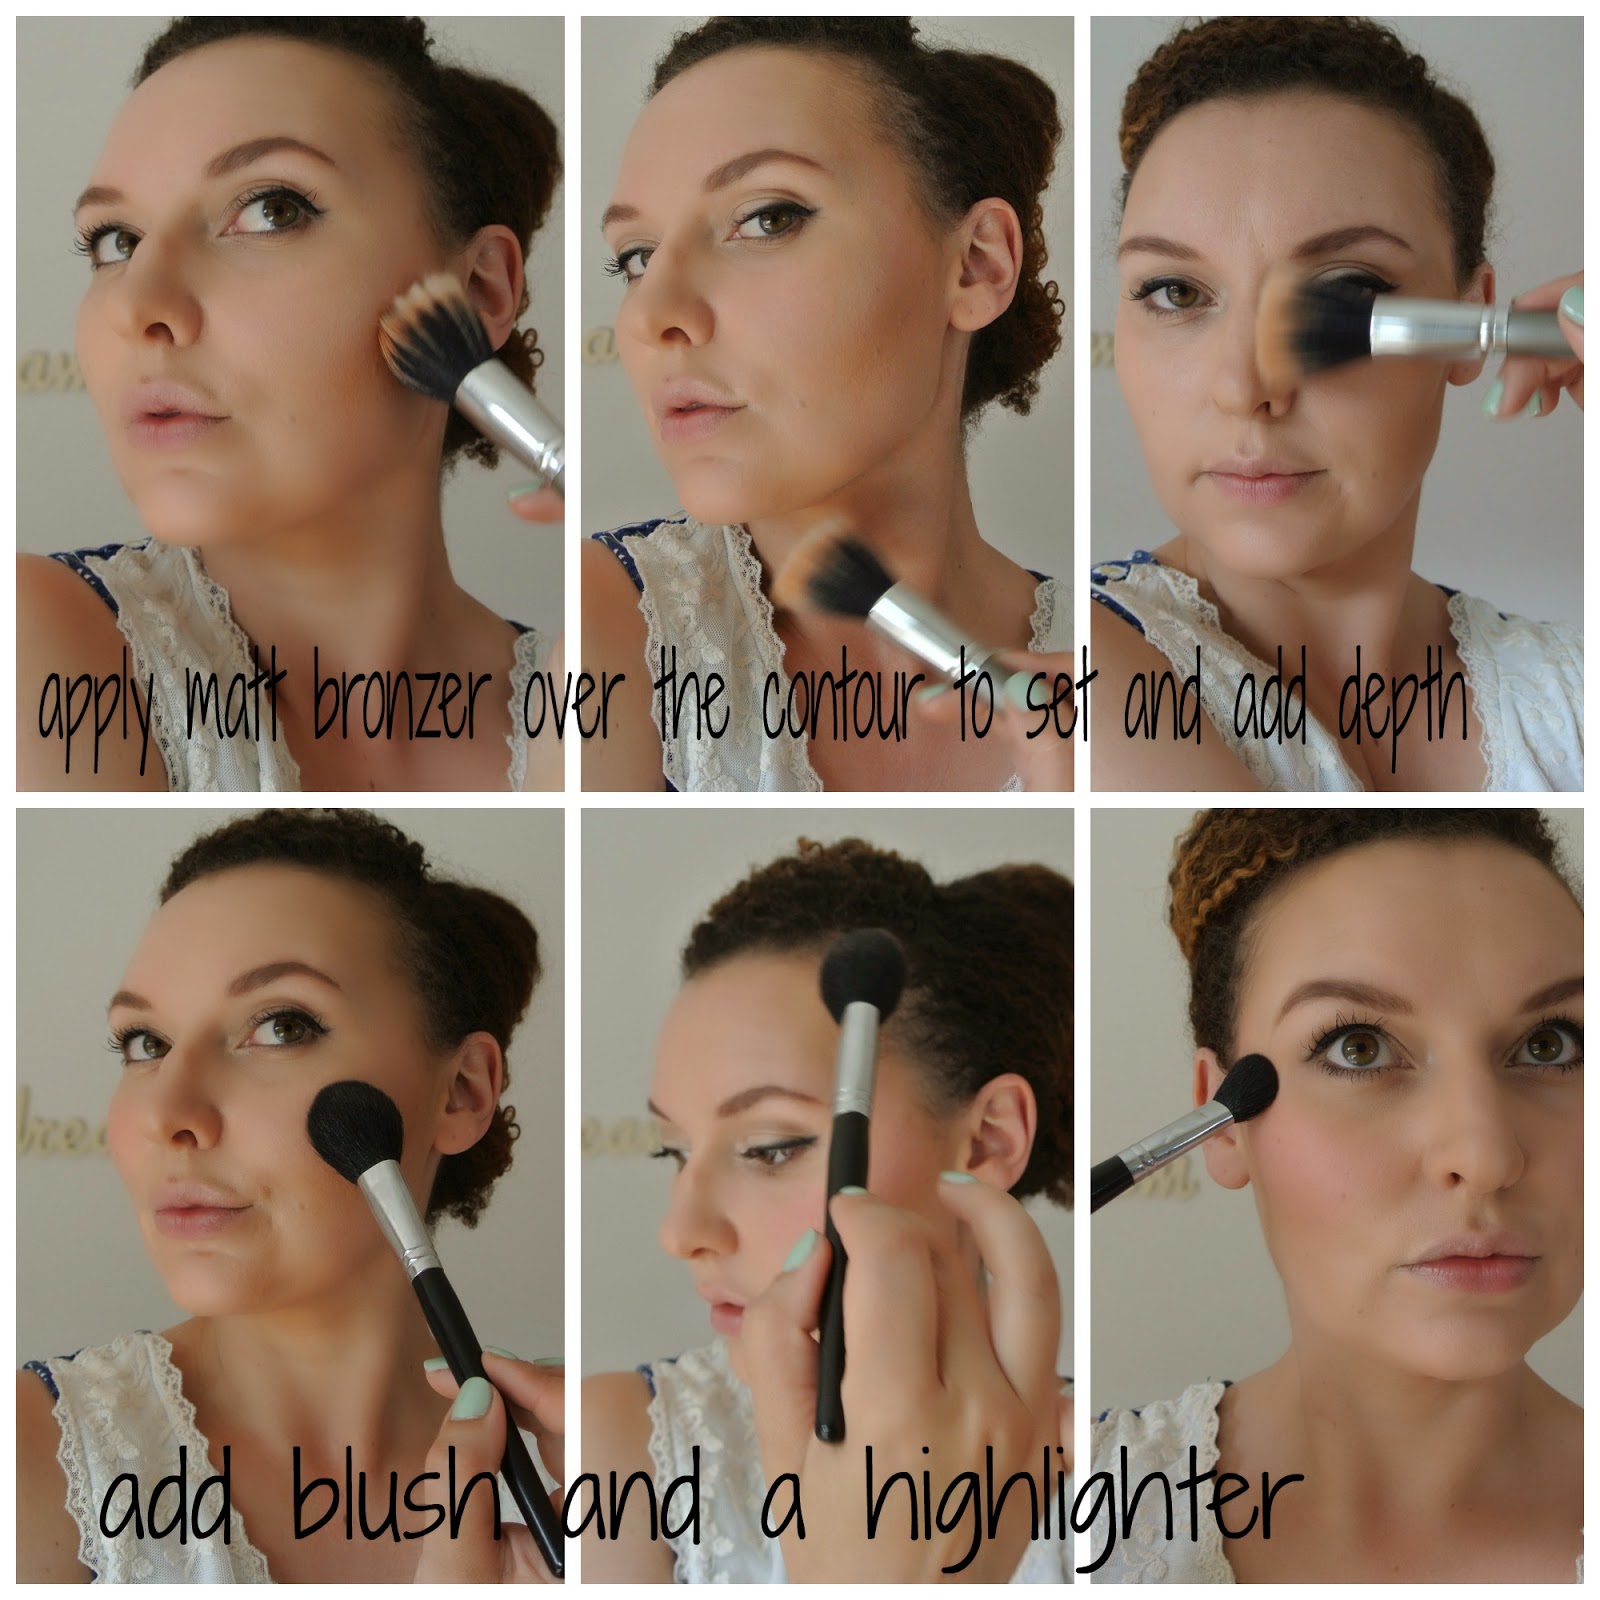
The next step is to  follow up this process with two powders to further enhance the contour and set the make up.  I used a pressed powder over the highlighted areas and a matt bronzer over the contour.   It's not necessary to add blush but I feel naked without it so I always add a sweep of blusher between the contour and highlight on the cheekbone,  add a touch up on the temples and in the summer a touch over my nose.  I go on and conceal under the eyes and any areas that need a bit of extra coverage.  


You can then add extra highlight if you so desire with an an illuminating highlighter such as MAC soft and gentle (which I am using here) or the old faithful touch éclat.  Places I recommend doing this is top of cheekbones, inner corner of eyes, cupids bow, brow bone.  This is one of my tricks to look awake even though I may be really tired!


PS pouting in the mirror while doing all of the above is totally optional but makes the whole process way more fun!

Hope this helps you ladies in the quest to a contoured face let me know how you get on.  Now there's a new term on the street which is 'Strobing" basically you can already do this if you mastered the two step process of contour & highlight.  How to strobe: omit or downplay the contour and ramp up that highlight baby!!!