Adore Beauty Pty Ltd

Thursday, 26 February 2015

How to make a DIY Vision/Inspiration Board

Before I moved to Australia I spent hours and hours on Pinterest deciding how I was going to decorate our new home, how our existing furniture and trinkets would fit and how it would all come together.  Hard when you have no idea what the house you are moving into is going to look like.  What I did know was I wanted a designated work space that I could write at and be my own little corner of inspiration with a beautiful vision/inspiration board where I can pin things (and I mean actually pin in real life person) not on pinterest.


{the diy}

  • I picked up cheap cork board from the local DIY shop and opted for a beachy/whitewashed poster frame to put it into (I really wanted a large ornate gold frame but as my budget was not $300 I was not going to get it.  I stand by the fact it would have looked divine!)
  • Next prize off the frame from the cork board (in my case I enlisted the help of husband) I made sure I chose a flimsy board for this reason, you can get cork on rolls but this option seemed cheaper and easier to me.
  • I discarded the glass from my whitewash frame and inserted the cork board and glued it straight on the back of the frame


  •  Next I treated myself to some lovely fancy and inspiring stationery.  I love stationery sad I know but I do I can't help it and I always hear a deep in breathe from husband when I head off to Kikki.K (fabby brand of stationery and general gorgeous goodies, they deliver world wide) 
  • Things to buy: some fancy push pins, string & mini pegs, general lovely things to adorn your board
  • Colour- choosing one or two main colours for your accessories will be sure to pull it altogether and keep a theme going even though in reality it will end up a mishmash of colour and textures.  I chose gold & turquoise to compliment my logos 
  • Include elements from nature such as the pine cone and shell (collected by Ollie), a flower from Poppy's naming day, this will ensure there's interest and variety on your board and also remind you of the great outdoors when your sat in front of your desk

  • Here's my finished inspiration/vision board, well I say finished but it's meant to be a work in progress.  I have chosen items to remind me of previous fabulous things I have created (such as my handmade feather crown I made for a shoot), notes and quotes given to me by friends, our wedding invite, and just things that I hope will inspire and entertain as I sit in my little corner.  


I've got some printable quotes to frame and hang then next on my list is a few old school clipboards to hang on the wall so I can keep my to do list and new project ideas 'in my face'.  What do you do to keep yourself inspired and organised?

Thanks for reading...soundtrack today was Mumford & Sons 'Little Lion Man' I painted my kitchen cabinets to this album and ever since it's my go to track when ever I need to get stuff done...often with a glass of red.


{here's a recap}


Monday, 23 February 2015

Changing directions...

So at 17 you're meant to decide what it is your going to do for the rest of your life, right?

That's pretty much it isn't it? Well even before that you are choosing the subjects you're going to do to get you were you are going, you're choosing whether your going to uni, whether you should get a job, whether there other options and routes you can take.  

I did a Psychology degree and did well, I got a first class, but it's never what I say when someone asks me what I consider as one of my achievements. To be honest since I got it I'm quite embarrassed to mention it and never offer it up in conversation.  Why? I don't think it did me any favours.   I went to university at 17 with no idea why I was going there, I didn't know what else I wanted to do I left with an amazing degree result and no idea what to do with it.  I still don't.  It took me until I was in my late twenties to have the guts to try something completely different and change my direction.  Whenever I find myself at a cross roads in my life I find myself back asking that question of what it is I want to be when I grow up.

My friend gave me this quote many years ago and it's always given me some solace that I'm certainly not the only person that has internal dilemmas with what they should be/want to be/actually do...

"It was also Miuccia Prada who said 'I thought fashion was stupid because I thought there were more intelligent and noble professions, like politics" and I think every woman has this hesitation at one time or another. I did. I spent four years at college trying to find out what I wanted to do that did not involve the fashion industry.  But I always came back to it.  And not for the free samples (which are not as free as you might think).  I came back to it because I was in love with style, and I finally recognised it as something important and influential" Nina Garcia, The Little Black Book of Style.

I suppose what I'm saying is that it's OK to take a change in direction, that choosing something that might seem riskier, that following your heart can be the right thing to do, that starting out from scratch (again) isn't a bad choice.  What do you think?  Can you change around what 'you do'? Have you thought about a 'career change'? 


Thank you Cherry for sending me this quote all those years ago I still think of it every time I question what it is I should do/be (which happens a lot!) here it is pride of place on my inspiration board | soundtrack today was 'Princess Sophia, Poppy on the iPad next to me...don't judge me)


Thursday, 12 February 2015

What does your lipstick say about you?

With a lack of any actual make up for me to play with (I don't have my kit shipped to Australia yet I'm limited to what tutorials I can create) sooooo I thought we could have a bit of lipstick fun...what does your lip colour say about your personality?


{Nude}
You're happy to let your eyes do the talking, mysterious & understated suits you well, you are intriguing and have a relaxed & effortless style, you're sultry and can be deep you're not afraid to let your natural beauty to shine through.

Pink, Orange, Purples your go to lip is bright & fresh, your personality is fun, carefree, with a great sense of humour, you are high energy & fun to be around and don't care much what other people think of you.

Sophistication is your strong point, you're not afraid of being bold, your style is classic & timeless, you can handle yourself in any situation and have a natural air of grace but can be feisty.

{Dark}
You're sexy and confident, you are sassy and you're not afraid to show it, you're extremely feminine, passionate, a bit of  a vamp, admired by women and men alike.

Ok, so it's a bit of fun what lipstick are you most drawn to? I personally like them all...so what does that say about my personality!? x


*click on your choice of {lip look} to see my handpicked product choice...you can purchase directly via these links please be aware these do contain affiliate links/images courtesy of Pinterest*


Sunday, 8 February 2015

Can you have Roots & Wings?

The first time I heard the expression 'Roots & Wings' was in my dad's Father of the Bride speech.  I had just returned from a 4 year stint in Australia to come home to Scotland and get married.  When my dad said it that day, my wedding day, I felt instant tears prick. Because, one, I knew he was proud of me for what I had done, gone off into the big bad world to try things out for myself, to see what the world had to offer, to just go out there and be me and, two, how proud he was that I had came home to my roots.  To where I was meant to be.

SO here I am over 5 years later not very many weeks off my return to Australia and I heard that expression come up again and it hurt.  Right in the heart!  The thing is I really makes me ask myself what it means to me and where do I fit in?   Are roots and wings ever a permanent thing? And can you have both?  Can you have roots and can you have wings? Or if you give in to one are you completely disrespecting the other? Now here I am dislodging my roots to open my wings again and it's exciting and challenging, but it hurts. Hurts to know how it effects my family, my friends, my kids, my kids friends, my kids friends mums, my work, my world, what I've worked so incredibly hard at building up, what and who I'm leaving.

I'm not the only person who's ever done it and I know that.  I suppose everyone goes through times were they are pulled in more than one direction, who might feel a split, who struggle to work out where they fit in and I take solace in that.   I still don't know the answer maybe I will work it out.  I'm sure my own kids will test me on it in the future.  I know they will and I know that will not make it any easier when it happens and it's my child spreading they're wings.  So what do you think? Can you have both? Should we have to choose? 

(So I wrote this a while ago I just never had the guts to hit publish so here it is in all it's bitter sweet, heart on my sleeve glory.  Soundtrack was (completely by chance but very relevant)  A Thousand Miles (Live Acoustic) - Vanessa Carlton.


Friday, 6 February 2015

Mummy ramblings ...

I just timed out myself from my nearly three year old. I say nearly three because admitting this adorable little two year old has brought me to tears for the fifth time this week seems like a feeble mother thing to admit...nearly three is almost a whole extra year of tantrums to really perfect the art you know.

She's perfected it alright.  A broken glass on the floor so I tell her to stay where she is while I get the mop/hoover/perform heroic bare foot acts to remove the peril of a shattered tumbler.   Of course she doesn't stay still "it's OK mummy I just walk round it...remember?" she tells me. Oh great thanks, child of mine, break it down for me why don't you? Seriously, me and her clash we're both competing for the head of the house, who is in charge, is it me the 34 year old, well educated, reasonably successful mother of two or is this cute little powerhouse of sheer determination and might. We all know who it is but I will never admit to it.  I'm looking for a breakthrough.  One day we'll butt heads and I'll be the winner she'll finally  realise I'm in charge and she'll bow down politely hahahaha such an unlikely, hilarious idea I've just coughed up half of the almond croissant I smuggled in here to accompany my time out. 

Will I ever get over this? Will we both back off with our needs to be the dominant female and end up in a blissful state of equilibrium? I have no idea, probably not but mummy time outs are proving way more effective that toddler time outs, a lot less tears, a lot less crying, think this might be the way to go.

Shakespeare was right ...

I think I will order this from Etsy for Poppy's room it's perfect for her x


Thursday, 5 February 2015

Make up to WORK your specs

Sometimes I love my specs sometimes I hate them "Hello Giggles" hit the nail on the head with their article (read up here) which inspired me to write this post.  So here's 5 ways I have found, in my experience, that glasses generally rock my make up wearing world.

{bye bye tired eyes}
If you are having a particularly "tired/hungover/beenupdoingthenightfeed(s) eye kind of day" reach for the specs.  Wearing your glasses can disguise those under eye bags like no concealer I know.  If you are going for this option either forget the concealer completely and opt for a hydrating eye cream or mix the two on the back of your hand and apply for a lighter, hydrating and concealing, combo.

{balance is everything}
Feel like going for a statement lip?  Wearing a bright or bold colour on your lips can be a great way to balance the face when wearing your specs.  Often when you pop your glasses on your eye make up is seriously toned down, why waste your time then? One of my favourite avec-glasses looks is lashings of mascara with curled lashes and a hot pink/bright orange/bold red lip.  Love it and super easy (follow my long lasting lip lesson for tips) or if you are not used to wearing a bold lip work up to it by wearing a stain on your lips, something that adds colour but is still transparent and natural looking. 

{all about the finishing touches}
Not many of us manage to actually apply make up whilst wearing our specs (cue some awkward back breaking stance in front of the sink trying to get close enough to the mirror) apply finishing touches with your frames on.  Pop your blush on slightly lower than you would normally, it might sound strange but put your glasses on now and try it I promise you will see what I mean.  Don't spare on highlighter you can still have highlighted cheekbones whilst wearing frames and this will contribute to the brighter eye goal (see above) and you can most definitely do contour with glasses.

{the ticket to experiment} 
Given that your glasses are likely to tone down whatever make up you put on your eyes why not try experimenting with a much darker, smokier looking eye.  You might be put off wearing an evening smokey eye during the day but wearing one with your specs can give you a proper power look. Technique needn't be your strong point as the glasses can hide a multitude of sins (stick to my smokey eye technique as a fail-safe).  The only reverse of this is if you opt for rimless or very neutral frames then you may need to apply a little more caution.  Keep lips nude for an effortless, chic look.

{beware of the brow}
I have done this myself, probably on more than one occasion, over defined my eyebrows when wearing my specs.  What happens is....you just look angry.  Particularly with a heavy rim frame.  Keep your brows filled in but natural looking to stop yourself from looking like an evil genius, unless of course that was what you were going for.  

If you are stuck in a rut when it comes to making your specs work with your make up look to the big advertisers for inspiration. They generally get it bang on.  Here's a few of my favourites...wear them with pride ladies x

Sunday, 1 February 2015

Overcoming if

'If' is such a small word isn't it?  Or is it?

Just two little letters that can just stop you in your tracks. It's a powerhouse in the form of a conjunction, it's conditional on something else, usually, and sometimes my head is full of ifs. 

"If I had those cute $150 trainers I'm sure I would take up running and be trim and toned by now" 

"If I had done graphic design at uni I would be able to create all the wonderful lovely creative things I have stuck in my head that I can't seem to get out"

"If  it wasn't raining I could get out and get some fresh air..."

If's don't need to be so negative.  I'm working on putting a positive slant on all of those debilitating, insecurity causing 'if's'.

'what' meets 'if' and I follow it up with a '?'

All of a sudden 'if' sounds so much more positive when preceded with 'what'.

"what if you forget the expensive running shoes put on your regular shoes and just go for a walk??"

"what if I explore what I can do with my creativity and if I really want to know how to do things I just go for it and learn from other means and ways"

"what if I just take an umbrella or even a raincoat and just get myself out there?"

There is always 'what ifs' to my 'ifs'  it makes them a challenge instead of a blocker.

Soundtrack today James Morrision singing "Man in the Mirror" love him reminds me of my wedding day x

Wednesday, 10 December 2014

3 Make up Brushes to treat yourself to.

So I have a full list of brushes that I think you should have in your arsenal way back in the early days of my make up DIY series #molmakeuplesson2 but there's just so many brush options to treat yourself to and just help make doing your make up something special so here we go....splurge time!


{The Fan Brush}


Well isn't this a girlie little number!  I love a fantail brush when I want to do something lightly and subtly with make up.  So I would go for this if I wanted a light dusting of powder to set my skin or if I wanted to add a highlight to my cheekbones, or down the bridge of my nose.  If you can be heavy handed when it comes to make up this is a good option to keep it light!  Have a look for yourself here.

{Optical Blurring Brush}


Ohh I am almost drooling here!  I always say when it comes to topping up your make up you should buff out what you already have on your skin before applying more! So when I came across this I was instantly in love.  You could use it for applying your foundation or take it with you for buffing emergencies!  Have a look for yourself here.

{Blending Brush}


I know it sounds a bit boring but a good quality blending brush is the answer to your eye make up dreams... a fluffy brush like this that can really get into the crease of the eye perfect for the socket line eye make up or just for blending in a transition colour for a smokey eye. Have a look for yourself here. 


How to apply concealer to look fresh and awake!

Next in my series of how to take your make up from day to night...

I sometimes do this routine just to freshen up my look if I'm off out somewhere and literally have ten minutes to get ready, sometimes this is all I do base wise if I am in a rush doing the school run for example.  It's a combination of concealing and highlighting that results in a nice fresh and awake look.  You do this AFTER you have applied your usual foundation.

{how to}

1. Apply approx 4 strokes of a brightening concealer downwards fanning out following the shape of your eye with the last one winging outwards in the direction of your ear (bringing the concealer up like this really brightens the full under eye area and has a highlighting effect)
2. Using a damp beauty blender or your finger pat the concealer from the inner corner outwards blending as you go upwards towards the temples
3. If you want to set the concealer in the same manner with a translucent powder
4. Follow with a sweep of blush directly under where you have put your concealer starting at the apple and sweeping upwards to temple.

So simple but can really freshen up your look!

{tools & products}


For more tips on how to take your make up from Day to Night check back on my previous posts


Tuesday, 9 December 2014

How to make a glitter dipped feather garland

A few of my favourite things right now are feathers, arrows and angel wings.  I've always been aware of symbols and what their meanings are (well to me anyway) and I have always chosen to surround myself with little reminders hence why when you come into my home you'll see lots of 'word art' and my jewellery and little trinkets usually all hold some symbolic meaning to me.  I think in such a busy world and busy life we need little minders to keep us grounded and just refer us back to our own values.  This is probably why I was so in love with the the Pandora feather ring in my October wishlist  and the angel wings earrings in my gift giving guide have a look if you missed these are both are gorgeous!

I wanted to share a little DIY on a glitter dipped feather garland, partly because I think it would make a gorgeous chic Christmas decoration and partly because I can't wait to share an image of the garland in action from a recent Made Over Ladies photoshoot, the garland in question will be adorning a wall somewhere in my new home and I can't wait to get it up!

{how to}


1. Paint the glue onto the tip of the feather, you can chose just how glittery you want them but I just went for the tip as I wanted them to look glitter dipped.
2. Dip the glued tip into a little pot of glitter and give them a bit of a shake to remove the excess
3. Leave them out to dry in all of their glittery glory
4. You have a few options now if you chose to make them into a garland you can use a long length of natural string and knot varying lengths of string all the way along attaching a feather at the end of each length.  I use knots and then a spot of glue on each knot to keep them in place. You could place them all in a cute little jar on your mantle (instant christmas decoration). I gave a few to Kirsty which she put in with some flowers and wore in her hair to our friends wedding or you could go all out and make yourself a full feather crown like I did for this shoot....


Photography:  Karolina Kotkiewicz 
Hair, Make up and Styling: Kirsty Stevenson & Amy Hughes at Made Over Ladies
Flowers by Kirsty at Made Over Ladies
Cake: Vanilla Heaven Bakery (dressed by Vintage Gathering)
Models: Brogan & Kyle

I got all my supplies for this garland at www.hobbycraft.co.uk


The Audrey Brow- how to get a retro brow.

Mirror, Mirror on the wall...who has the most fabulous eyebrows of them all?

There is so much choice for eyebrow shapes out there and when you get yourself the right tools and with a bit of practise you can really choose what shape you are going for and use it as a new way to change your look up.  You do need to be mindful of your own natural shape for example my brow shape isn't naturally as straight as Audrey's but its amazing what you can do I often do this for an evening look and is one of those subtle add ons you can do to take your look from day to evening.  Perfect for those Christmas parties!


{brow inspiration}


{how to}


1. Take your spoolie (or clean mascara wand) and brush your brows up all the way along, if you have naturally bushy brows (lucky you!) you can start brushing the tail down towards your ear instead of up.
2. Perfect the arch- dip into your product and draw quite a sharp but small line outwards at the top of your brow (we are going for a slight angle outwards and not upwards as we are not trying to do angry brows) work down with whats left on your brush in small strokes down through the depth of the brow. If you feel it's looking too pointy smooth your finger over the outer point which will gently blend it out.
3. Do the tail- from the outwards arch work (with small strokes) down the tail. It's up to you how far you bring the tail but bear in mind the longer you go it will start to drag the look of your eye downwards (Audrey has quite a short tail)
4. Back to the start- work the product through the main part of the brow but still start at the arch and work forwards, your brush strokes as you get closer to the start should be moving upwards but still holding the brush at a horizontal angle.
5. Add a little bit of concealer above the brow for a lifting effect and on the brow bone as a highlight.
6. Optional- finish with a brow gel to keep it all in place and define hairs.

note...you don't need to keep dipping back into your product at each stage just keep stepping back and assessing.

{The finished look}

{tools & products}

  • If you are using a shadow or gel you will need an angled brush, stiff bristles are better.
  • A spoolie (if you have a used but clean mascara wand you can use that) or if you fancy a splurge I like this one by Blinc as it's double ended
  • You can also get eyebrow pencils that have the spoolie end like this fab one by TOPSHOP if you are using a pencil hold it at a horizontal to your brow.
  • I personally prefer shadow here I am using espresso by MAC.
Do you have a brow icon???

Monday, 1 December 2014

Don't waste your money this Christmas...December Wishlist and some giftgiving wisdom.

Oh it's that time of year again! I've been doing lots of thinking recently about the amount of 'stuff' we accumulate and have been doing alot of reading about ideas for making good choices for Christmas presents (pop over to Slow Your Home for some fabulous tips that I'll be taking on this festive season). Maybe it's because for the second time I have just finished packing up my whole life which really highlights how many possessions we have and how liberating it is to really pare down to the stuff that we really love, need and choose to have filling our space. I'm trying to shop smarter for Christmas and really make sure I'm giving gifts that mean something to my family & friends.

So here is my Christmas wishlist and some present buying words of wisdom too!


{support small business}

As a small business owner myself I understand the importance of supporting the little guy I feel almost altruistic handing over the cash when it's to someone I know works really hard for it and has given me something that little bit more unique, one off or just that I know there's been effort put into it by a hard working someone in similar shoes.

The Ugly Duckling Shop- If you live in or close by to Edinburgh you absolutely must stop by this shop.  It is full of handpicked, sparkly, gorgeous little items that you can treat the loved ones in your life to!  There's also stunning unique furniture pieces, sweet little cards and beautiful home decor it's definitely worth a walk around! So out of all these goodies my pick this Christmas are these gorgeous angel wings earrings.  If you mention Made Over & Me you will also get a extra special treat of 20% off!

{give quality not quantity}

What would you rather have lots of little things that you just don't really need or one thing that just really blows you away? I think quality trumps quantity every time on the most part these days I try to choose one thing that will really fit the bill rather than a few bits and bobs that might fill a gift bag better. Where possible I will also include a gift receipt so that if I do get it wrong at least there's the option to return it.  This is one of the perks of buying from a big retailer.

My pick obviously falls in the make up category and this time it's the Urban Decay Naked Palette 3  I never bought this before as I didn't think I would use it much on clients as the shades were all in the pink range however I was wrong...I got this recently and I love it for a nice alternative for the usual champagne tones I find the pink is a nice compliment to my paler winter skin tone. I also love The Basics Palette these matte shades are divine and a real make up bag staple so if you feel like keeping classic this is a great option.

{document it}

I just spent a small fortune on a one image download of Ollie's school photo yes they look cute and it's the Primary 1 picture so I felt obliged to buy it but if I had been smarter (and more organised) I would have done a lifestyle shoot with all the whole family.  Most people have fabulous photographers that are local to them, I have met some lovely, creative, talented ones on the wedding circuit, a lot of them also offer fantastic lifestyle packages too. You could document a wintry woodland walk, if your really on the ball you could find a field of daisies somewhere and roll about laughing, having a professional photographer following you and capturing it all just sounds extravagantly good fun!

One Big Picture Photography offer a fab lifestyle package where you get gorgeous images, have a fun shoot for the whole family and the resulting pics will give you tons of present options for the grandparents, aunties and great Nan's.  I would also love if someone gave me a gift like this as if you are like me it always seems to be me behind the camera when my kids are about.  For the full celebrity treatment book yourself in for hair and make up to really shine in your pictures....why not try Made Over Ladies ;)

{give the gift of experience}

We all deserve a treat from time to time and often after Christmas money can be tight! Why not opt for giving the gift of a lovely recharging massage or facial, a cinema trip or what about a lovely meal out?  If your recipient has kids maybe you can throw in the offer of babysitting too?!

Angels with Bagpipes- I love the look of this restaurant. Fine dining, gorgeous décor and old Edinburgh atmosphere to accompany your meal.  I'm drooling whilst reading the menu!

If you can't afford a big gift like a full meal out why not opt for something you know they will appreciate find out what they like ie red wine, jelly beans, prosecco, cured meat just ask them what's their treat and give them that!


Have a lovely festive season and enjoy all the planning and shopping try not to go too crazy...x


Thursday, 27 November 2014

Time saving tip for silky soft skin!

Hands up if you let your skincare/beauty routine slide in the winter? I dare you to reach down roll up your trouser leg and have a feel! Is it dry and scaly?? If so you need to up your moisture.  I for one can never be bothered applying moisturiser after my shower in the winter. It's toooo cold but equally I don't want scales....eurgh.

Here's my three step routine for fabulous skin all year round.

1. Drink more water. There's no getting round it you need to drink it to let it hydrate you, no exceptions. 

2. Dry body brushing. I've been doing this for over a year it's really helped with circulation and just the general condition of my skin. Work upwards in the direction to your heart. It literally takes minutes and you can do it will the water heats up try this one.

3. Buffy from Lush.  This has been a staple in my shower for quite some years.  I love that it exfoliates gently and leaves a layer of moisture on your skin which sinks into your skin through the course of the day such a fab time saver (and shiver saver!)


Enjoy your newly silky soft skin x

Wednesday, 19 November 2014

Finding Forest Fairies...

When it gets to this time of year and there's an ounce of sunshine I try to get out there and make the most of it.  What fun we had on our recent walk, there was stick collecting, puddle jumping and perhaps the most surprising... forest fairy finding!


Ok so we've yet to locate an actual fairy but I'm quite adamant they are nocturnal...here's hoping x

Friday, 7 November 2014

Moonstruck 3D Fibre Lash Mascara by Younique...

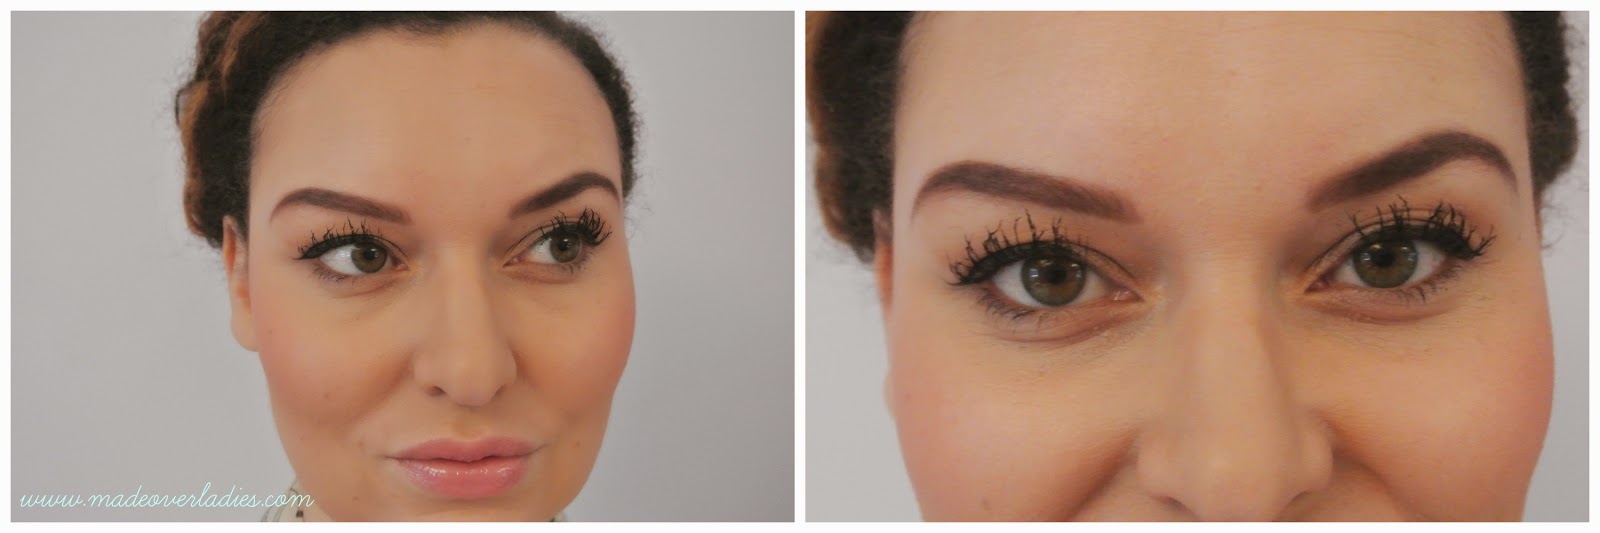
So you have probably heard the hype about the Moonstruck 3D Fibre Lash Mascara by Younique, it comes from America and there's a good chance you have seen it all over Facebook claiming it to be the next big thing when it comes to lashes.  I've had the chance to wear it a few times now so think I'm in a good position to let you know my thoughts on it. 

Mascara's are one of the things in my kit I rarely spend more than £10 on I'm a regular buyer of Max Factor False Lash Effect or L'oreal Double extension as I often apply individual lashes to add volume and length to my clients lashes.   My clients love the look of the lashes but this is a fiddly job and difficult to apply on yourself so I'm often asked for alternatives.  I think this mascara is a good alternative to do just that.  Price wise the mascara is £23 plus postage from america so not cheap for an everyday mascara but as an easier option than false lashes and a cheaper option than semi permanent eyelash extensions I think it definitely is good value for money.


Here's how to apply:


Do your eyes first (prior to foundation etc) as this can be a bit messy....

1. Curl your lashes with a good quality lash curler (I reccommend The Shu Uemeru Curler)
2. Apply a coat of your regular mascara and allow to dry (I have tried the 3d mascara with and without my regular mascara and I recommend doing this step.  You can do it without but you get better results with)

One eye at a time for the next steps:
3. Apply the 'Transplanting Gel' first (this is just like a black mascara
4. Apply the fibres (you'll see lots of fall out on your under eye area)
5. Quickly apply another coat of the Transplanting gel (this keeps it all in place)
6. If you want more lashes...repeat the process.

Be warned... it's a bit addictive!  After cleaning up the fall out I went on to finish the rest of my make up. I followed my five minute flawless foundation technique then my easy contouring with powder. 

Then I took a step back had a look and then decided to add another coat!!


So what's my thoughts...

  • I like it.  It's an easy process to apply (yes I wouldn't be spending time on it every morning prior to the school run) but I would wear as an alternative to falsies for a big night out or if I just feel like adding a little extra drama.  
  • It's easy to remove.  I recently stopped wearing waterproof mascara as I just found it too tough to budge every night and I really want my lashes to be clean when I sleep to really let them breathe and regenerate as I sleep.  I did my usual technique to remove which is soak 2 cotton pads in an oil based make up remover and press over my lids for about 30-60 seconds then gently wipe away.  This minimises rubbing at the eyes but ensure the product is all soaked off.
  • It's fine for my sensitive contact lense wearing eyes.  I was a bit worried about the fibres flying everywhere and getting trapped in my contacts but there's been none of that.
  • If you like a slightly clumpy finish then this is for you.  It you like lashes to be separated and long this probably won't suit you but I like a clumpier and dense finish.  For optimum depth to your lashes follow my free hand liner tutorial and you can come through to give more separation if desired.
  • I don't like the mess it makes in application (lots of fall out) but to be honest it's not an issue if you do your eye make up first which I think is the most efficient way to apply your face.
  • If you have been wearing extensions for a bit too long and feel you would like to try an alternative you might like this there has been some blogs mentioning the mascara might not be good for your lashes but I believe as long as you remove the product well overnight and you give your lashes a break every now and again I don't see why this would cause more damage than a regular waterproof mascara.  If this is something you are worried about supplement your lashes with a good quality lash serum.
  • It takes a wee while to arrive from the US (approx 7-9 days) and when we are used to being able to get our hands on things on next day delivery this can be frustrating.
  • Sorry I have not done the cry test on it yet so can't 100% confirm whether it is waterproof I definitely wouldn't go swimming in it but it did manage a 20 minute walk in the Scottish rain without running anywhere.

Impressed?? I am slightly addicted I have to say so if you would like to buy you can do here or send me a message on amy@madeoverladies.com there's also lots of other products to have a look at too!!


Here's the finished look...


Monday, 3 November 2014

November Wishlist

Wow it's November already that really did sneak up on me.  Here's my monthly Wishlist a round up of the products I have seen pop up that I have been lusting over....


Younique 3D Fibre Lash Mascara

When I do a make up on someone they usually always fall in love with the lashes.  It's amazing how a longer and fuller lash line can really open up the eye and just make you look so much more awake!  This mascara is a great alternative to using false lashes which can often be difficult to apply yourself.  I will be doing a full review on this product very soon here on the blog so stop by if you are interested in that or if you can't wait the link above will take you straight to where you can bag yourself one.  What I also like about this is if you don't like it they have a 'Love it Guarantee'.


Deepi Statement Pendant Necklace

I love a statement necklace! This is one of my little tricks to instantly dress up an outfit whether I'm off out to work or doing school run there's tons of these over at Accessorize and I love that there's always matching items to add into your basket!  I equally love this statement ring to go with it.


Mahabis

I admit these babies are expensive for slippers BUT they are sooo cute and comfy looking! You can change the soles up so you can have a few different colour combinations plus the hard soles make them great for popping out to the bin or letting the dog out.  I think these a the perfect combination of pratical, cosy & stylish (in a Scandinavian chic kind of way)


Damn Glamourous by MAC

Loving a dark lip right now and I especially love the name of this one.  Another fool proof way to dress up an outfit it instantly adds glamour to an understated outfit if you like a glossy finish try Rebel Lipglass.  Give your dark lip more staying power by filling in your entire lip with a complimentary lip liner such as MAC's Beet.


x

Tuesday, 28 October 2014

L'amour Glamour-Front Cover

So happy that I could be on such a fabulous team that made it to the front cover of The Best Scottish Weddings Magazine.  This is my second cover I have had the pleasure of working on and it gives me a great sense of achievement.  Shot at Ingiliston Country Club in Bishopton we were surrounded by gorgeous scenery and the beautiful sights, sounds and smells that having horses about brings! 

The gowns were show stoppers and all about all out glamour, details that could be changed up (such as detachable trains) or little quirks in design that just makes these dresses draw dropping, my favourite was the cut out detail in the red lift shot this dress really blew me away!  I chose a smokey eye using neutral and warm browns, a really fresh look to skin to keep the dark berry and red lip looking really modern and still bridal.  I think the images really show how a more dramatic make up look can still look natural, elegant and very bridal.


Photography: Hamish Campbell
Fashion: Beth Forsyth & Sarah Gillespie
Make up: Amy Hughes Made Over Ladies
Hair: Kirsty Stevenson Made Over Ladies
Model: Lauren Tempany Model Team


Monday, 27 October 2014

Simple contouring with powder


Soooo contouring then? I always get asked about this as if contouring is a new and crazy difficult make up technique but it's really not it it's been part of a make up artist techniques for years plus can be simple, quick and incorporated into your daily make up routine (if you want to).  I do it most days and it's really not complicated and really is just strategic placement of bronzer. If you want to read more in detail about it see here and here. 

Here's my easy peasy technique:
1. Choose a matt bronzer this is the Rimmel Natural Bronzer (which has some slight shimmer)other good options are Benefit Hoola, Bourjois Delice de Soleil Bronzing powder I love this tapered blusher brush by Eco tools for this task
2. Make your first sweep under the cheekbones (from the top of the ear at an angle going toward the corner of the mouth but stopping about 1 or 2 inches from the mouth)
3. Go under the jawline (you can also bring this down the decleotage)
4. Sweep down the sides of your nose and lightly under the tip of your nose
5. Optional extra- the upper corners of your forehead
6. Go over each area again adding a little bit more product if you need it.


Voila easy peasy contouring...

.

Thursday, 23 October 2014

How to do your own wedding make up- added drama!

I'm honoured to be featured on the fabulous Braw Brides once again with a new wedding make up tutorial I've opted for a budget look this time round but the products I have chosen are great quality & still long lasting and is just a little bit more drama for your big day.

If you like the look and are interested in the products click on any of the clicks below and you can buy it all online. Easy peasy!


SHOP THE POST 


Brushes I used:
Nasnshy Blending Brush- perfect if you have small eyes or need more precision!

Here's the finished look...