Adore Beauty Pty Ltd
Showing posts with label highlight. Show all posts

Monday, 27 October 2014

Simple contouring with powder


Soooo contouring then? I always get asked about this as if contouring is a new and crazy difficult make up technique but it's really not it it's been part of a make up artist techniques for years plus can be simple, quick and incorporated into your daily make up routine (if you want to).  I do it most days and it's really not complicated and really is just strategic placement of bronzer. If you want to read more in detail about it see here and here

Here's my easy peasy technique:
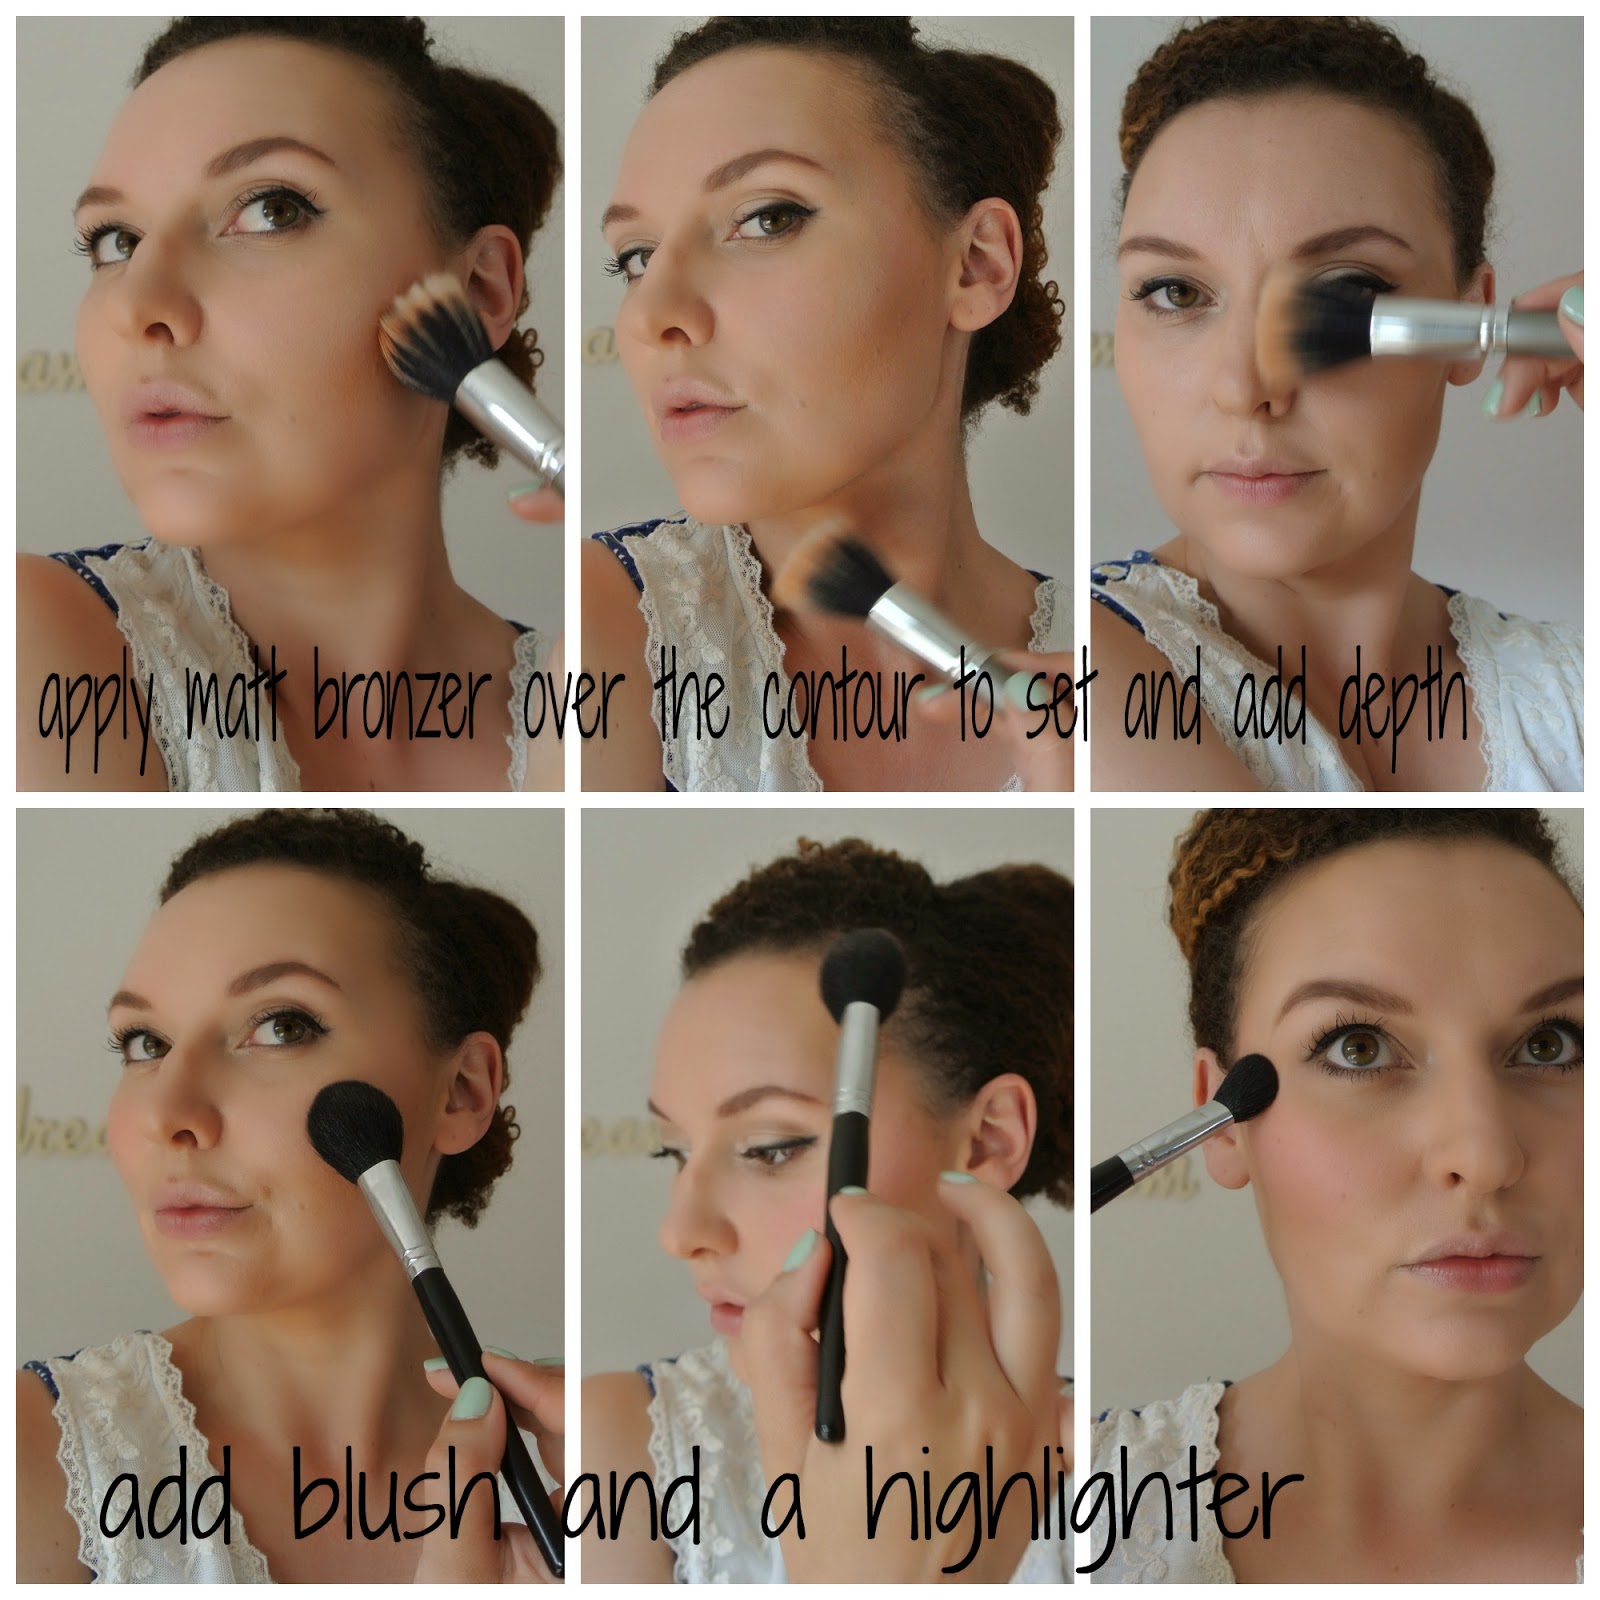
1. Choose a matt bronzer this is the Rimmel Natural Bronzer (which has some slight shimmer)other good options are Benefit Hoola, Bourjois Delice de Soleil Bronzing powder I love this tapered blusher brush by Eco tools for this task
2. Make your first sweep under the cheekbones (from the top of the ear at an angle going toward the corner of the mouth but stopping about 1 or 2 inches from the mouth)
3. Go under the jawline (you can also bring this down the decleotage)
4. Sweep down the sides of your nose and lightly under the tip of your nose
5. Optional extra- the upper corners of your forehead
6. Go over each area again adding a little bit more product if you need it.


Voila easy peasy contouring...

.

Wednesday, 2 July 2014

How to Contour & Highlight

Ladies as requested here is my quick take on contour and highlight.  My version is not complicated and doesn't include layer upon layer of product.  I use a foundation stick to ensure enough coverage but if you want more you could do this over a coat of foundation (for example something light like MAC Face & Body).  Pop to the end of this post to purchase the products you might need for this look.

You need two colours of foundation a darker colour (one or two shades darker than your skin tone) this is your contour.  The darker colour is put in the areas of the face we’d like to ‘push back’ so under the cheekbones, under the jawline, down the sides and under tip of the nose and on the outer corners of the forehead.

You also need a lighter colour (one or two shades lighter than your skin tone) this is your highlight.   The lighter colour works by bringing forward the areas you are highlighting so above the cheekbones, down the centre of the nose and the centre of the forehead.


I'm using the Maybelline stick foundations in Soft Honey & Classic ivory.  I like a stick foundation as they make the task of contouring quite easy.  Prepare to look a bit odd in between blending!


Now you are ready to blend blend blend! You are going to blend these two colours so you have no lines left starting by blending the darker colours first using a buffing brush (I like the Real Techniques brushes check out my post of the tools you need here) in small circular motions I always start at the hollow of my cheekbone.  


Next you want to blend out the highlight you can use the same brush but you may need a smaller brush for the nose the aim is to blend not so that both colours are merged into one but so there are no harsh edges.


The next step is to  follow up this process with two powders to further enhance the contour and set the make up.  I used a pressed powder over the highlighted areas and a matt bronzer over the contour.   It's not necessary to add blush but I feel naked without it so I always add a sweep of blusher between the contour and highlight on the cheekbone,  add a touch up on the temples and in the summer a touch over my nose.  I go on and conceal under the eyes and any areas that need a bit of extra coverage.  


You can then add extra highlight if you so desire with an an illuminating highlighter such as MAC soft and gentle (which I am using here) or the old faithful touch éclat.  Places I recommend doing this is top of cheekbones, inner corner of eyes, cupids bow, brow bone.  This is one of my tricks to look awake even though I may be really tired!


PS pouting in the mirror while doing all of the above is totally optional but makes the whole process way more fun!

Hope this helps you ladies in the quest to a contoured face let me know how you get on.  Now there's a new term on the street which is 'Strobing" basically you can already do this if you mastered the two step process of contour & highlight.  How to strobe: omit or downplay the contour and ramp up that highlight baby!!!