As we move into autumn/winter its the time of year we tend to get a little braver with our make up and we go for the richer and more sumptuous colours. This how to do your own wedding make up is a good balance between injecting some rich colour but still keeping it classic for your big day. Plus I have made this tutorial all with budget products because lets face it if you are doing your own wedding make up the chances are you aren't heading off to Space NK to buy all of your wedding day cosmetics....even though I know you deserve it! I have included a full product list at the end of the post. This would also be a great special occasion make up for attending a wedding or a night out.
As always I start with the eyes...
1. Start by prepping the eye with either an eyeshadow primer or if you don't have one use some concealer sparingly dabbed over your entire lid up to the brow.
2. With a plum kohl pencil draw a v shape in the outer corner of your eye (this acts as your colour base which gives the eyeshadow something to stick to and makes the colour you apply next more vibrant)
3. Blend Blend Blend. Make sure you soften the kohl right out but keeping it in a V shape at the outer corners (you don't have to be tidy here)
4. Apply your darker colour (Regal a rich aubergine colour from the sleek I Divine Au Natural palette) over where the pencil has been blended out. Use a fluffy eyeshadow brush for this and remember to keep to the outer V shape.
5. Clean up underneath the eye if you have bended a bit too far out. Use a cotton bud dipped in eye make up remover to sweep diagonally from the outer corner out towards the end of the brow. This will give a nice clean finish.
6. Pat the lighter colour (I am using Taupe) over the rest of the lid and into the inner corner.
7. Use a transition colour (I have chosen Cappucchino) to sweep through the crease, this helps to give your eye dimension and depth.
On to the liner...
8. Using a eyeliner pen (i'm using the L'oreal Superliner). Hold the pen horizontally and very tight to your lashes (make sure you are using the long side of the pen) I like to start about three quarters of the way along (this helps to keep the eye look open and wide draw small strokes along the lash line (keeping tight to the lashes) if you need to pull your eyelid up slightly to get to the lashline go ahead and do this (you don't want any gaps)
9. Once you have your horizontal line along the lash line pull the line upwards and out (imagine your lower lashline being stretched up toward your brow as your guideline)
10.Once you are happy with the length start from the point and bring it back down at an angle to make a (kind of) triangle shape
11.Fill in the gap so it's all black (you can also go over this with a black shadow if you want a softer line)
12. Go ahead and apply your mascara top & bottom (I'm using one with a primer which is applied first to lengthen the lashes) you can also apply some of the darker shadow along the lashline if you want to
Perfect the skin...
13. For wedding day skin I want it to look dewy but not shiny so I've chose a combo of primers an illuminating one for most of my face which I apply with my foundation brush and a matifying one I use over my nose, forehead & sides of nose (these are my shiny areas adjust what you use according to your skin)
14. I use two methods for applying foundation (you can read more in detail in my 5 minute tip) but basically I start by using my flat brush and sweeping some of the foundation down from the centre of my face then switching to a buffing brush to 'whisk it round' this fills in pores and any fine lines. I the move round my face doing the same two step process until I have a nice even and flawless coverage.
Safe and easy contouring...
15. In my last wedding tutorial I opted for contouring with stick foundation but without practise you run the risk of a muddy complexion (not good for bridal make up) using a powder is the easiest and safest method use a matt bronzer (this is rimmel) I always start under the cheekbones as this is where I want the most concentrated product. I sweep the bronzer from the top of my ear down in a diagonal towards the corner of my mouth.
16. Next the jawline, sweep under the jawline to shade the area below, if you need a bit more help in that area sweep down the neck and even into the décolletage.
17. Sweep down each side of the nose and under the tip of the nose for some gentle nose slimming effects and finally touch the brush over the corners of your forehead. This is what I call soft focus contouring I do it in every make up I do it means I can still see your skin but the angles of your face are emphasised in the softest of ways as we use bronzer it also adds warmth and colour to your skin.
Add blush & conceal/highlight...
18. I've chosen a soft peach blush to keep the skin looking nice and fresh I've chosen a cream blusher by revlon, just tap this up and over the cheekbones on the diagonal starting from the apple directly above where you applied your contour
19. Conceal (& highlight) they areas you wish to conceal are usually under the eyes, down the centre of the nose, mid forehead and also sometimes the upper lips, I opt for a pen concealer draw in where i want to highlight then blend blend blend
20. Also do any spot concealing here if you have any blemishs you'd like to cover
21. I then set my highlight with a loose powder and add any extra powder I require over the shiney areas
22. If you like an illuminated look sweep a highlighter over the cheekbones (above where you placed the blush) in this case I used the 'taupe' shade from my eyeshadow palette.
Get a retro brow...
23. Start by brushing the brows up and outwards
24. Using a stiff angle brush start at the arch by filling in with a complimentary eyeshadow. If you are going for a retro brow extend them outwards here at this peak then start moving the brush downwards on an angle, go ahead and fill in the rest of the brow keeping the start the most natural (go lightly on product less is more here)
25. Use a dab of concealer to highlight on the brow bone and just above the arch (this has the effect of a brow lift) you can also use whats left on your concealer to correct any mistakes you have made or to soften the arch if you've made it to pointy
The drama part...
26. I've opted for a dark lip for this look I start by lining the lip if you don't like a fully lined lip follow the guide below then blend all over with a fingertip
27. Pack your lip brush with your lip colour and apply starting from the centre of the lip this way you can really work it into the lips to create a stain then as you work outwards to the lip line you can use the brush to perfect the line getting right into the corners of the lips and sharpened out the cupids bow
28. Blot the lips
29. Reply & then if you like an uber glam look apply a complimentary dramatic gloss
Add more drama with lashes...
30. Your finished eyeshadow should look something like this adding individual lashes just adds more drama
31. I came across these little bunched lashes in Superdrug and I love them for self application and comfort...I find them much more comfortable than a strip
32. Whatever lashes you choose the application is the same. Firsty put a drop of lash glue on the back of your hand and dip the knotted edge lightly in the glue then let the glue dry a little bit (count to 30ish) before you apply.
33. You are aiming to put the lashes on top of your own lashes and get them as close as you can to your own lash roots use tweezers to 'tuck' the lashes in behind your own natural lash.
35. Apply 3 of these bunches to each eye and allow the glue to dry or 6/7 individuals all the way across
36. Once its all dry go back in with your liner and paint over the lash glue.
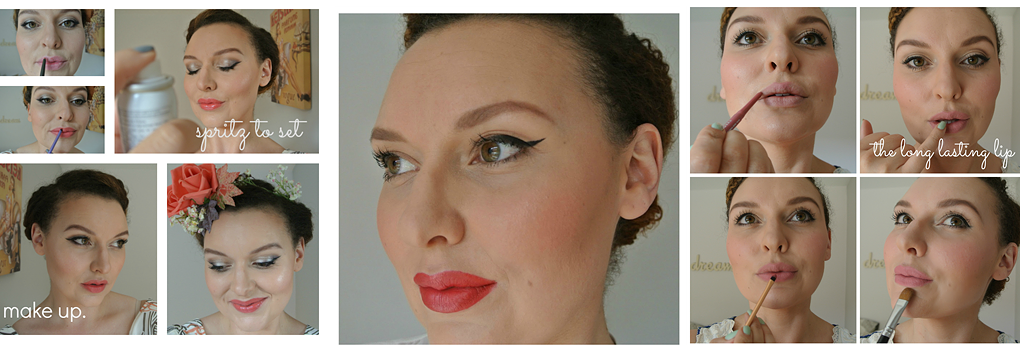
Here's the finished look...
Not ready for a dramatic eye & lip combo? I added an alternate lip just in case you wanted a more neutral but still gorgeous option. This peach lip is Max Factor's Pink Brandy. I finished off the make up with a spritz of Evian's Spring water which keeps the skin fresh and helps your make up last. Great to take along with you and spriotz through out the day.
Let me know your thoughts ladies and if you try it out? And what do you prefer the Berry Stained lip or the soft peach lip?
If you like my flowercrown...pop back over to the blog next week for a DIY flowercrown tutorial.
SHOP THE POST
Brushes I used:
perfect if you have small eyes or need more precision


.jpg)