Adore Beauty Pty Ltd

Wednesday 10 December 2014

3 Make up Brushes to treat yourself to.

So I have a full list of brushes that I think you should have in your arsenal way back in the early days of my make up DIY series #molmakeuplesson2 but there's just so many brush options to treat yourself to and just help make doing your make up something special so here we go....splurge time!


{The Fan Brush}


Well isn't this a girlie little number!  I love a fantail brush when I want to do something lightly and subtly with make up.  So I would go for this if I wanted a light dusting of powder to set my skin or if I wanted to add a highlight to my cheekbones, or down the bridge of my nose.  If you can be heavy handed when it comes to make up this is a good option to keep it light!  Have a look for yourself here.

{Optical Blurring Brush}


Ohh I am almost drooling here!  I always say when it comes to topping up your make up you should buff out what you already have on your skin before applying more! So when I came across this I was instantly in love.  You could use it for applying your foundation or take it with you for buffing emergencies!  Have a look for yourself here.

{Blending Brush}


I know it sounds a bit boring but a good quality blending brush is the answer to your eye make up dreams... a fluffy brush like this that can really get into the crease of the eye perfect for the socket line eye make up or just for blending in a transition colour for a smokey eye. Have a look for yourself here


How to apply concealer to look fresh and awake!

Next in my series of how to take your make up from day to night...

I sometimes do this routine just to freshen up my look if I'm off out somewhere and literally have ten minutes to get ready, sometimes this is all I do base wise if I am in a rush doing the school run for example.  It's a combination of concealing and highlighting that results in a nice fresh and awake look.  You do this AFTER you have applied your usual foundation.

{how to}

1. Apply approx 4 strokes of a brightening concealer downwards fanning out following the shape of your eye with the last one winging outwards in the direction of your ear (bringing the concealer up like this really brightens the full under eye area and has a highlighting effect)
2. Using a damp beauty blender or your finger pat the concealer from the inner corner outwards blending as you go upwards towards the temples
3. If you want to set the concealer in the same manner with a translucent powder
4. Follow with a sweep of blush directly under where you have put your concealer starting at the apple and sweeping upwards to temple.

So simple but can really freshen up your look!

{tools & products}


For more tips on how to take your make up from Day to Night check back on my previous posts


Tuesday 9 December 2014

How to make a glitter dipped feather garland

A few of my favourite things right now are feathers, arrows and angel wings.  I've always been aware of symbols and what their meanings are (well to me anyway) and I have always chosen to surround myself with little reminders hence why when you come into my home you'll see lots of 'word art' and my jewellery and little trinkets usually all hold some symbolic meaning to me.  I think in such a busy world and busy life we need little minders to keep us grounded and just refer us back to our own values.  This is probably why I was so in love with the the Pandora feather ring in my October wishlist  and the angel wings earrings in my gift giving guide have a look if you missed these are both are gorgeous!

I wanted to share a little DIY on a glitter dipped feather garland, partly because I think it would make a gorgeous chic Christmas decoration and partly because I can't wait to share an image of the garland in action from a recent Made Over Ladies photoshoot, the garland in question will be adorning a wall somewhere in my new home and I can't wait to get it up!

{how to}


1. Paint the glue onto the tip of the feather, you can chose just how glittery you want them but I just went for the tip as I wanted them to look glitter dipped.
2. Dip the glued tip into a little pot of glitter and give them a bit of a shake to remove the excess
3. Leave them out to dry in all of their glittery glory
4. You have a few options now if you chose to make them into a garland you can use a long length of natural string and knot varying lengths of string all the way along attaching a feather at the end of each length.  I use knots and then a spot of glue on each knot to keep them in place. You could place them all in a cute little jar on your mantle (instant christmas decoration). I gave a few to Kirsty which she put in with some flowers and wore in her hair to our friends wedding or you could go all out and make yourself a full feather crown like I did for this shoot....


Photography:  Karolina Kotkiewicz 
Hair, Make up and Styling: Kirsty Stevenson & Amy Hughes at Made Over Ladies
Flowers by Kirsty at Made Over Ladies
Cake: Vanilla Heaven Bakery (dressed by Vintage Gathering)
Models: Brogan & Kyle

I got all my supplies for this garland at www.hobbycraft.co.uk


The Audrey Brow- how to get a retro brow.

Mirror, Mirror on the wall...who has the most fabulous eyebrows of them all?

There is so much choice for eyebrow shapes out there and when you get yourself the right tools and with a bit of practise you can really choose what shape you are going for and use it as a new way to change your look up.  You do need to be mindful of your own natural shape for example my brow shape isn't naturally as straight as Audrey's but its amazing what you can do I often do this for an evening look and is one of those subtle add ons you can do to take your look from day to evening.  Perfect for those Christmas parties!


{brow inspiration}


{how to}


1. Take your spoolie (or clean mascara wand) and brush your brows up all the way along, if you have naturally bushy brows (lucky you!) you can start brushing the tail down towards your ear instead of up.
2. Perfect the arch- dip into your product and draw quite a sharp but small line outwards at the top of your brow (we are going for a slight angle outwards and not upwards as we are not trying to do angry brows) work down with whats left on your brush in small strokes down through the depth of the brow. If you feel it's looking too pointy smooth your finger over the outer point which will gently blend it out.
3. Do the tail- from the outwards arch work (with small strokes) down the tail. It's up to you how far you bring the tail but bear in mind the longer you go it will start to drag the look of your eye downwards (Audrey has quite a short tail)
4. Back to the start- work the product through the main part of the brow but still start at the arch and work forwards, your brush strokes as you get closer to the start should be moving upwards but still holding the brush at a horizontal angle.
5. Add a little bit of concealer above the brow for a lifting effect and on the brow bone as a highlight.
6. Optional- finish with a brow gel to keep it all in place and define hairs.

note...you don't need to keep dipping back into your product at each stage just keep stepping back and assessing.

{The finished look}

{tools & products}

  • If you are using a shadow or gel you will need an angled brush, stiff bristles are better.
  • A spoolie (if you have a used but clean mascara wand you can use that) or if you fancy a splurge I like this one by Blinc as it's double ended
  • You can also get eyebrow pencils that have the spoolie end like this fab one by TOPSHOP if you are using a pencil hold it at a horizontal to your brow.
  • I personally prefer shadow here I am using espresso by MAC.
Do you have a brow icon???

Monday 1 December 2014

Don't waste your money this Christmas...December Wishlist and some giftgiving wisdom.

Oh it's that time of year again! I've been doing lots of thinking recently about the amount of 'stuff' we accumulate and have been doing alot of reading about ideas for making good choices for Christmas presents (pop over to Slow Your Home for some fabulous tips that I'll be taking on this festive season). Maybe it's because for the second time I have just finished packing up my whole life which really highlights how many possessions we have and how liberating it is to really pare down to the stuff that we really love, need and choose to have filling our space. I'm trying to shop smarter for Christmas and really make sure I'm giving gifts that mean something to my family & friends.

So here is my Christmas wishlist and some present buying words of wisdom too!


{support small business}

As a small business owner myself I understand the importance of supporting the little guy I feel almost altruistic handing over the cash when it's to someone I know works really hard for it and has given me something that little bit more unique, one off or just that I know there's been effort put into it by a hard working someone in similar shoes.

The Ugly Duckling Shop- If you live in or close by to Edinburgh you absolutely must stop by this shop.  It is full of handpicked, sparkly, gorgeous little items that you can treat the loved ones in your life to!  There's also stunning unique furniture pieces, sweet little cards and beautiful home decor it's definitely worth a walk around! So out of all these goodies my pick this Christmas are these gorgeous angel wings earrings.  If you mention Made Over & Me you will also get a extra special treat of 20% off!

{give quality not quantity}

What would you rather have lots of little things that you just don't really need or one thing that just really blows you away? I think quality trumps quantity every time on the most part these days I try to choose one thing that will really fit the bill rather than a few bits and bobs that might fill a gift bag better. Where possible I will also include a gift receipt so that if I do get it wrong at least there's the option to return it.  This is one of the perks of buying from a big retailer.

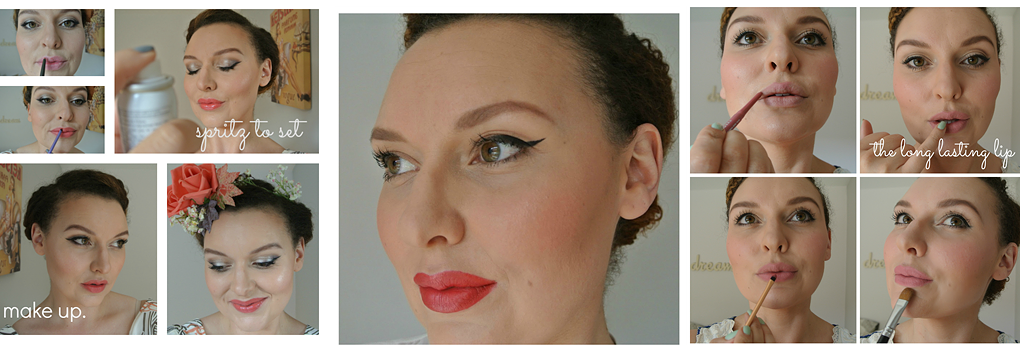
My pick obviously falls in the make up category and this time it's the Urban Decay Naked Palette 3  I never bought this before as I didn't think I would use it much on clients as the shades were all in the pink range however I was wrong...I got this recently and I love it for a nice alternative for the usual champagne tones I find the pink is a nice compliment to my paler winter skin tone. I also love The Basics Palette these matte shades are divine and a real make up bag staple so if you feel like keeping classic this is a great option.

{document it}

I just spent a small fortune on a one image download of Ollie's school photo yes they look cute and it's the Primary 1 picture so I felt obliged to buy it but if I had been smarter (and more organised) I would have done a lifestyle shoot with all the whole family.  Most people have fabulous photographers that are local to them, I have met some lovely, creative, talented ones on the wedding circuit, a lot of them also offer fantastic lifestyle packages too. You could document a wintry woodland walk, if your really on the ball you could find a field of daisies somewhere and roll about laughing, having a professional photographer following you and capturing it all just sounds extravagantly good fun!

One Big Picture Photography offer a fab lifestyle package where you get gorgeous images, have a fun shoot for the whole family and the resulting pics will give you tons of present options for the grandparents, aunties and great Nan's.  I would also love if someone gave me a gift like this as if you are like me it always seems to be me behind the camera when my kids are about.  For the full celebrity treatment book yourself in for hair and make up to really shine in your pictures....why not try Made Over Ladies ;)

{give the gift of experience}

We all deserve a treat from time to time and often after Christmas money can be tight! Why not opt for giving the gift of a lovely recharging massage or facial, a cinema trip or what about a lovely meal out?  If your recipient has kids maybe you can throw in the offer of babysitting too?!

Angels with Bagpipes- I love the look of this restaurant. Fine dining, gorgeous décor and old Edinburgh atmosphere to accompany your meal.  I'm drooling whilst reading the menu!

If you can't afford a big gift like a full meal out why not opt for something you know they will appreciate find out what they like ie red wine, jelly beans, prosecco, cured meat just ask them what's their treat and give them that!


Have a lovely festive season and enjoy all the planning and shopping try not to go too crazy...x