Winged eyeliner...it's one of those things that can be soo right but can go soo wrong, it could easily make you late for work or a night out you could literally spend a good half hour trying to 'even' those flicks out. Let me tell you now the face is not symmetrical so trust me if you are trying to get those flicks perfectly symmetrical you should just give up now!
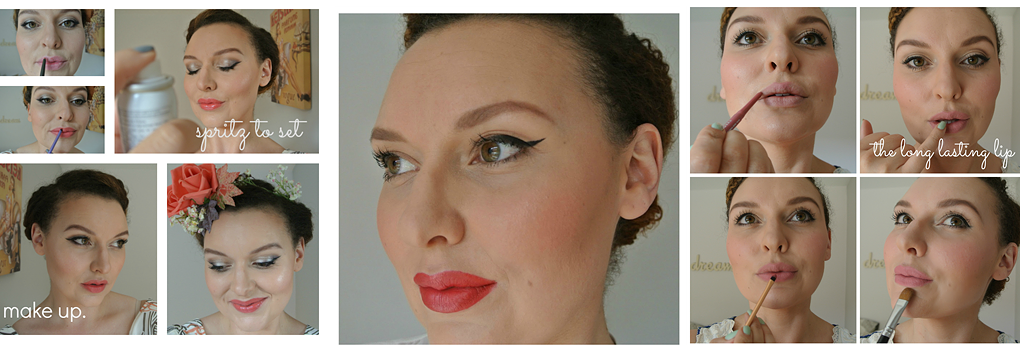
Here's my 'how to' for an easy winged out look there's special 'item' that makes this so super easy but I'm not going to mention it yet you will need to read on to find out. I've paired mine with a classic red lip, fail safe classic look...I love it. My liner of choice for this technique is L'oreal gel intenza.


So what's going to make this look so easy for you! Fanfare please....sellotape! It's going to keep the flick nice and clean and sharp. Take two short strips and stick it to the back of your hand a few times. Stick the tape at an angle that follows your lower lash line upward towards the tail of your brow. Once you are used to doing liner you will be able to do it freehand and this would be the imaginary line you would be drawing.

With your gel liner dip a fine liner brush into the pot and go ahead and draw your wing it doesn't matter too much if you are a bit messy and go over the tape but you do need to keep it tidy on the inner edge. Once you've done the wing use your long edge of the brush to line the lash line. How thin you go depends on your eye shape I generally keep it quite thin and leave the inner corner liner free this gives the eye an open look. If I wanted something more feline I would go ahead and line right into the tear duct. Then go ahead and lift your eyelid up gently and coat the underneath of the top lashline. This keeps it all nice and black with no skin peeking through. Pull the tape off from the bottom inner corner upwards and outwards towards the brow.

So you have your liner! Now for a few finishing touches. I always 'set' my liner by pushing a matt black shadow over the the gel liner using an angled brush. It keeps it in place and adds to the intensity. If you want to to can also connect the wing on the lower lash line. To do this you would use the same black eyeshadow and push it from the wing close to the lower lashes (you can chose how far along you'd like this to go) Next, apply your concealer (if you do this step first the tape will take the concealer with it) add mascara upper and lower, an extra sweep of blush and you and your reasonably perfect liner are out of here!

Let me know if this works for you ladies! Comment and tell me what eye makeup technique you would like next x
{More on how to do your own make up...}
The Make up brushes you NEED
Using your fingers to apply your make up
Intro to doing your eye make up and why I do eyes first.
How to do a smokey eye.
Using your fingers to apply your make up
Intro to doing your eye make up and why I do eyes first.
How to do a smokey eye.
or if you are Melbourne based and would like to book and one on one lesson or special occasion make over read more about my make up services here.
{You can buy all the products I used here}
*contains affiliate links*
L'oreal gel intenza
Real Techniques Core Collection
Real Techniques Starter Brushes
Napoleon Colour Disc (Trench Coat)
Fine Liner Brush
{You can buy all the products I used here}
*contains affiliate links*
L'oreal gel intenza
Real Techniques Core Collection
Real Techniques Starter Brushes
Napoleon Colour Disc (Trench Coat)
Fine Liner Brush