Adore Beauty Pty Ltd

Friday, 25 April 2014

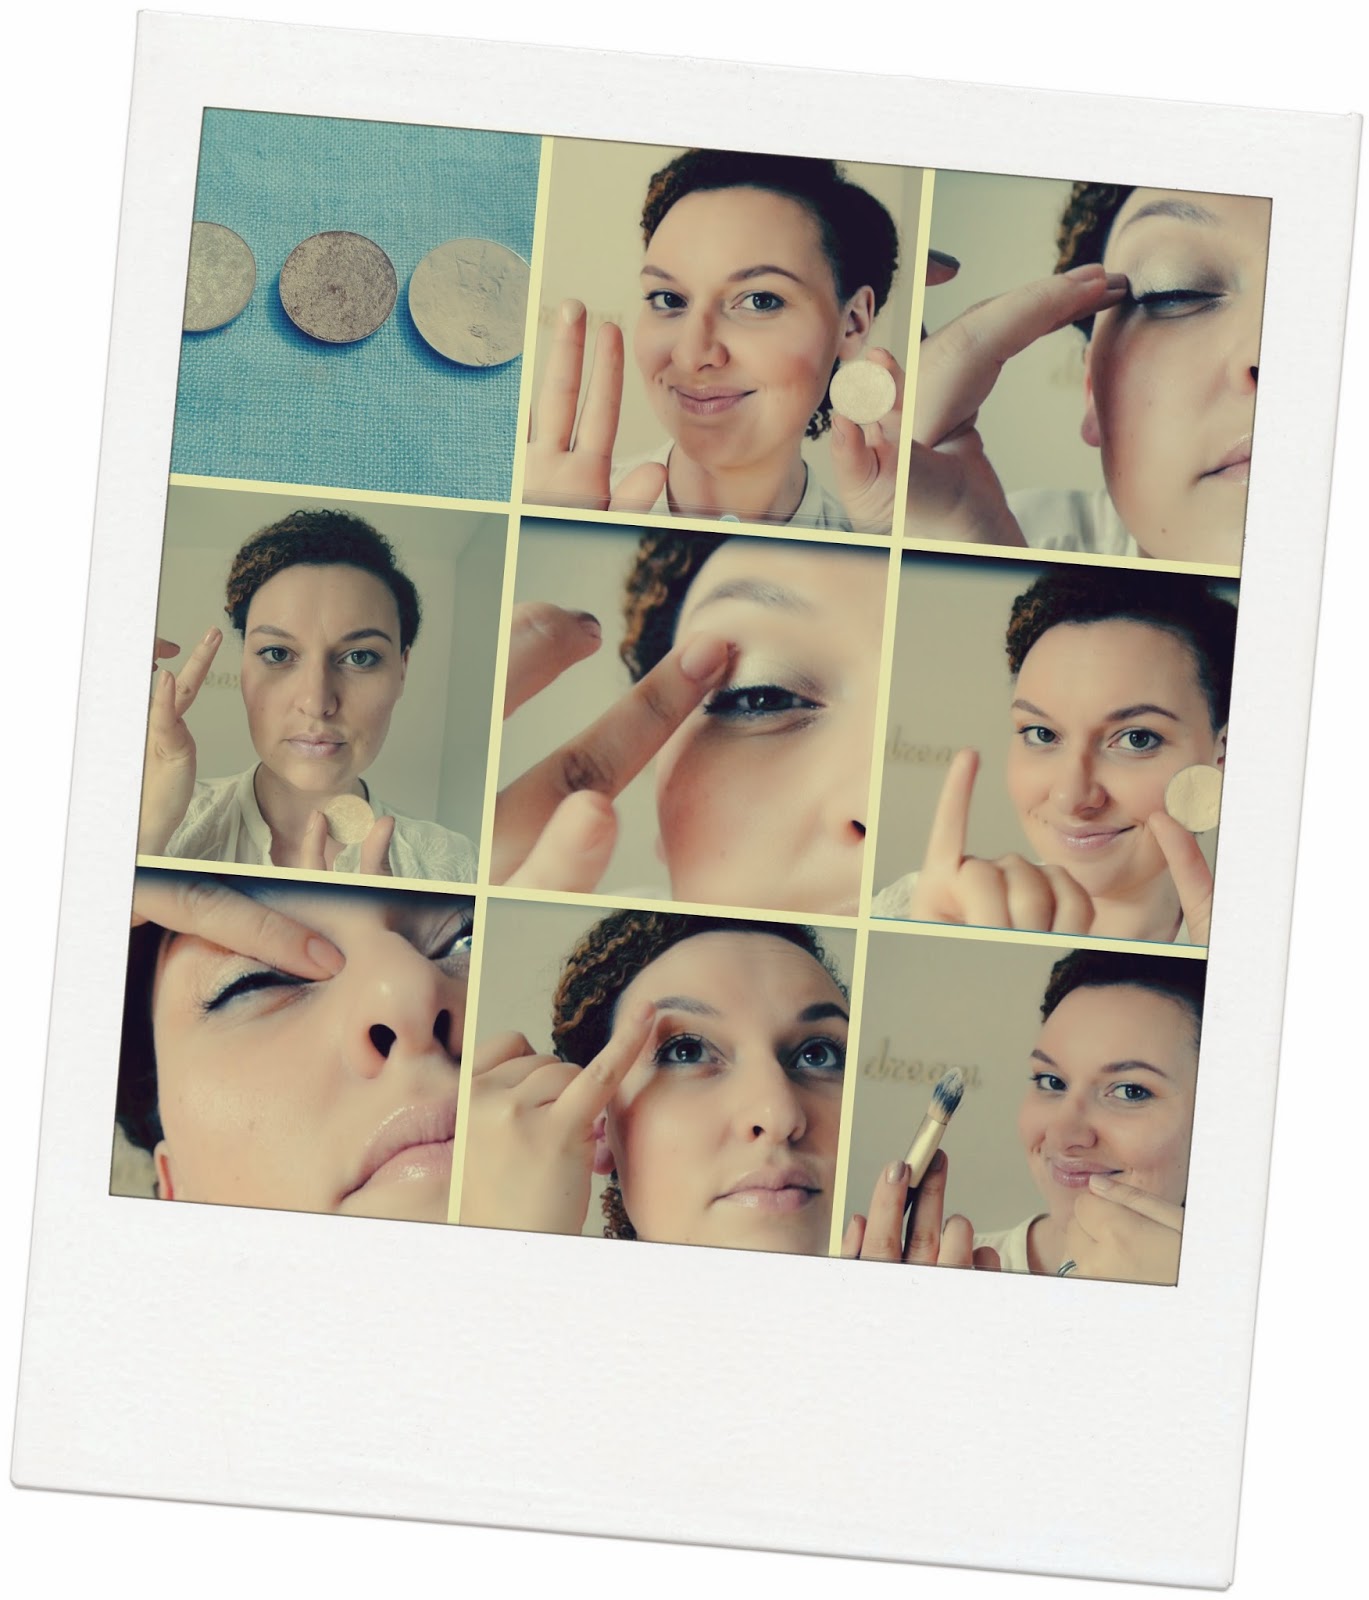
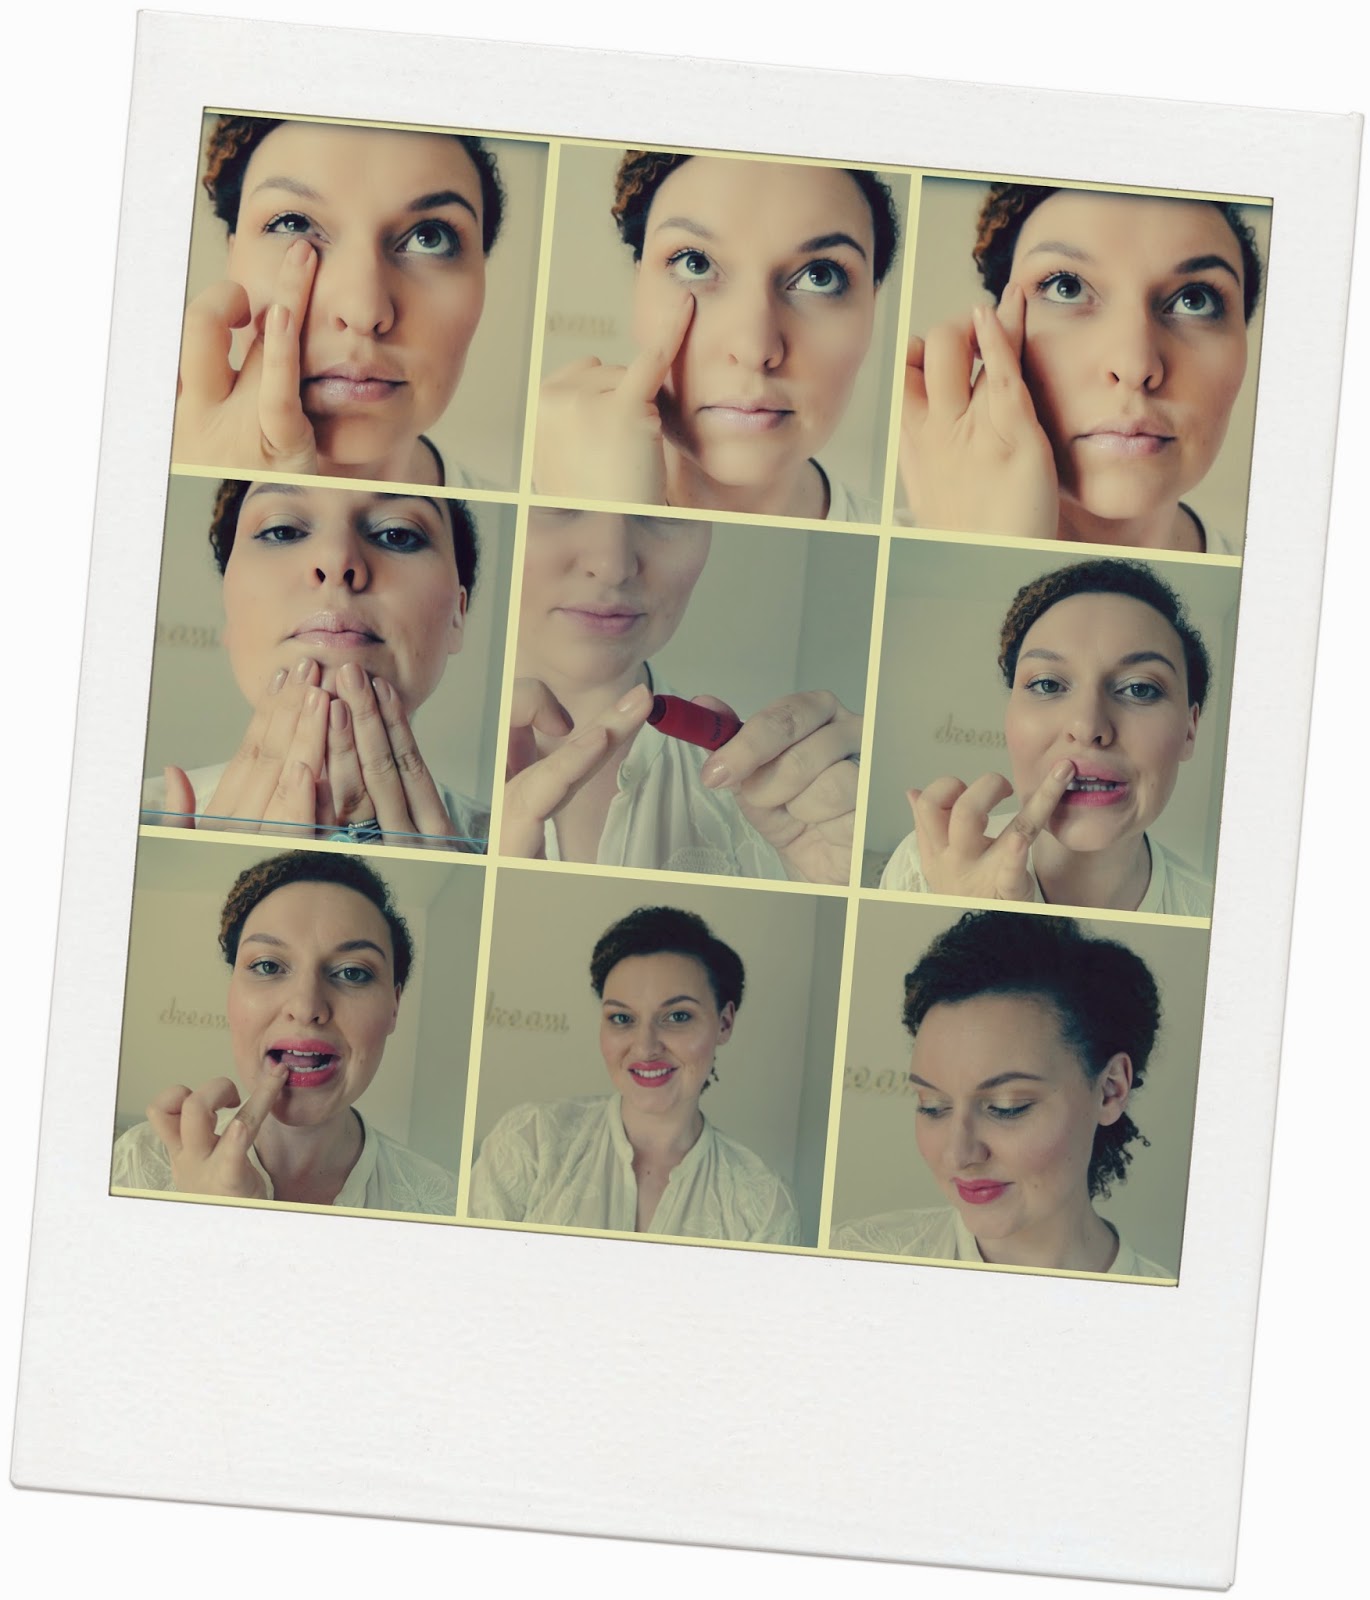
Using your fingers to apply make up.

As we discussed in the last lesson, catch up here , a set of brushes is going to make things a whole lot easier for you when it comes to make up however I think your fingers are an invaluable tool in make up application.  I remember when my friend was pregnant I took her into MAC for a treat to get her make up done and the makeup artist thought is was actual blasphemy when she said sometimes she used her fingers for applying her make up...really?  Maybe it's because I don't have to sell brushes as part of my job but personally I think provided they are clean and you use them in the right manner go for it I say.  Here's my best finger tips...


  • Use your left hand for your left eye and your right hand for your right eye. Why? The orientation of your finger tips works best this way and blending should go from inner corner towards outer corner
  • Use your ring or middle finger for applying eye shadow all over the lid in a patting and then swiping motion 
  • Press the pad of the ring finger in a darker shadow and apply this right into the crease and outwards and down into the outer corner and the same back up again
  • For inner corner highlight press your little finger into a lighter shade starting at the inner corner sweep slightly up into your crease and then the same on your brow bone
  • A note on textures- as I used two shimmery shades here I used a matt texture as my highlight


  • Feel free to apply your foundation with your fingers (I prefer a brush this one is Boots No7 Foundation brush)
  • Pat and press your foundation into your skin to 'mold' your foundation into your skin (this makes sure you're not left with brush marks)
  • Using your ring finger pat pat pat your concealer under your eye along and up the outer corner of your eye and down towards the outer corner of your mouth
  • Use your fingers to pat a cream blush up over the cheekbone.  If you dont have cream blush maybe you could use your lipstick (think multi-use people!)
  • Add a sweep of your lighter shimmery eyeshadow over the top of the blush to act as a highlight
  • Press your middle finger into a bright lipstick and dab and work into the lips to create a stain finish up with a dab of lip balm.
So it's likely this won't be your special occasion face but it could be your go to the park with the kids face, meet the girls for coffee face or your 'oh my god i'm so late but I won't scare anyone' face...  It's pretty much my go to face and I hope it works for you!

{More on how to do your own make up...}


or if you are Melbourne based and would like to book and one on one lesson or special occasion make over read more about my make up services here

Wednesday, 23 April 2014

Do not disturb...make up lesson in progress...


I had the pleasure of spending a morning with my good friend Lynne and her lovely mum Norma to do a make up bag review and a make up lesson.  We had identified a few things the ladies wanted to work on before the lesson for Lynne it was mastering an eye make up look and creating something herself that she could wear day and night.  Norma wanted to really go through her make up collection and decide what was maybe no longer age appropriate or what would and wouldn't work for her.  How brave are these ladies make up free and about to dive into their first lesson!


We started off doing the clear out and wow what a collection of make up these ladies have but both said admittedly they had hardly ever used it.   We were ruthless we got rid of anything that was too old, the wrong shade, that didn't work the way we wanted it to or that I didn't think would work for them.  Here are the rejects...

It's a good idea to do this if you have a make up bag full of products you don't use or don't know how to use.  Embrace the spring clean feeling and get rid of it!  It's only taking up space and breeding bacteria!  Rummaging through old and unused products will just slow you down a clean kit of products you can rely on is the way to go.  We did of course find the good and the bad.  Norma had the perfect neutral palette of warm browns that complement her eye, skintone and hair colour perfectly.  Lynne had her go to primer and foundation that works a treat for her.  It's about finding what works for you and adding in products and tools that make your routine easier & better.


Getting down to business...after we filtered through the vast collection of make up the ladies had I picked out what I thought they should be using as their staple products between that and the goodies I brought along there was plenty to get started with.  We did a combination of demonstration and DIY techniques and both ladies finished a complete look on themselves.  I filled out a face chart (shopping list!) for both detailing products that I think would work for them both. 

Here's my lovely ladies with their completed looks...


Lynne said "I absolutely loved my lesson, learned loads and opened my eyes to doing things in a better way.   I'm no longer terrified to explore the make up section in Boots!!  I used to have a straight in straight out approach or stand staring blankly at the shelves hoping for the right product to leap into my basket. Now I'm happy to wander round and try things because I know what to look for. Amy's lesson was informative and fun. I would recommend the lesson to anyone who knows they need some make up help and for people who want to be excited by make up again!"

Norm said "I really enjoyed the lesson and learned a lot.I had a good overhaul of make up collection which was what I wanted.I found the whole experience enjoyable and enlightening. Friendly approach with honest comments given. Not rushed and relaxed. Lots of information and advice given regarding brushes and foundation and eye make up"

I had a lovely time with Lynne and Norma and we probably could have talked about make up all afternoon it really is a minefield.  Make up to me has always been something I was comfortable with, yes, I haven't always got it right but I have never been scared of experimenting and trying new things.  If it doesn't come quite as easily to you or you want to overhaul your make up bag get in touch with me.  I'm not saying one lesson will teach you everything you might ever need when it comes to make up but it might get you thinking differently about things, push you slightly out your comfort zone were you might be keen to experiment and let you know whatever you are doing isn't wrong there might just be different or even better ways to do it!

Don't forget to follow my DIY series #molmakeuplesson (links below) which is a weekly series to teach you the basic steps in make up and give you some tip offs on tools and products along the way.  Feel free to comment and ask questions if you have any.

*Thanks to Lynne & Norma for being my make up lesson guinea pigs, completing the pre & post lesson homework and giving me honest feedback don't forget that this is a process and getting comfortable doing your make up probably isn't instantaneous but enjoy the practice and don't be afraid and i'm never far away if you need some help!* 

follow the links for....


Sunday, 20 April 2014

Happy Easter from Made Over Ladies...

Spring is my favourite season I love all the blossoms, lighter nights, the lambs, the yellow spring flowers, and of course, the Easter Eggs! This year we had a Made Over Ladies egg hunt with the little ones and I'm not quite sure who had more fun!

Kirsty had decorated the the house beautifully paper pom poms and hand stitched Easter bunting framed the front entrance.  


Time to get this hunt started! The kids had a ball looking for clues and seeking out those eggs!


Proud of their finds these wee happy faces make it all worthwhile.


Time to work it off...egg & spoon race! All lined up and ready to go they were so good at this and there was only a few splatted eggs.  Morven won for the bigger kids & Evan took the gold for the little ones! 


We finished off the evening with playing out late in the sunshine, munching on eggs whilst us mummy's chilled in the evening sun. 


Poppy managed to take five minutes out for a quick pose!


Happy Easter to all our family & friends,

Amy & Kirsty xxx


Friday, 18 April 2014

Storyboard- 'Homecoming'

Today is our 5 year anniversary.  When I look back on our wedding I'm reminded of all the love and generouisty that surrounds us, the happiness that I felt that day from waking up feeling like it was Christmas morning, my dad walking me down the aisle, our first kiss as husband and wife to dancing the night away with all our family and friends.  It's a feeling I will always carry in my heart wherever I am. 


Love you honey happy anniversary x

Thursday, 17 April 2014

The Make up Brushes you NEED.

The word NEED is the key word here!!  The make up brushes you hold in your arsenal are there to make the task of make up easier. I have lots of brushes in my professional kit and I wouldn't expect any one person to need the same amount of brushes to use on themselves. Fact is sometimes too many brushes can be confusing! I'm sure if you go to a make up counter they will have a lot of brushes on offer that you don't necessarily need but they certainly can help in making doing your own make up easier , better and making it more long lasting. This post will give you a guideline on the brushes you require to do make up on your self and overview of the brushes I like to use.


When I bring out my brush roll I usually hear a little swoon and the occasional gasp yes they look impressive and they really allow me to do my job well they are made up of a combination of the original brushes I trained with (from Napoleon Perdis), a select few MAC brushes and some from Real Techniques. My own personal brushes are an even more a random selection that I've collected over the years. The fact is you will never need as many brushes as a professional make up artist as you have these wonderful things called fingers that you can supplement your tool kit with! I will come back to fingers in my next post.


{What brushes do you need?}


Here is the list I give my #molmakeuplesson clients and remember you can have more or less than these and you can use them in a multi-purpose way. 

For a flawless face: 
  • Foundation brush this can be a flat foundation brush or a rounded buffing style/Kabuki
  • concealer brush- again flat or rounded
  • powder/blush brush or both
  • Kabuki or buffing brush (if you are over the age of 20 you fill find this brush helpful!) 

Planning on making eyes at someone... you better get these on your list:
  • eyeshadow brush a flat brush for ‘laying down’ the colour
  • eyeshadow brush a fluffy brush for blending in the crease of your eye for example the infamous 'MAC 217'
  • angled liner brush
  • Eyelash curlers (shu uemura expensive at £20 a pop but trust me totally worth it!)
  • A 'spoolie' for combing though your brows or you could use a clean mascara wand

Lips are the first thing a man notices about you....apparently
  • lipbrush 
{Size isn't everything ladies!}

When picking your brushes keep the size of your features in mind. A big voluminous powder brush might be ok just to apply a layer of translucent powder to set your make up but its unlikely you will be using it for anything precise...the smaller the brush the more precisely you can use it. Maybe choosing a smaller powder brush would be better and you can multi-use to scuplt your face with bronzer, apply your blusher and use it to powder (don't forget to clean it off between each step) If you have small eyes a big eyeshadow brush isn't going to be much use to you you will likely end up getting shadow everywhere go for a smaller more precise brush or if you have big eyes a small blending brush isn't going to help your case much either!

{No messing about...buy these brushes}


I'm a big fan of the Real Techniques Brush sets and this is not  a sponsored post I've just decided to break it down and make to easier to decide what to buy.  They are beautifully soft dense brushes that last well...sometimes the descriptions are confusing for example the deluxe crease brush is not an eyeshadow brush but more a 'buffing' concealer brush so use it to buff concealer under the eyes without sinking into fine lines. Putting a big brush like this near your crease shouts out panda eye to me even in the hands of a professional! So look at the brush and think of it in it's possible multi-use forms could you use a fine eyeliner brush with a bit of concealer to pin point conceal a blemish? I think so! These are my go to brushes I recommend The Core Collection and The Starter Kit  (you can buy directly from the affiliate links at the bottom of this post) The Buffing Brush is my favourite when applying foundation it really gives an amazing airbrush style finish. This is also my go to brush for make up top up I usually 'buff' with a clean brush if there has been any settlement of the make up in fine lines or frown lines!  I also like the expert face sponge (use damp) to apply foundation and blend off hard edges off concealer/blush etc.  If you don't want a whole set and are only looking for a buffing style brush for quick and airbrush style application I recommend the Expert Face Brush.

I am a BIG fan of the Kabuki brush and all it's variations and the Eco Tools range also do these so well and are great value for money. Im also a big fab of their tapered blush brush for applying bronzer in a contouring way.  You can buy online here


Good brushes are an investment, the majority of my brushes were bought over 7 years ago but because I have maintained them and taken care of them they are still in good condition, so yes, this might be somewhat of an outlay if you are starting from scratch but there is so much option out there you can have a good selection of brushes for any budget.

I hope this has helped you in the quest to the find best make up brushes to use in your own tool kit. These brushes are all high quality with a reasonable price point so you can afford to spend a bit more on your make up! We will revisit tools in a future lesson & how you can use fingers effectively in your make up application. 

{shop the post}

Real Techniques Core Collection (Orange kit) *free worldwide shipping
Real Techniques Starter Set   (Purple kit) *free worldwide shipping
The expert face sponge *free worldwide shipping
or 


{More on how to do your own make up...}


or if you are Melbourne based and would like to book and one on one lesson or special occasion make over read more about my make up services here


Thursday, 10 April 2014

Skincare and Intro to #molmakeuplesson

This is the first of my series on make up DIY which I am doing hand in hand with make up lessons with my clients.  You can use these posts to refer back to after your lesson or if you are reading online to guide you in your make up application.  Please do not be shy and if you do have a question please feel free to post it as it may be something that someone else is struggling with.

I was astounded by the response I got requesting 'guinea pigs' to sample my new service of make up lessons.  I have always been asked about doing lessons but have always thought people would prefer to head off to their local MAC counter where you can pick up tips and redeem your money against products however I have began to realise that not everyone likes the "you've been MAC-ed look" and I must admit I do like the odd MAC makeover but I suppose I am very specific on the look I am going for and I usually like the results...recently I have been seeing these horrendous wet look eyebrows coming out of MAC so if you are heading there be sure to ask for a natural brow finish!


Anyway on to lesson #1 and I might add I am not a skincare professional this routine is what works for me & my skin.  


Skincare for me starts before bed I cleanse all the make up off and I like to do this a few different ways.  

1. With a make up remover I love my Bioderma or Sephora Waterproof Make Up Remover (you can read more about my thoughts on those here
2.With a cleansing oil- a favourite of mine is the Superfacialist Una Brennan Skin Renew Cleansing oil (have a look here) I just warm a few drops up in my hands as soon as you rub your hands together the lovely scents of rosemary and rosehip are released (it makes you feel better instantly) I like to do a facial massage and some deep  breathing as the smell is sooo good and very relaxing. 
3. With a babywipe after a night out...oooh I'm so naughty! As long as you get the make up off it doesn't really matter how you do it!
image from www.luuux.com

Here's a fab image on facial massage I do this most nights before bed and I prefer to use an oil, either my cleansing oil or I use a deep hydrating oil which sinks into the skin.   You can treat yourself to a host of gorgeous oils but I really love using natural oils such a pure coconut oil too or good quality carrier oils.  With benefits such as skin plumping, firming and radiance boosting can you really afford to not give facial massage a try! 

On really dry skin days for me I like to apply a night cream after the oil for a really powerful dose of moisture! If you are prone to spots or your skin tends to flare up with too rich a product try a lighter but still skin nourishing serum.

In the morning I don't really have to cleanse my face as such as I have generally done all the hard work the night before.  I just give my face a wash with a gentle cleansing milk or just splash a bit of cold water on my face (in an attempt to wake up usually!) but apparently this also helps close pores.  I apply my moisturiser, eyecream & lipbalm straight out of the shower so it has plenty of time to absorb before I do my make up.  It's a good idea to grab a glass of water at this stage then by the time you've got your face on you are already one glass down :)


The only other things I do when it comes to skincare is exfoliate once or twice a week to do this I use my cleansing milk and a muslin cloth I don't like really abrasive exfoliaters I find them too harsh.  Another fab thing for skincare is facemasks I am a big fan of sleep in facemasks which basically you put on when you go to bed and wake up looking lovely and plump (I have also been known to put this on thinly before my make up when I've had a few too many vinos the night before and my skin is begging for moisture!). In fact I had actually popped this on before bed the day I woke up to the #nomakeupslefie nomination and I was super glad I had that combined with my HD Brows made for a not so scary one!  I also love the fresh facemasks from Lush with Angels on Bare Skin being my firm favourite for quite some time.  There's something just so relaxing about a facemask I love taking the time to do them and my skin reaps the rewards...I'm off to put one on right now! x


If you are interested in a make up lesson with me please send me and email on amy@madeoverladies.com and look out for my weekly DIY make up series on the blog.  Feel free to let me know if there is anything in particular you would like covered!


Wednesday, 2 April 2014

The Rules of Wedding Make up

What a nice surprise to see my name in lights again....well not quite lights but I always get a little bit excited when I see something I have written or worked on appear in print whether that be in paper or online...

Let me draw your attention to 'Made In Scotland Magazine' that is an online directory and magazine that celebrates all things Scottish, Beautiful and unique and it was my pleasure to write an article on 'The Rules of Wedding Make up' in issue #6. 

You can get the low down on three of my most requested looks for bridal make up 

Polished & Natural
Photo courtesy of lushweddingphotography
Subtle SmokeyPhoto courtesy of Marc Millar Photograghy


Making a statement
Photo courtesy of jawnmcmlenaghan.com


I hope you enjoy the article and thank you to my lovely brides Katrina, Suzi & Corrine for sharing their gorgeous wedding photos with me.


Tuesday, 1 April 2014

French Fancies...

I'm just back from a trip to Paris to celebrate Miss Poppy's second birthday here's the gorgeous girl on her big day...


As most family holidays go it was pretty fabulous but a lot of hard work! So of course I got myself some goodies as my own reward here I will give you a quick rundown on my purchases, what my thoughts are and to see if they are going to make into the kit bag! So here's my french fancies....

Bioderma- Micelle Solution


 Ok so I'm perhaps a little slow on the uptake with this one as this product has been on the market for about 6 years and has a massive cult following on the beauty circuit.  I generally love my tried and tested Sephora waterproof eye makeup remover as it literally melts away the make up but I feel can leave a bit of a slippy surface fine for if you are stripping your make up and applying a nice nourishing serum or night cream before you jump into bed but not great for correcting a mistake or for cleaning up the skin before applying base (as if you've had your make up done by me you know I generally do eyes first). I actually love this stuff so I am well and truly jumping on the band wagon. I felt it was light and didn't leave a film on my skin but still effective at removing my gel liner and waterproof mascara which for me if always the hardest thing to shift!  This product does not contain soap so cleans up your skin keeping it balanced whats also fab as you don't have to rinse it off so if you feel sometimes you find adding extra water is drying for your skin you have just dab your face with a towel and also makes it great for mid makeover clean ups.


Benefit Gimme Brow


I mentioned this in my Spring Treats post which you can read here  well I finally got it as I was very sensible and waited until we got on the ferry to make my purchase (thus saving on the duty) I had it out the packaging on my brows before we hit Calais! I chose the medium/deep and there's some helpful instructions and pretty pictures on how to apply, the wand is teeny tiny and did not disappoint I would say put the first sweep out of the tube at the arch of your brow then work towards the start of your brow so the most of the product is concentrated away from the front.  Its the most natural way to your brows and avoids the 'sharpie brow' faux pas!  I do love this product it give me great individual hair definition which I don't get from anything ever (my brows are sparse and fair) it also has tiny fibres through it to thicken out your brows.  I have added a little bit of my usual shadow on an angled brush to elongate the tail of my brows and that has made this work perfectly for me.  Good to use on it's own and over shadow.  As for being waterproof it lasted swimming with two over zealous kids so of course I didn't put my head in the water or anything but there was lots of splashing!

L'occitane Ultra Comforting Cleansing Milk (which apparently is no longer available in the UK sorry I didn't know this when I bought it but according to L'occitane the 'Shea Cleansing Milk is the newer and advanced version) another cleanser as I'm fed up of feeling like I have tight sore skin after I wash my face.  Of course winter has taken it's toll on my skin and I am definitely drier than usual particularly on my forehead (flaky is not pretty).  I love anything described as a 'milk' as I just feel it will be gentle and kind I really like this but not necessarily for cleansing my face from make up more like cleaning a reasonably already clean face so maybe if you've done a good make up removal and you feel you need a calming wash or great for first thing in the morning when all your really doing is washing off your night cream and freshening up. Love it! No scent as such just feels soft and all the natural ingredients makes you feel quite virtuous.


Sephora Eye Liners

Sephora Eye Liners- Can you believe this was my first time in an actual Sephora shop! I nearly burst with excitement and when I explained to my husband what it was I watched his face fall when he clicked on I was about to spending our Euros on make up! I did not go as mad as I thought I would, I loved looking at the Marc Jacobs Beauty collection that has just been released but I didn't splurge.  I do now sort of regret not treating myself to one of the gorgeous Style EyeCon Paletes but as I had just re-stocked my MAC palette I thought I would take a deep breathe walk out the shop then If I realllly felt I needed it I could go back...have a look here if you can't resist though!  I would probably go for 'The Starlet' if I was buying as it has a rust/orangey tone I would die for. ANYWAY! So I treated myself to some nice new liners as this is something I seem to have ran out of all at once.  I chose a few from the Sephora collection I opted for Tiramisu as I love using a brown liner in bridal make up and being waterproof I knew it would be great.  Also great for my kit is Tango Night- which is a black purple so would make a great base for a smoldering purple smokey eye, I also chose 'Diamonds are forever' which is quite a sparkly grey colour.  Lastly I opted for lovely skin colour liner called 'Blonde Ambition' which I will be using mostly on myself to give me a bit more of an open eye look.  (This holiday left me needing a holiday to get over it!) If you want to try out any of these or anything from the Sephora collection I have just discovered they now ship to the UK.....oh this could be dangerous! 


Agatha Necklace- Finally this was a lovely (non make up related treat) for Miss Poppy and myself.  We are sharing this gorgeous Agatha necklace as a joint mothers day/second birthday gift.  She has so many toys and is always so generously treated by our family and friends we decided to buy her a beautiful keepsake in Paris that she can wear when she is older.  It was actually really hard to find something in Paris that was french themed but not tacky so I was uber excited when I came accross Agatha (particularly as it had my girl crush Alexa Chung as the face of Agatha...I was sold).  We chose this gorgeous Eiffel Tower love heart necklace that is engraved with a poem in French on the back.  I love it and will take good care of it for when she is old enough to wear it and we can tell her she got it in Paris. Apparently the French describe the Effiel Tower as "une monstruosité "(although don't quote me on that as I think my source was the episode of SATC when Carrie moves to Paris with the Russian) and also that the French are rude but we had lots of immaculately styled women (mostly) interacting with the kids and making them laugh on trains etc.  I found it all quite delightful and will always have happy memories of our Paris adventure. Hope you've enjoyed my french fancies...Au revoir xxx


***Just a little note to say from now on were possible I will be using original photography on the blog so please bear with me while I work on my photography skills!***