Just wanted to give you all the inside story on our recent photo shoot "A vintage wedding story" that we shot on location in the beautifully quaint South Queensferry with a gorgeous backdrop of the bridges and little hidden lanes with intriguing double front doors lined with miss matched pots blooming with daisies and pansies. Graeme Webb (based in the Scottish Borders) was our photographer and the lovely Brogan was our model.
The dresses. We were astounded by the beautiful condition of both dresses given that they were both almost 4 decades old. The first was a white longsleeved handmade full length dress with caped sleeve and modest train. The vintage lace detail around the empire line and trim round the cape is so simple yet the impact it makes is just stunning. We teamed the dress with a simple vintage hair clip, flat mary jane style pumps in white and a hand tied pink daisy posie (hand made by our talented Kirsty). The finished look was innocent, pretty and pure. The second, again handsewn, was a high necked lace dress layed over a beautiful lilac cotton with a long gathered sleeve and statement train. The daisy trim around the neck, empire line and sleeve was so sweet and we loved it so much we echoed the daisy theme in the hand tied daisy posie (again Kirsty's multi talents at work) and daisy hair clip.
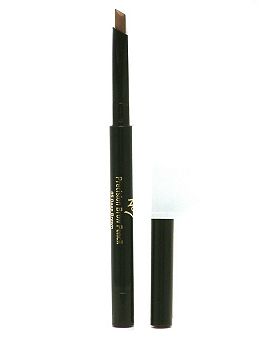
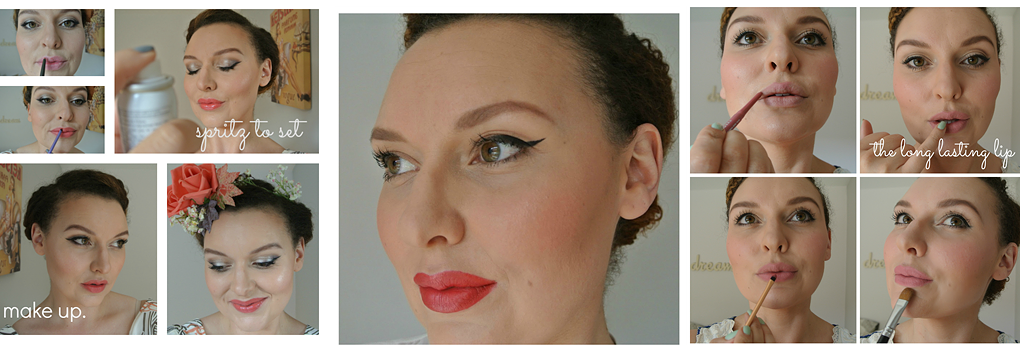
The low down on Brogan's make up. We wanted to keep Brogan looking fresh and youthful but playing up the drama in the eyes. Her base was simple with minimal contouring and a sweep of MAC's Fluer Power powder blush over the cheekbones I complimented this with a sweep of highlighter just above the blush and graduated this up to the temples. Eyes where a combination of Urban Decay's 'Sin' over the lid with 'Toasted' worked into the crease, I then smudged 'Sin' along the lower lashline and inner corner of the eye to reflect the light and add a bit of luminosity to the look. I used MAC fluid line in Blacktrack to define the upper eyelash line and after mascara applied a full set of lashes. Lips where kept neutral in the first shots with a smudge of nude lip colour applied with a finger then later change to a berry tone(Lipstick Queen Jean Queen) to compliment the lilac of the second vintage dress. The finished look was simple but effective and authentic to a seventies bridal look.
Our fabulous stylist Kirsty worked her magic on Brogan's hair. Firstly Kirsty smoothed out Brogan's hair so it looked smooth and shiney then added volume using rollers. Again we wanted the hair to be uncomplicated and once on location Kirsty worked on Brogan's hair firstly by sweeping the front section back and away from Brogan's face. This made for such a simple elegant style and accessorised perfectly with a vintage clip. The second hair style was a modern twist on the vintage theme. Kirsty piled Brogan's hair up into a beautiful up do perfect for any special occasion from a wedding to a red carpet event. I was a bit mesmerised by the speed that she did so. A simple ivory daisy clip was used to accessorise the style and tie in with the daisy detail of the beautiful lilac dress. Both looks were perfect for the feel of our theme.
A vintage wedding story...meet our vintage bride, wed in the seventies, dreaming of daisy chains and happily-ever-after.
Friday, 5 August 2011
Thursday, 21 July 2011
Lashtastic!
Sorry for the cheesy blog heading I couldn't resist. Just wanted to let you all know about this fabulous new product by one of the false lash front runners: Eylure.
These beautiful lashes give a top and bottom set that are really quite easy to apply and give a beautiful 'open eye' finish to your eye make up. They are less fiddly than the individuals but add just the right amount of drama to the eyes! I particular like these ones teamed with a monochrome 60's eye with a generous helping of black liner . A la the Iconic Twiggy...
And if you are a Britain & Ireland's Next Top Model fan the fabulously bitchy but normally accurate Ms Grace Woodward was sporting them in this weeks episode.
They are also on offer in Boots so try them out if you feel like adding a bit of a twist to your make up!
Friday, 24 June 2011
One for the eyebrow obsessed...
I am an eyebrow obsessive...it's often the first thing I notice about someone and everyone's are different. I like to maximise my brows maybe because nature wasn't so generous to me in the brow dept and I've always been jealous of those who are naturally well endowed when it comes to brows! I change my brows depending on the look I'm going for which is something the brow blessed don't have the same flexibility with so here I count myself lucky.
If you need a little help in filling in your own face framers try the Boots No 7 Precision Brow Pencil. The formula is a lot creamier than a kohl pencil and blends easily making a more natural looking brow. The pencil is wide with a flat edge which makes pencilling in more graphical/squared off eyebrows nice and easy. It might take a bit of practise but once mastered a well groomed eyebrow can work wonders for the face even with minimal make up else where on the face.
Monday, 30 May 2011
Fabulous and free!
I love a glossy magazine nearly as much as a glossy lip...pick up Red (July 2011) and you can have both! Nab yourself a lovely new Jemma Kidd lip gloss rrp £14. I went for the 'perfect red' but there is also a lovely tango orange and a lighter peach tone. All are quite sheer, super glossy and fabulously free!
Monday, 23 May 2011
A treat for lips...
Are you like me and addicted to lip balm? I have been ever since I purchased my first little tin of Vaseline (you remember that little round tin don't you?) I applied like it was going out of fashion,on the hour every hour. Nature intended for your lips to be moist and soft. Dry and flakey lips are the result of getting into the vicious cycle of applying lip balm. So, can you break the cycle? YES just stop putting it on, of course your lips will have to go through a period of re-training and yes they are going to be sore and flakey and dry and probably not that attractive.
So, if like me, you would rather humour your insatiable lip balm addiction treat yourself to this...it's lovely, tingly, softly tinted and smells gorgeous.
Embrace your addiction!!
So, if like me, you would rather humour your insatiable lip balm addiction treat yourself to this...it's lovely, tingly, softly tinted and smells gorgeous.
Embrace your addiction!!
Tuesday, 3 May 2011
Doing bridal the right way- go Kate!
How could I resist a blog entry on the newly wed Kate Middleton's beautiful bridal look? Her make up was lovely and was pitched just at the right level not too much and not too bare. The rules for bridal make up are no longer about looking 'natural' the new rules are...there are no rules!
I loved Kate's heavy eyebrows, flushed cheeks and smokey(ish!) eye with the clever use of eyeliner. Some brides shy away from eyeliner as they don't want their make up to run but modern formulas are so much more wearable and don't run as easily as you might expect. I do recommend some definition on the eyes as it makes your eyes stand out so much more in photography. Choose formulas that are tear proof and if you really want to try it out go and watch a tear jerker after you've had your make up trial!
Kate's beautiful face was self made and she trusted her judgement in what to go for, if you are used to wearing eye liner every day why would you change this on your wedding day? I like that Kate had obviously packed a touch up bag- did you notice the fresh sweep of blush over her cheekbones by the time they made it to the balcony in time for 'the kiss'? Do take along the essentials with you- lip colour, blush and face powder. Even the best make up products applied with the most up to date techniques is going to wear off eventually (especially with all the kissing!) so don't be caught out and take along some products to re-apply. Oh yes and my tip is save the kisses for your hubbie all the rest can have air kisses...mwah!
Monday, 21 March 2011
Product tip off- Rimmel Colour Mousse Eyeshadow

I love this very reasonably priced (rrp £4.99) and fool proof colour mousse for eyes. It is so easily applied (use fingers or brush) and blends with minimal effort. Layered over an eyeshadow primer (see previous posts for some recommendations) it does not crease and actually lasts the the advertised 8 hours (and counting!)
I like 'glitz' for a natural look paired with 'sassy' to add some definition to outer corners. Try a few layers of the mousse to intensify the colour if you fancy something with a bit more drama. Alternatively this would also make a nice base for a smokey eye by laying down the mousse as the base colour all over the lid and up into the crease and then work some powder shadow/pigment over the mobile lid blending the colours together.
All in all I lovely product at a nice affordable price!
Tuesday, 28 December 2010
Avoid a falsie faux pas!
Eek! I have not blogged since July! Sorry if you have been checking my blog and it has been stagnant all this time. I have been compelled to return to the world of blogging as nothing is better than the festive season for seeing the most awfully applied false lashes ever! I love lashes and often can change your whole look but take some time to perfect them first please ladies!
Here's a few tips...
Don't forget to measure up first- place the lashes on your lid if they are too long snip them to size on the outer corner you'll still have plenty of lash and will stop them 'dragging' on the outer corner of your eyes. You can always use the snipped off section as an outer corner set on another occasion.
Use eyeliner- this is the key to fabulous falsies. A sweep of liner can camouflage the lash base easily, can be painted on to hide and glue that may not have dried perfectly and most importantly used to 'connect' the gap of lash to inner eye by painting from the inner corner all the way along under the lash line. Takes a bit of practise but is the key to a gorgeous false lash.
Wear again- most good quality false sets can be used more than once but don't overdo it ensure you remove the glue/make up using an eye make up remover as soon as you take them off. The worst thing ever is to see a set of lashes that looks like they have been slept in. The clump is not your friend! Pick up a tube of Ardell glue from Sallys and you can use this to re-apply your freshly cleaned falsies.
Lastly have fun ladies there are so many different styles, lengths and sizes of lashes out there they really can be the finishing touch to that NYE outfit!
Saturday, 31 July 2010
Product Tip Off- Barry M Nail Paint 'Mushroom'

I love this new shade of Nail Paint by Barry M in Mushroom. Alot of the beauty bloggers have been saying the greige craze is over but I love this shade and I would say it still falls in the same category it's sophisticated and looks great on short nails. It's a steal at 2.95 GBP but might need a bit of help with a good base and top coat.
Here I go talking about priming again but...I am using the Nails Inc 2 pack Kensington Cavier Top and Base Coat that you can pick up in Boots right now for 7.00 GBP. It's a 2 pack of conditioning base coat and super shiney top coat that really gives you a professional looking finish and fast drying (45 seconds they say!) it's a bit of a splurge item but not the splurge price tag to match!
Saturday, 24 July 2010
Too time poor to be preened???
One question I am always asked is if I can only buy one product what should it be? Unfortunatly there is no easy answer as make up is individual as the person wearing it so there is not a 'one size fits all' product. If you are struggling for time in the morning (who doesn't?) I suggest spending some time to really assess your face and think about your features what you might need to conceal and what you think you can get away with.
Sit down with a mirror and look at your face shape, hairline, features, skin type and lip/eye colour. For me I don't go anywhere without my blush and a slick of mascara but my skin and lip colour is quite vibrant on their own so can often skip the stage of applying a heavy foundation and prefer a lip balm to spending time on liner and lip gloss. A good bronzer can be used as a bronze, contour and eyeshadow all depending on how it's applied. Highlighters can be great for using on lids, cheeks and eyes to give you a fresh faced look (try the classic Benefit HighBeam). If it's your skin you need a bit of help with invest in a really good foundation or even mix some of your foundation with a luminating face cream (my favourite is MAC Strobe Cream which is also a great alternative to primer if you don't want to splurge try Olay's Complete Care Multi-Radiance moisturiser).
We all need a bit of pampering and some salon treatments can be really beneficial in your time saving efforts. Eyelash and eyebrow tinting are a great way of saving your precious time on applying mascara and filling in the all important brows. Regular facials can help the skin look more radiant and keep up your water intake. Keep lips buffed by giving them a rub with a towel or your toothbrush a apply a lip conditioner. Finally try and give your nails a buff and polish atleast once a week.
Good luck ladies time is precious but for me it's time well spent!
Thursday, 22 July 2010
Prep those peepers!
As a make up artist I find that preparation takes up atleast 50% of my time when doing any makeover. I have spoken about priming in previous posts but this time I'd like to focus on getting your peepers ready! The way I see it is what is the point of spending your cash on lovely eyeshadow and liners for them to slip off an oily lid or end up rubbed off after a couple of hours. There's a few options for priming the lids for your eye make up the easiest and least expensive is to conceal and powder using your existing concealer or foundation. Use a brush to apply the concealer and ensure you push if right into the lash line. Buff away any creases that may form in the concealer just using your finger then apply a loose powder with a brush to help set the concealer ready for your eyeshadow and also helps when it comes to blending.
There are also specialised eye priming products out there with which I have had mixed success. Urban decay's eyeshadow primer potion is raved about and often sold out at their counters but I find the consistency not much better than that of a good stick concealer although the 'sin' version gives a nice finish it's benefits as a primer to me aren't overwhelming. My favourite priming product I have tried so far is the MAC painterly paint pot which is almost like a very thick concealer come cream eyeshadow. It erases any veins, lines or discolouration on your eye and gives a lovely blank canvas for your eye make up. I still tend to use a sweep of base eyeshadow over the paint point for ease of blending but it really gives a lovely finish to your eye shadow and makes it last all day.
Sunday, 13 June 2010
Orange and Coral Summer Lovin'
I am really loving Orange lips just now and I have found an inexpensive product which ticks all the boxes for me- creamy, intense colour and long lasting when applied on well prepped lips. Rimmel Colour Show Off Lipstick in 'Tell No One'. It gives a nice orange glow and is not at all scarey as you may think orange might be. The fruity scent is also a nice surprise! Layer the colour over a nude lip liner to make a more vibrant finish. Pair with coral nails (try limited edition Bourjois Tangerine Fatal) and a swirl of Benefit Coralista on the cheeks...really love this look for summer.
Friday, 4 June 2010
Product Tip Off- OPI 'Bling Dynasty'

Perfect for summer this gorgeous gold nail lacquer is an investment. OPI may not be the cheapest but they are long lasting and have a great range of colours. This is an almost rusted yellow gold, not brassy, looks amazing with the bronze and gold make up products you are hopefully sporting this season. Bonus is it will take you through to autumn/winter too as will contrast perfectly with brown black smoky eyes making a luxe combination. Keep nails short and blunt though you don't want to look like a Bling Nasty!
Tuesday, 1 June 2010
Bronzed Beauty
Just been to see the new SATC movie and regardless of what the critics say I'm a SATC/make up/fashion fan so I of course loved it! The make up was bang on trend with bronzed looks being the show stealers on all of the girls but mostly focused on Carrie.
To recreate your own bronzed goddess look invest in a good quality bronzer such as MAC Mineralise Skinfinish Natural. This can be used as a multipurpose product which makes it an even better buy. Firstly use as a bronzer (doesn't take a rocket scientist to work that one out), or you can sweep over arms, legs and decolletage for a flash of colour (perfect for fake tan phobics), or with a fluffy eyeshadow brush sweep along the crease of the eye too create definition and make your eyes look bigger.
FACE: Bronzed looks on the face couldn't be easier here are two easy options for application. The first option is after you have applied your regular base use a stipple brush to 'buff up' the base then apply with the same brush as if you are applying a face powder (go lightly though as it's easier to build up colour than remove). Finish of by highlighting the cheeks with a coral blush to lift the cheekbones and stop the colour from looking too one dimensional. I have searched for low cost coral blushers but the best by far is Benefit Coralista (worth investing a few extra pounds). The base colour of this product is coral but also gives a warm gold sheen to the cheeks. The second way to apply a good bronzer is to use it as if you are using your blusher but add and extra swirl of product to your brush and sweep down the bridge of your nose, over your forehead and your chin. If you want you could use a highlighter just above the bronze on your cheekbone to further highlight the colour carry the same highlight directly under your brows.
EYES: If you haven't got a gold eyeshadow yet get out there and invest right now as it is all over summer make up. Using an antique gold gives a more luxurious finish and can be combined with a sweep of bronze in the crease and a dab of yellow gold in the inner corners of your eyes. No 7 (Boots) have some gorgeous gold colours including a creamy textured kohl pencil in gold. Use this to open up your eye by lining the waterline but if you are going for a dramatic look you cannot go wrong with black kohl. Eyeliner does not have to be precise for this look I prefer a kohl smudged with a bit of a dark eyeshadow black, brown or even navy you can also do this on your lower lash line, remember you can bring this quite low down for more drama. The look is sultry and sunkissed so give your liquid liners a miss for this one... think of being in a hot sticky country and there is no room, time or effort for liquid liners in such conditions!
LIPS: Keep them natural and let your natural lip colour shine through use a lip balm such as Carmex which gives a tingly feeling and plumping effect or try Bloom (an Australian brand available in Superdrug in the UK) lip balm pots (last for ages) again the mint one gives you a nice plump lip. Mirror the highlight in the corner of your eyes by popping some of the yellow gold eyeshadow on the cupids bow.
Friday, 28 May 2010
A Flawless Canvas
Skincare is a whole topic on it's own but I recently had a facial skin scan which shows you the damage on your face due to the elements one of which is the most dangerous...the sun. On the lead up to summer I recommend you invest in a UVA/UVB sunscreen especially for the face. You can buy loads of products that now come with sunscreen combined so stock up on these if you are often rushed getting ready in the morning a tinted moisturiser containing sunscreen can be a lifesaver even on cloudy days our sensitive skins are at risk of damage. If you are off on holiday somewhere hot or live in a sunny country invest in a specialist sunscreen for the face put on straight away as soon as you come out of the shower as often the textures of these creams take some time to seep into the skin. Be aware if you are a bride or having photographs taken as sometimes these products make you skin appear white (especially compared to your body colour).
Using a facial scrub once or twice a week is an ideal way of shedding dead skin and showing the glow underneath. Be careful not to overuse as you can scrub too much and at the same time rob your skin of it's natural oils. Some of my favourite scrubs come from Lush with their fresh ingredients they smell good enough to eat but don't tend to last well although you can keep them in the fridge to keep them fresh. Try Angels on Bare skin or my all time favourite Buffy which is an all over body scrub but by breaking a bit off and softening in water you can create a beautiful moisturising scrub.
Moisturiser- when is the right time to moisturise? Clients often complain to me that their make up slides off in the warmer weather. Often there is not enough time to let your skin settle after applying your moisturiser I tend to moisturise at night before bed (or at least after the make up comes off and I am home for the night) then in the morning use a primer prior to applying make up (MAC Prep and Prime is my favourite). A layer of moisturiser, eye cream, primer does not make for a happy base as your foundation will slip off as soon as you put it on. If you can't bare to go without moisturiser make sure you apply straight after washing your face and allow time for your skin to absorb it.
Finally ladies please don't forget to take your make up off at night! You can buy some amazing make up removers but to me you can not go wrong with a pack of cleansing or baby wipes. Some beauty experts may warn you off using them as they state they drag on the skin etc but to me I think a quick removal is better than none! If you do decide to use an eye make up remover (sometime essential with heavier make up) press and hold a cotton pad dipped in make up remover before you wipe. This will allow the remover to start dissolving the make up and minimize pulling on the delicate skin of the eyes.
Thursday, 27 May 2010
Getting the perfect brow
We have all been guilty of over tweezing but now more than ever a heavy brow is the perfect make up feature to compliment this summer's bronzed looks. Even the sparsest of brows can be filled in and pencilled to create that effortless (but actually heavily styled) brow. The best advice I ever got when it comes to brows is to think of them as sisters and not as twins...they will never be identical so don't over tweeze trying to 'even them out'. Various products can be used to create the brows you want try a matt powder eye shadow applied with a stiff angled eye liner brush, this will give a much more natural look or if you want something dramatic use a pencil and 'feather' the strokes up and blend to rid harsh lines. Always brush brows up and set with either a brow gel or clear mascara. If you make a mistake use a dab of concealer on a brush to erase and even out the shape you are going for. Using a highlighter under your eyebrows will help 'lift' the eyebrow and create more of a frame for your eyes. There are numerous tutorials on getting the perfect eyebrow but my favourite is the new Mac Power Brow tutorial this is a dramatic take on it but creates a very fashion forward looks.
If you've got very heavy brows you may still need a bit of product to fill in any gaps you may have plus getting your eyebrows shaped professionally to begin with will help. If you keep up your visits to the brow bar then great but you can do it DIY with your tweezers just don't leave it too long between maintenance otherwise it will be hard to keep the shape.
Tips for DIY shaping. There are many different shapes of eyebrows but like any good story a good eyebrow has a beginning middle and end. Look at yourself in the mirror and using a long thin brush place the brush next to the bridge of your nose (it is better to guage this on the bridge of your nose than the nostrils as everyones noses are different shapes) where this imaginery line begins is where your brow should start. The middle point is the peak hold the brush so you can see a line from the same point skimming past the outer rim of your pupil this is where the outer arch should peak. Pay special attention to the peak when filling in your brows it's often an area where people don't emphasis but is actually fundamental in framing your face. Finally a third line from the same point to the outer corner of your eye will give you a reasonable point where your brow should end. Check out the MAC video for some more tips but remember to pair down this look for everyday!
Don't forget about what colour you choose for eye brow grooming plus you can try different shades depending on whether you are creating a daytime or evening look. Often a more dramatic eye colour will call for a darker eyebrow just be careful not to vary too much from your hair colour the shade you choose should match and mirror your brow colour not the colour you wish it was similarly if you change your hair colour dramatically don't forget about your eyebrow colour.
Have fun and you may be surprised what a difference a bit of eyebrow grooming makes!
Hi everyone, ok I am new to this blogging thing but thought I would give it a try! I hope I can help a few of you save some time and money with make up tips and product tip offs! Our time is so so precious I hope you can take some of these ideas and build them into your busy lifes. Every little helps and if a little bit of glamour in your day makes you feel better than I say we can afford to make the time!
Ok this is a new product I am using for nails. I am loving short nails at the moment and the new neutrals/greyish (greige) colours that are out just now are fab and so wearable. I love the rimmel 60 second Grey Matter it's afforable and actually does what it says on the jar. The brush is flat and rectangular which makes application very easy and it does dry nice a quickly. After 2 coats you get a gorgeous matt finish and the colour which is more on the grey side of greige looks very urban sportswear and quite luxurious. Plus a welcome change if you have are fed up of scarlet nails. If you are looking for a more high end polish try Nails Inc. the London shade is fab and hints at a bit of colour giving a very subtle mauve colour. Nails Inc are doing various freebies just now too so look out for them. Anyway try it out and let me know how you get on!


